Introduction
In the previous Zephyr hands-on series, I used SKPang’s ESP32 CAN board to progressively explore the Zephyr porting process, starting with a Wi-Fi Scan and continuing through AP connection, UDP communication, TCP communication, and finally an MQTT IoT project.
Throughout this process, Wi-Fi, TCP/IP networking, and MQTT were implemented using Zephyr APIs, and the complete IoT communication architecture—from the ESP32 through an MQTT Broker to a FastAPI server—was verified.
This time, I will port Zephyr RTOS to Seeed Studio’s XIAO ESP32S3 board and verify whether the Zephyr applications developed for the previous ESP32 board can be migrated and run successfully on the new board.
The purpose of this exercise is not simply to reimplement Wi-Fi and MQTT on the XIAO ESP32S3. The main objective is to examine how much of an existing Zephyr application developed for one board can be reused on another board without modifying the code, and to evaluate this through an actual porting process.
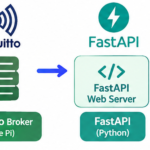
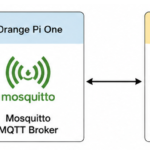
First, the Wi-Fi Scan project will be migrated to verify basic Wi-Fi functionality. Then, the networking and MQTT code from the existing ESP32 MQTT project will be extended to the XIAO ESP32S3, and MQTT Publish/Subscribe communication will be tested. Finally, the complete IoT communication path will be verified by integrating the project with a Mosquitto MQTT Broker and a FastAPI/Uvicorn server.
Through this process, I will examine how Zephyr can reduce hardware dependencies when changing boards and how much of an existing application can actually be reused on a new board.
XIAO ESP32S3 Board Overview
Seeed Studio’s XIAO series is a family of compact development boards featuring MCUs from various manufacturers, including the ESP32-S3.
The image below shows several boards from the XIAO series.

Representative MCUs include the ESP32 series, RA4M1, RP2350, RP2040, nRF52840, and nRF54L15.
With a compact size of 21 × 17.8 mm, the XIAO series is well suited for small IoT applications where board size is limited, including wearable devices.
The link below is the official XIAO website.
The board used in this porting exercise is the XIAO ESP32S3.
The XIAO ESP32S3 is a compact development board based on Espressif’s ESP32-S3 MCU. Despite its small size, it provides built-in Wi-Fi and Bluetooth connectivity, making it suitable for sensor nodes and IoT devices where space is limited.
I purchased the board from AliExpress for KRW 13,150 (approximately USD 9.5).
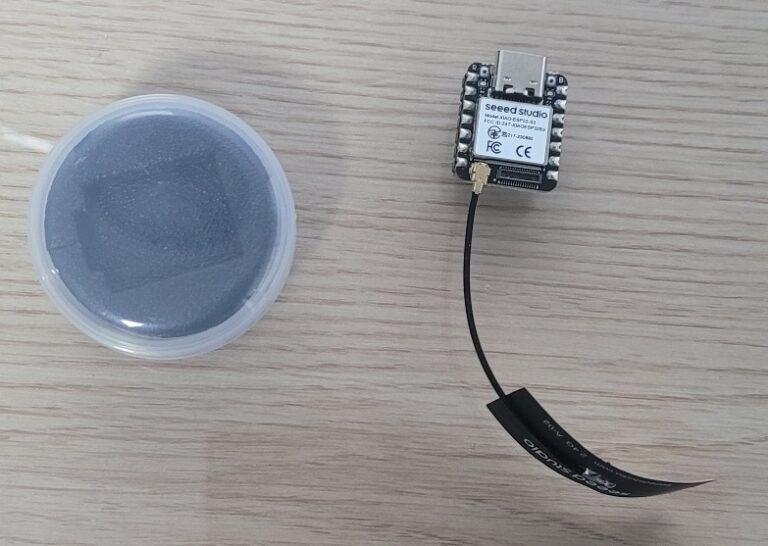
The image below shows the product as delivered. It was packaged in a small plastic cylindrical container, as shown on the left. The image also shows the board after it was removed from the package and the antenna was attached.
The main specifications are shown below.
| Item | Specification |
|---|---|
| MCU | ESP32-S3R8 SoC |
| CPU | Xtensa LX7 Dual-Core 32-bit |
| Maximum Clock Frequency | 240 MHz |
| Wi-Fi | 2.4 GHz Wi-Fi |
| Bluetooth | Bluetooth Low Energy 5.0 / Bluetooth Mesh |
| PSRAM | 8 MB |
| Flash | 8 MB |
| UART | 1 |
| I2C | 1 |
| SPI | 1 |
| GPIO (PWM) | 11 |
| ADC | 9 |
| User LED | 1 |
| Charge LED | 1 |
| Reset Button | 1 |
| Boot Button | 1 |
| Dimensions | 21 × 17.8 mm |
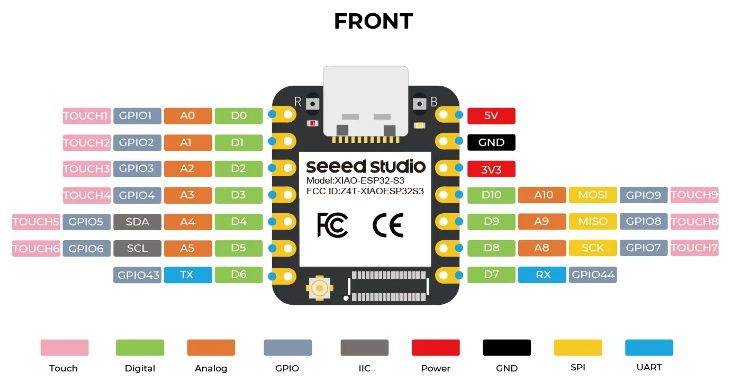
The figure below shows the pinout of the board.
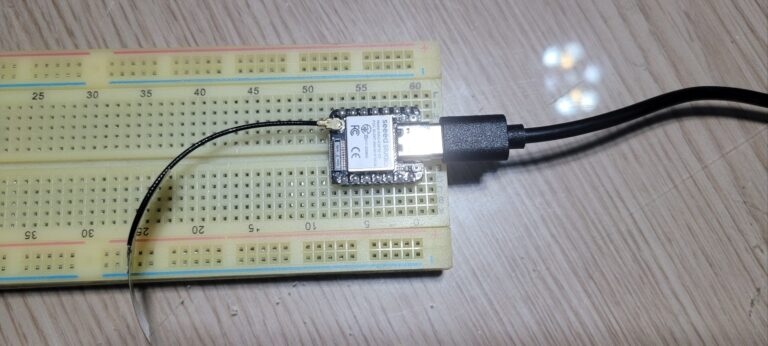
The image below shows the XIAO ESP32S3 mounted on a breadboard for testing. Through the USB-C connector, the board can be connected to a PC to download the Zephyr application and monitor its operation.
Preparing the Custom Board my_xiao_esp32s3
The XIAO ESP32S3 is officially supported by Zephyr and is already registered as an official board.
The link below provides information about the XIAO ESP32S3 board on the official Zephyr website.
Since the XIAO ESP32S3 is officially supported by Zephyr, applications can be built and run using the official board definition without any modification.
However, the purpose of this exercise is to understand Zephyr’s board structure and establish a method that can later be applied to user-designed hardware. Therefore, I created a custom board named my_xiao_esp32s3 based on the official XIAO ESP32S3 board definition.
The first step is to examine the official XIAO ESP32S3 board files provided by Zephyr.
The following shows the folder containing the official board files.
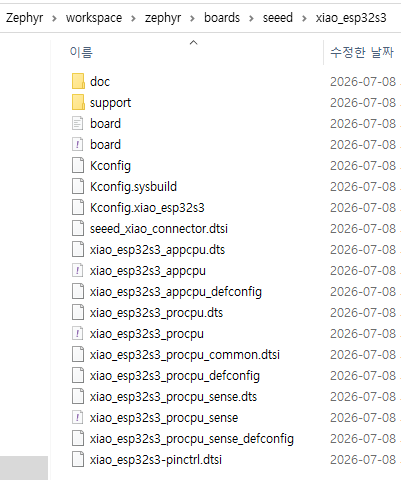
Zephyr board definitions contain the information required to build a board, including the MCU type, CPU core, Flash and memory configuration, GPIO and UART peripherals, clock settings, and DeviceTree configuration.
In this exercise, instead of creating these board definitions from scratch, I created a custom board by copying the existing XIAO ESP32S3 board files.
I copied the xiao_esp32s3 folder into the following directory:
D:\Zephyr\workspace\my_boards\boards\seeed
The copied folder was then renamed to my_xiao_esp32s3.
Next, any filenames containing xiao_esp32s3 were changed to my_xiao_esp32s3. References to the original board name inside the files were also modified to match the new custom board name.
The following shows the directory structure of the custom my_xiao_esp32s3 board.
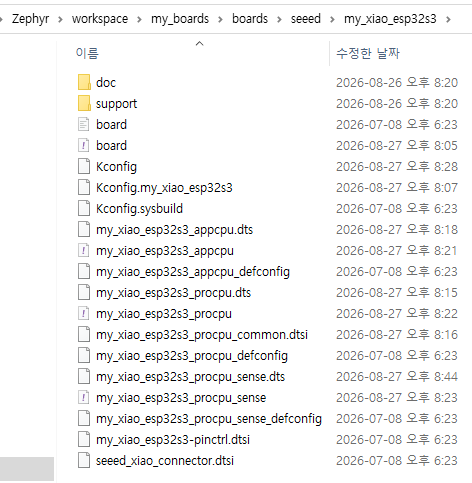
By keeping the custom board separate from the Zephyr source tree, the board configuration can be managed independently without modifying the original Zephyr source files.
When building the application, BOARD_ROOT is specified so that the Zephyr build system can locate the custom board.
-DBOARD_ROOT="D:/Zephyr/workspace/my_boards"With this configuration, the relationship between the actual directory structure and the reason why BOARD_ROOT is specified only up to the my_boards directory in the build command becomes clear.
Project Setup and Code Reorganization
With the custom board my_xiao_esp32s3 prepared, I created a Zephyr application project for the XIAO ESP32S3.
Since the final goal of this porting exercise is to migrate the MQTT project that previously ran on the ESP32 board to the XIAO ESP32S3, the project was named as follows:
xiao_esp32s3_wifimqttRather than copying all of the source code from the existing ESP32 MQTT project at once, I first created the basic project structure and then proceeded step by step with the process of migrating the existing code to the XIAO ESP32S3.
Project Structure
The basic project structure was organized as follows.
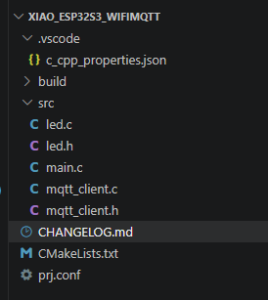
Managing IntelliSense for Each Project
Starting with this project, the VS Code IntelliSense configuration was reorganized so that it could be managed separately for each project.
Previously, the IntelliSense configuration was managed in the .vscode folder of the Zephyr workspace. However, as the number of projects increased and each project required different board configurations and include paths, I found it more convenient to manage these settings independently for each project.
Therefore, I created a .vscode folder inside the xiao_esp32s3_wifimqtt project and added a c_cpp_properties.json file as shown below.
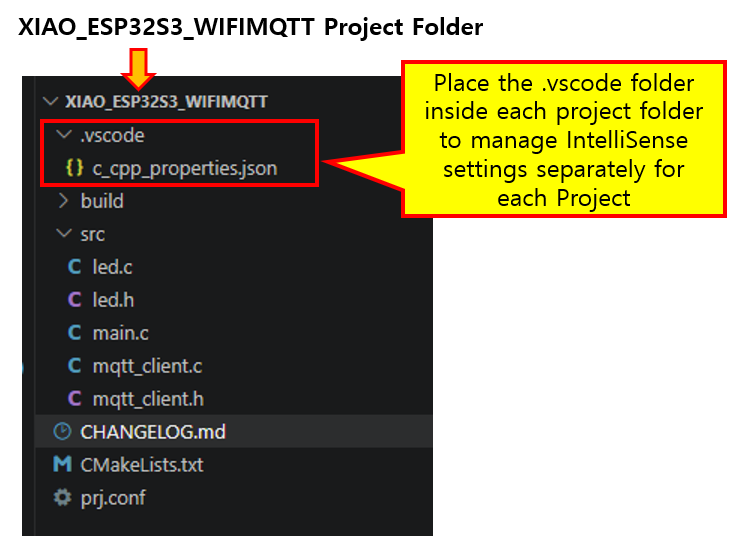
The contents of c_cpp_properties.json are as follows.
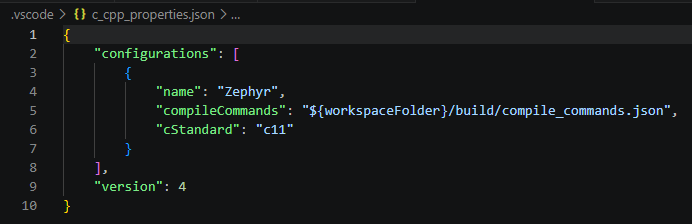
Here, IntelliSense is configured to directly reference the following file generated during the Zephyr build process.
${workspaceFolder}/build/compile_commands.jsonFor this project, I opened the following project directory.
D:\Zephyr\workspace\my_projects\xiao_esp32s3_wifimqtt${workspaceFolder} to point to the current project directory, so each project can independently use its own build/compile_commands.json file.After changing to this configuration, I confirmed that the IntelliSense errors previously displayed in the Zephyr header files disappeared.
For future Zephyr projects, I will manage IntelliSense settings individually in each project’s
.vscodefolder.
The link below provides the official Zephyr documentation for configuring Visual Studio Code.
Zephyr Official Documentation: Visual Studio Code
Preliminary Verification Using Wi-Fi Scan
Before migrating the MQTT project, I first used a simple Wi-Fi Scan project to verify that the custom board configuration and basic Wi-Fi functionality prepared in the previous steps were working correctly.
The Wi-Fi Scan project previously developed for the ESP32 board was migrated to the XIAO ESP32S3, and the application was built and flashed using the custom board my_xiao_esp32s3.
The test results confirmed that Zephyr ran successfully on the XIAO ESP32S3 and that information from nearby Wi-Fi access points, including SSID, RSSI, and Channel, was displayed correctly.
This confirmed that the custom board definition created earlier was properly applied and, at the same time, that the Wi-Fi functionality of the ESP32-S3 was operating correctly under Zephyr.
For more details about Wi-Fi Scan, refer to the previous article, Zephyr ESP32 Tutorial #2 – Wi-Fi Scan.
The main difference from the previous Wi-Fi Scan exercise was that the target board had been changed to my_xiao_esp32s3. The basic application structure and operation remained the same, allowing me to verify that the existing Zephyr application continued to work correctly even after changing the target board.
With the custom board and basic Wi-Fi operation successfully verified, the next step is to migrate the MQTT project that previously ran on the ESP32 board to the XIAO ESP32S3.
Migrating the MQTT Project
Creating Project Configuration Files
The configuration files that need to be created for the new project are CMakeLists.txt, prj.conf, and CHANGELOG.md.
CHANGELOG.md is not directly related to program execution. Instead, it is used for project management. I record basic project information as well as the build, flash, and Espressif monitor commands so that they can be copied and reused when needed.
First, let us look at CMakeLists.txt. The following shows its contents.
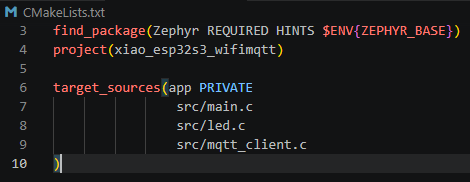
In the project() statement, the project name is set to xiao_esp32s3_wifimqtt, and main.c, led.c, and mqtt_client.c are included in target_sources().
led.c was added to this project to provide a simple visual indication that the Zephyr application is running correctly on the board. It toggles the LED every 500 ms using a separate thread.
This LED thread is independent of the actual project migration and does not affect the MQTT porting process.
The file that requires the most attention in this migration is mqtt_client.c.
Next, let us look at the prj.conf file.
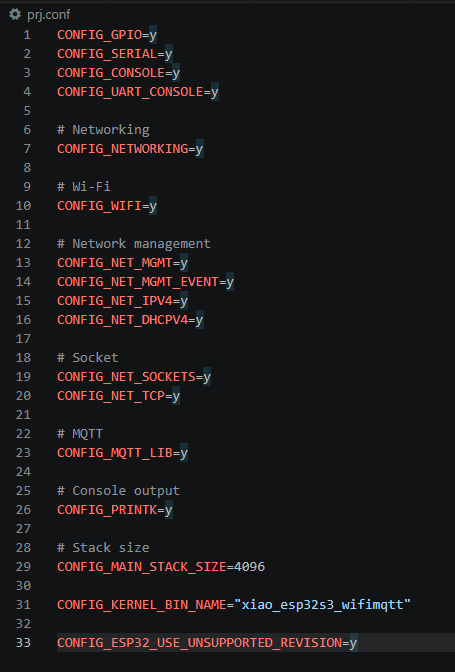
With the CMakeLists.txt and prj.conf configuration completed in the previous step, I migrated the MQTT project that had been used on the existing SKPang ESP32 CAN board to the XIAO ESP32S3 project.
The main files used for MQTT communication in the existing project are as follows.
main.c
mqtt_client.c
mqtt_client.h
The purpose of this exercise is not to rewrite the MQTT application, but to verify how much of an existing Zephyr application can be reused when the target board is changed.
Therefore, the overall program structure and operation of the existing MQTT project were kept unchanged, and I focused only on identifying the parts that needed to be modified for use with the XIAO ESP32S3.
Reviewing the Existing MQTT Project Structure
The overall operation of the existing program is as follows.
Zephyr Start
    ↓
Wi-Fi AP Connection
    ↓
IP Address Assignment via DHCP
    ↓
MQTT Broker Connection
    ↓
Subscribe to esp32/control
    ↓
Publish to esp32/test
The MQTT Broker address, port, and topic settings were also kept the same as in the existing test environment.
MQTT Broker : 192.168.0.7:1883

Publish   : esp32/test
Subscribe : esp32/control
Therefore, there was no need to change the MQTT communication method or protocol for this porting process.
Reviewing Changes Required for the New Board
The existing project used an ESP32, while the new board uses an ESP32-S3. However, the application does not directly control GPIO registers or depend on Wi-Fi hardware-specific code. Instead, it uses the Wi-Fi, Network Socket, and MQTT APIs provided by Zephyr.
Therefore, mqtt_client.c and mqtt_client.h, which handle MQTT communication, contain almost no board-specific dependencies and could be reused from the existing program with little or no modification.
The Wi-Fi connection functionality also uses the Zephyr Network API, allowing it to be migrated to the XIAO ESP32S3 without major changes to the application code.
As a result, the key point of this porting process was not to rewrite the MQTT application itself, but to change the target board to my_xiao_esp32s3 and apply the appropriate Zephyr Kconfig settings and build configuration for the new board.
However, to visually confirm that the Zephyr application is running correctly on the board, led_thread_start() was added at the beginning of the main() function.
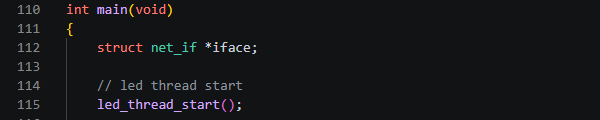
Except for this addition, most of the MQTT program code from the existing ESP32 project was reused without modification. A detailed explanation of the complete MQTT program was already covered in the previous ESP32 MQTT exercise, so it will not be repeated here.
The link below provides the previous article covering the MQTT project in detail.
Zephyr ESP32 Tutorial #6 – MQTT Communication
Now, I will build and flash the project using the my_xiao_esp32s3 board and verify whether the existing MQTT application operates correctly even after changing the target board.
Build and Flash
Now, I will build the XIAO ESP32S3 MQTT project and flash it to the board.
Since the custom board my_xiao_esp32s3 created earlier is being used, the build command specifies BOARD_ROOT as follows.
west build -b my_xiao_esp32s3/esp32s3/procpu -p always -- -DBOARD_ROOT="D:/Zephyr/workspace/my_boards"The following shows the Visual Studio Code Terminal after the build was completed successfully.
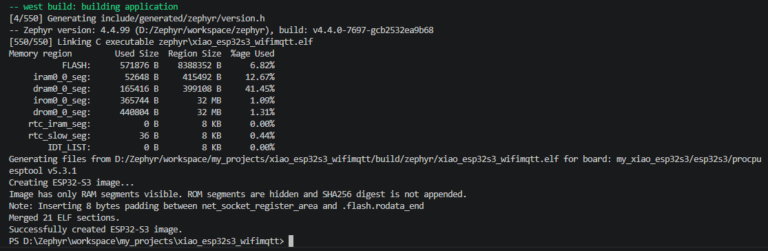
From the build results, we can confirm that the target board was correctly recognized as follows.
my_xiao_esp32s3/esp32s3/procpuIn addition, the following executable file was generated using the project name specified by CONFIG_KERNEL_BIN_NAME in prj.conf.
xiao_esp32s3_wifimqtt.elfFinally, the message SUCCESSFULLY created ESP32-S3 image. was displayed, confirming that the ESP32-S3 image was generated successfully.
Next, I connected the XIAO ESP32S3 board to the PC via USB and flashed the application using the following command.
west flashAfter flashing was completed successfully, I used the following command to monitor the operation of the XIAO ESP32S3.
west espressif monitorUsing the monitor, I then checked whether the Wi-Fi AP connection, IP address assignment, and MQTT Broker connection were completed successfully.
The following shows the monitor output.
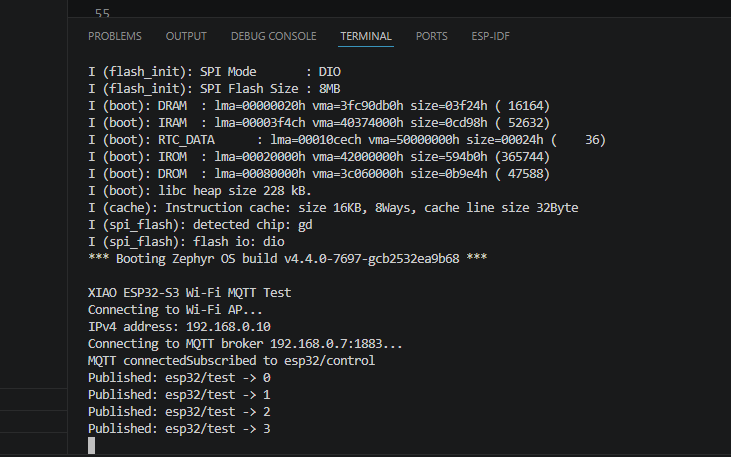
From the monitor output, we can first confirm that Zephyr booted successfully on the XIAO ESP32S3 and that the application started running.
*** Booting Zephyr OS build ...
XIAO ESP32-S3 Wi-Fi MQTT Test
The board then connected to the configured Wi-Fi AP, and an IPv4 address was successfully assigned via DHCP as follows.
Connecting to Wi-Fi AP...
IPv4 address: 192.168.0.10
After the Wi-Fi connection was established, the board connected to the MQTT Broker running at 192.168.0.7:1883 and subscribed to the esp32/control topic.
Connecting to MQTT broker 192.168.0.7:1883...
MQTT connected
Subscribed to esp32/control
Finally, values were continuously published to the esp32/test topic.
Published: esp32/test -> 0
Published: esp32/test -> 1
Published: esp32/test -> 2
Published: esp32/test -> 3
Therefore, I confirmed that the MQTT project originally developed for the existing ESP32 board could also be successfully built and executed on the XIAO ESP32S3, with everything from the Wi-Fi connection to MQTT Broker access and Publish operation working correctly.
In the next section, I will verify the overall porting results by integrating the board with the previously configured FastAPI server.
Porting Results
The final results of the MQTT project migration were verified using the FastAPI + Uvicorn web server running on the Orange Pi.
First, I connected to the Orange Pi server via Remote SSH from the Visual Studio Code Terminal and started the Uvicorn web server.
The following shows the screen after starting the web server.
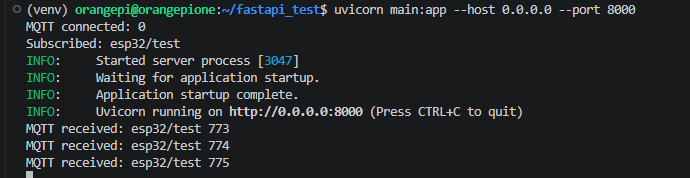
As Uvicorn started, the FastAPI web server was launched successfully, and at the same time, it was confirmed that the application had subscribed to the MQTT Broker’s esp32/test topic.
MQTT connected: 0
Subscribed: esp32/test
INFO: Uvicorn running on http://0.0.0.0:8000
With the server running, when the XIAO ESP32S3 is started, the data published to the esp32/test topic is delivered to the FastAPI application through the Mosquitto MQTT Broker.
The Terminal output below shows that the values transmitted from the XIAO ESP32S3 are being received continuously.
MQTT received: esp32/test 773
MQTT received: esp32/test 774
MQTT received: esp32/test 775
Therefore, the data transmission path verified so far can be summarized as follows.
XIAO ESP32S3
      ↓
    Wi-Fi
      ↓
MQTT Publish
  esp32/test
      ↓
Mosquitto Broker
192.168.0.7:1883
      ↓
   FastAPI
These results confirm that the MQTT application originally developed for the ESP32 board also operates correctly on the XIAO ESP32S3 and can successfully transmit data all the way to the MQTT Broker and FastAPI server.
Next, I will verify the received data through a web browser.
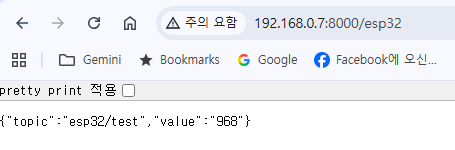
As shown above, enter http://192.168.0.7:8000/est32 in the browser’s address bar.
{"topic":"esp32/test","value":"968"}The topic and value fields are displayed. By refreshing the browser, we can confirm that the value continues to change.
This is because the XIAO ESP32S3 continuously increments the counter value and publishes it to the esp32/test topic.
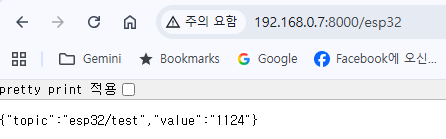
After refreshing the browser, the value changed from 968 to 1124. This confirms that the data published by the XIAO ESP32S3 is continuously transmitted to FastAPI through the Mosquitto MQTT Broker and can also be verified in the browser through FastAPI’s /esp32 API.
Next, I will verify communication in the opposite direction.
In the previous test, the data published by the XIAO ESP32S3 was verified in the browser through the MQTT Broker and FastAPI. This time, I will call the FastAPI Control API from the browser and verify whether FastAPI publishes an MQTT message that is received by the XIAO ESP32S3.
The Zephyr application is already subscribed to the following topic.
esp32/controlThe On or Off command was entered in the browser’s address bar as follows.
http://192.168.0.7:8000/control/Onhttp://192.168.0.7:8000/control/OffFastAPI publishes the command received from the browser to the esp32/control topic through the MQTT Broker, and the XIAO ESP32S3, which is subscribed to this topic, receives the message.
The overall data flow is as follows.
Web Browser
     ↓
FastAPI + Uvicorn
     ↓
MQTT Publish
esp32/control
     ↓
Mosquitto MQTT Broker
     ↓
MQTT Subscribe
     ↓
XIAO ESP32S3
By checking the west espressif monitor output, we can confirm that the on and off payloads sent to the esp32/control topic are successfully received by the XIAO ESP32S3.
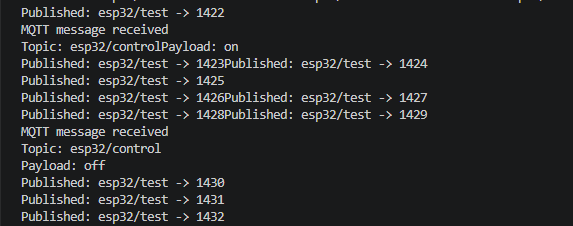
Therefore, I confirmed that not only data transmission from the XIAO ESP32S3 to the server, but also communication in the opposite direction works correctly, allowing control commands sent through FastAPI to be received by the XIAO ESP32S3 through the MQTT Broker.
Through this porting test, both directions of communication were successfully verified as follows.
[Status Data Transmission]

XIAO ESP32S3
      ↓
MQTT Broker
      ↓
FastAPI
      ↓
Web Browser

[Control Command Transmission]

Web Browser
      ↓
FastAPI
      ↓
MQTT Broker
      ↓
XIAO ESP32S3
This confirms that even after migrating the Zephyr MQTT application originally developed for the ESP32 board to the XIAO ESP32S3, bidirectional MQTT communication including Publish and Subscribe operates correctly, and the application can still be integrated with the existing FastAPI-based IoT server without modification.
Conclusion
In this exercise, I applied Zephyr RTOS to Seeed Studio’s XIAO ESP32S3 board and verified whether an MQTT application originally developed for an ESP32 board could be successfully migrated and operated on the new board.
First, I created the custom board my_xiao_esp32s3 based on the official XIAO ESP32S3 board files provided by Zephyr. I then migrated a simple Wi-Fi Scan project to verify that both the custom board configuration and the ESP32-S3 Wi-Fi functionality were working correctly.
Next, I migrated the existing ESP32 MQTT project to the XIAO ESP32S3 project. During this process, rather than rewriting the MQTT application itself, the main porting work involved configuring Kconfig and the build environment for the new target board.
In particular, because the existing application did not directly control the Wi-Fi or MQTT hardware and was instead built around the Network and MQTT APIs provided by Zephyr, most of the application code could be reused without modification even though the target board changed from the ESP32 to the ESP32-S3.
Finally, the data published by the XIAO ESP32S3 was
XIAO ESP32S3
      ↓
Mosquitto MQTT Broker
      ↓
FastAPI + Uvicorn
      ↓
Web Browser
I confirmed that the data was successfully transmitted through this path.
In the opposite direction, the On and Off commands sent by calling the FastAPI Control API from the browser were also transmitted through the following path.
Web Browser
      ↓
FastAPI + Uvicorn
      ↓
Mosquitto MQTT Broker
      ↓
XIAO ESP32S3
The commands were successfully received through this path, confirming that bidirectional MQTT communication was operating correctly.
Through this exercise, I was able to verify through an actual porting process that when using Zephyr, a significant portion of application code that does not directly depend on hardware can be reused even when the target board is changed.
Of course, this test was performed between the ESP32 and ESP32-S3, which belong to the same Espressif family, so it cannot be assumed that the same level of portability will always be achieved across all MCUs. However, this exercise confirmed that separating board-specific differences through DeviceTree and Kconfig while building application code around common APIs provided by Zephyr can be an important development approach for projects that need to support multiple hardware platforms.
This XIAO ESP32S3 porting exercise was meaningful not simply because MQTT was made to work on a new board, but because it provided a practical opportunity to verify whether the Zephyr applications developed so far could actually be reused on different hardware.