Introduction
As we go through our daily lives, we often use various technologies without knowing how they actually work. Bluetooth is one of them. We use many Bluetooth products, but we rarely have the opportunity to implement the technology ourselves.
While studying the Zephyr RTOS, I decided to implement Bluetooth LE myself. Rather than creating a simple communication example, I wanted to build something that could actually be used. So I decided to make a Remote Metronome for the band I play with as a hobby.
The concept is simple. The BPM and Start/Stop settings are configured on a smartphone and sent to the remote device via Bluetooth LE. The XIAO nRF54L15 then flashes an LED light according to the configured BPM. The goal is to allow multiple band members to watch the light and play together at the same tempo.
In this article, rather than focusing on the metronome application itself, I will focus on the underlying Bluetooth LE implementation using the XIAO nRF54L15 and Zephyr.
Using nRF Connect for Mobile on a smartphone, we will discover and connect to the device, examine the GATT Service and Characteristics, and test Write and Notify communication in practice. The complete source code will also be provided separately for download.
Basic Structure of Bluetooth LE
Bluetooth LE (Bluetooth Low Energy) is a Bluetooth communication technology designed for exchanging small amounts of data with low power consumption. It is widely used in devices that exchange relatively simple data with smartphones, such as sensors, wearable devices, and remote controllers.
In this project, there is no need to transfer large amounts of data between the smartphone and the metronome. Only the BPM value, Start/Stop commands, and current operating status need to be exchanged, making Bluetooth LE well suited for this application.
To understand Bluetooth LE communication, it is useful to first understand the relationship between Central and Peripheral devices.
In this project, the smartphone acts as the Central, while the XIAO nRF54L15 acts as the Peripheral.
Smartphone
nRF Connect
(Central)
    |
    | Bluetooth LE
    |
    ▼
XIAO nRF54L15
(Peripheral)XIAO nRF54L15 Smartphone
Peripheral Central
| |
|------ Advertising --------------->|
| |
|<--------- Connection -------------|
| |
|<========= BLE Communication ======>|After the connection is established, an important concept for exchanging actual data is GATT (Generic Attribute Profile).
In GATT, the functions provided by a device are organized into Services and Characteristics.
GATT
│
└── Service
      │
      ├── Characteristic
      │      └── Value
      │
      ├── Characteristic
      │      └── Value
      │
      └── Characteristic
└── ValueFor example, in the remote metronome, a single Metronome Service can contain Characteristics for BPM, Start/Stop, and the current operating status.
Characteristic data can be exchanged in several ways. In this project, we mainly use Write and Notify.
Write is used to send a value from the smartphone to the nRF54L15. Changing the BPM or sending a Start/Stop command from the smartphone are examples of Write operations.
In contrast, Notify is used by the nRF54L15 to inform the smartphone when a value has changed. Instead of requiring the smartphone to continuously read and check the value, the device can send the updated status when needed.
Therefore, the basic data flow of this project is as follows.
Smartphone                         XIAO nRF54L15

BPM / Start / Stop
        ------ Write ------------>

        <----- Notify ------------
Device StatusAdvertising → Connection → Service → Characteristic → Write/Notify
Now, we will implement this structure in Zephyr and verify each step using nRF Connect.
Development Environment and Hardware Configuration
Hardware Configuration
In this project, I used the Seeed Studio XIAO nRF54L15 board. Detailed specifications of the board can be found in the official Seeed Studio documentation.
Seeed Studio XIAO nRF54L15 Official Documentation
The XIAO nRF54L15 is a compact development board based on Nordic Semiconductor’s nRF54L15. It supports Bluetooth LE and allows applications to be developed using the Zephyr RTOS.
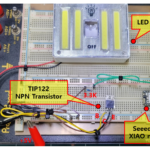
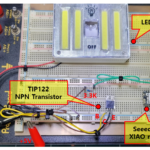
The hardware configuration used in this project is shown below.
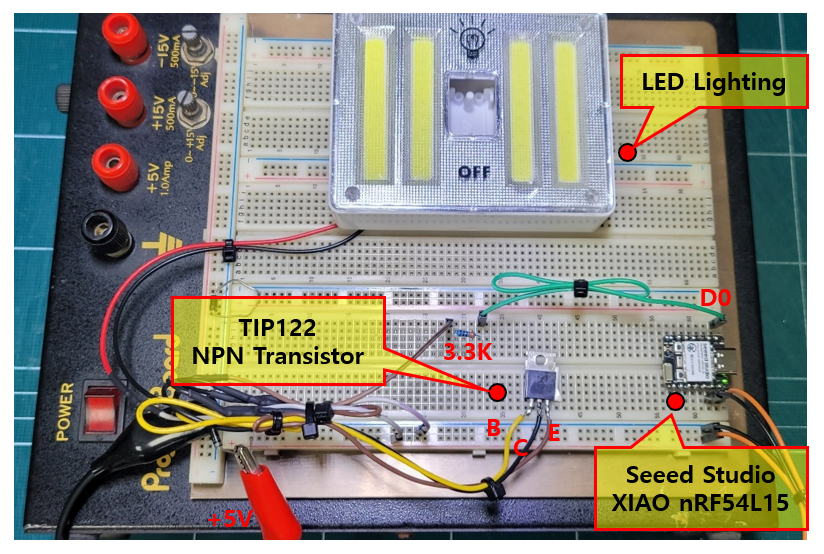
The D0 GPIO of the XIAO nRF54L15 is used to control a TIP122 NPN transistor, which switches the external LED lighting ON and OFF. A 3.3 kΩ resistor is connected between the GPIO pin and the base of the TIP122.
According to the BPM and Start/Stop commands received via Bluetooth LE, the XIAO nRF54L15 controls D0, causing the external LED lighting to flash at the configured BPM.
The main purpose of this article is not the LED driver circuit itself, but rather the implementation of Bluetooth LE communication using the XIAO nRF54L15 and Zephyr.
Software Development Environment
The software was developed based on Zephyr RTOS. Zephyr provides a Bluetooth LE stack and GATT APIs, allowing us to use them to implement a Peripheral device.
Zephyr Bluetooth Official Documentation
The development environment used for this project is as follows.
| Item | Environment |
|---|---|
| Development Board | Seeed Studio XIAO nRF54L15 |
| RTOS | Zephyr RTOS |
| Development Tool | Visual Studio Code |
| Language | C |
| Wireless Communication | Bluetooth LE |
| BLE Testing Tool | nRF Connect for Mobile |
| Test Device | Android Smartphone |
The firmware was written and built in the Zephyr development environment using Visual Studio Code, and then downloaded to the XIAO nRF54L15.
On the smartphone, I used nRF Connect for Mobile. With nRF Connect, nearby BLE devices can be scanned and connected without creating a separate smartphone application, allowing us to inspect their GATT Services and Characteristics.
It is also very useful for BLE firmware development and testing because values can be written directly to Characteristics using Write, and data sent from the device can be monitored using Notify.
In this project, I first used nRF Connect to fully verify the Bluetooth LE functionality of the nRF54L15. In the next stage, the system will be expanded into an actual metronome smartphone application.
Software Configuration
Project Structure
Now that the hardware setup is complete, we can run Bluetooth LE on the XIAO nRF54L15.
Zephyr includes a Bluetooth stack and APIs for Bluetooth LE, so there is no need to implement Bluetooth communication from scratch. We only need to enable the required features and use the APIs provided by Zephyr to build the application.
In this project, instead of placing all functionality in a single file, the program is divided into several modules as shown below.
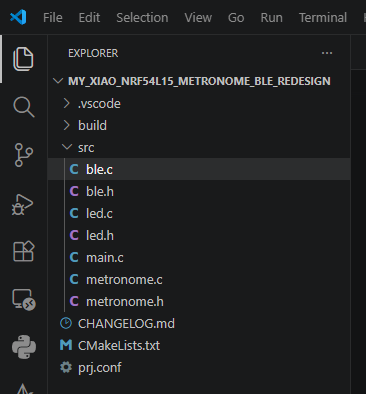
The Bluetooth LE functionality is implemented in ble.c and ble.h, LED control in led.c and led.h, and the metronome operation in metronome.c and metronome.h. The main.c file initializes each module and manages the overall execution flow of the program.
Separating the source code by function makes it easier to modify and test the Bluetooth communication, LED control, and metronome operation independently.
In a Zephyr project, the source files to be included in the build are specified in CMakeLists.txt. In this project, main.c, led.c, metronome.c, and ble.c are registered as application source files.
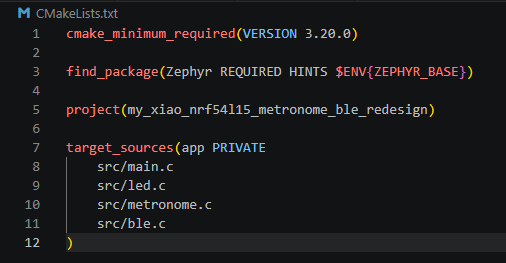
The source files registered with target_sources() are compiled together and form a single Zephyr application. Header files such as ble.h, led.h, and metronome.h are included from the source files using #include, so they do not need to be registered separately with target_sources().
Board Configuration
The board configuration is the same as the one used in the previous project. I used the official XIAO nRF54L15 board configuration provided by Zephyr and applied the custom board name my_xiao_nrf54l15 based on it.
Since the detailed process of creating the custom board was covered in a previous article, I will not repeat it here and will focus on the Bluetooth LE configuration.
Based on this project structure, the next step is to enable the required Bluetooth LE features in prj.conf and configure the application for BLE operation.
Bluetooth LE Configuration
In Zephyr, the features used by a project are configured in the prj.conf file.
For this project, I enabled the basic features required to operate as a Bluetooth LE Peripheral, along with the settings needed for GATT communication.
The following is the prj.conf configuration used in this project.
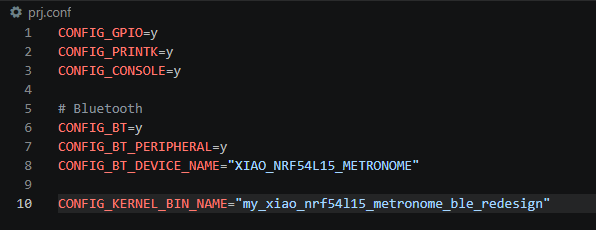
CONFIG_GPIO enables GPIO functionality for controlling the external LED lighting, while CONFIG_PRINTK and CONFIG_CONSOLE are used to display simple debug messages and check the operating status.
The settings directly related to Bluetooth LE are as follows.
CONFIG_BT=y
CONFIG_BT_PERIPHERAL=y
CONFIG_BT_DEVICE_NAME="XIAO_NRF54L15_METRONOME"
CONFIG_BT enables Zephyr’s Bluetooth functionality, while CONFIG_BT_PERIPHERAL configures the XIAO nRF54L15 to operate as a BLE Peripheral.
CONFIG_BT_DEVICE_NAME specifies the BLE device name. Later, when scanning for nearby devices with nRF Connect on a smartphone, the device can be identified by the name XIAO_NRF54L15_METRONOME.
Finally,
CONFIG_KERNEL_BIN_NAME="my_xiao_nrf54l15_metronome_ble_redesign"With the prj.conf configuration complete, Zephyr is now ready to use Bluetooth LE.
Next, we will initialize the Bluetooth stack and start Advertising in the program, then verify that the XIAO nRF54L15 can actually be discovered from a smartphone.
Bluetooth LE Implementation
Bluetooth Initialization and Advertising
Now that the software configuration is complete, we can start running Bluetooth LE on the device.
In this project, the XIAO nRF54L15 operates as a Peripheral. A Peripheral device first initializes the Bluetooth functionality and then starts Advertising so that nearby Central devices can discover it.
The overall process is as follows.
XIAO nRF54L15
      |
      ▼
Bluetooth Initialization
      |
      ▼
Start Advertising
      |
      ▼
Scan from Smartphone
      |
      ▼
BLE Device Discovered
In Zephyr, the bt_enable() function is used to initialize and enable the Bluetooth stack.
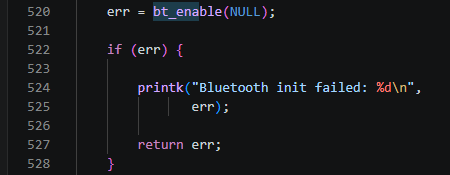
Once bt_enable() completes successfully, the device is ready to use Bluetooth LE.
The next step is to start Advertising. Advertising is the process by which a Peripheral device periodically announces its presence and basic information to nearby devices.
In this project, the Advertising data includes the device name and GATT Service information so that the device can be discovered by a smartphone.
The key part for starting Advertising is Zephyr’s bt_le_adv_start() function.
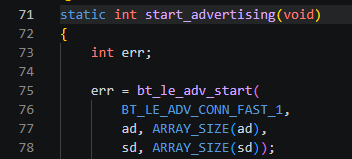
Once Advertising starts, the XIAO nRF54L15 becomes a discoverable BLE Peripheral device.
On the smartphone, we can run nRF Connect for Mobile and perform a scan to find the device name specified in prj.conf.
XIAO nRF54L15                         Smartphone
   Peripheral                         nRF Connect
      |                                   |
      |---- Advertising ----------------->|
      |                                   |
      |                         Scan / Discovery
      |                                   |
      |<---- Connection Request ----------|
      |                                   |
      |<======= BLE Connection ==========>|
At this point, the first stage of the BLE connection process — Bluetooth Initialization → Advertising → Scan → Device Discovery — is complete.
Next, we will implement the GATT Service and Characteristics required to exchange actual data after the smartphone connects to the device.
GATT Service and Characteristics
Through Advertising, the smartphone can now discover and connect to the XIAO nRF54L15. The next step is to configure the GATT Service and Characteristics used to exchange actual data between the connected devices.
As discussed earlier, GATT groups related functions into a Service, while actual data is exchanged through Characteristics.
In this project, I created a custom Metronome Service containing a Control Characteristic and a BPM Characteristic.
Metronome Service
      |
      ├── Control Characteristic
      |       |
      |       ├── 0x00 : STOP
      |       ├── 0x01 : START
      |       └── 0x02 : STATUS REQUEST
      |
      └── BPM Characteristic
              |
              └── BPM Setting
Each Service and Characteristic is identified by a UUID (Universally Unique Identifier). In Zephyr, BT_GATT_SERVICE_DEFINE() can be used to define a GATT Service and the Characteristics it contains.
Control Characteristic
The Control Characteristic is used to control the metronome’s Start/Stop operation and to request its current status.
When the smartphone Writes a value to the Control Characteristic, the write_control() callback function is called, and the metronome operates according to the received value as follows.
0x00 : STOP
0x01 : START
0x02 : STATUS REQUEST
When 0x00 is written, metronome_stop() is called and the metronome stops. When 0x01 is written, metronome_start() is called and the metronome starts operating.
After a Start or Stop command is processed, the updated Control state can also be sent back to the smartphone through Notify using notify_control().
0x02 is not an operating command. Instead, it is used to request the current status.
When 0x02 is written from the smartphone, the XIAO nRF54L15 checks the current Control value and BPM value, combines them into two bytes of data, and sends the result back to the smartphone through Notify.
Smartphone
    |
    | Control Write : 0x02
    ▼
XIAO nRF54L15
    |
    ├── Current Control Value
    ├── Current BPM Value
    |
    ▼
Status Notify
    |
    ▼
Smartphone
BPM Characteristic
The BPM Characteristic is used to set the metronome’s BPM value and read the current value.
When a new value is Written to the BPM Characteristic from the smartphone, the write_bpm() callback function is called by Zephyr’s GATT handling process.
For example, when a value of 60 is written as uint8 from nRF Connect, it is processed as follows.
nRF Connect
    |
    | BPM Characteristic
    | Write : 60
    ▼
XIAO nRF54L15
    |
    ▼
write_bpm()
    |
    ▼
BPM = 60
    |
    ▼
Change Metronome Timingread_bpm() callback function is called, allowing the currently configured BPM value to be checked.In other words, a Characteristic acts as a channel through which data is exchanged in Bluetooth LE, while callback functions such as write_control() and write_bpm() handle the actual data received through that channel.
Operation Flow
The data received through Bluetooth LE is connected to the actual metronome operation. When a Start command is received through the Control Characteristic, the metronome starts operating, and when a Stop command is received, the operation stops. The value received through the BPM Characteristic is used to determine the blinking interval of the metronome.
The actual beat timing is generated by the XIAO nRF54L15, not by the smartphone. The smartphone only sends the BPM and Start/Stop commands via Bluetooth LE. Based on the configured BPM, metronome.c generates the beat timing and controls the D0 GPIO to blink the external LED light.
The overall program flow is as follows.
Smartphone
    │
    │ Bluetooth LE
    │ Start / Stop / BPM
    ▼
  ble.c
    │
    ▼
metronome.c
    │
    │ Generate beat timing based on BPM
    │ Control D0 GPIO
    ▼
External LED Light
Meanwhile, led.c is not used to control the external LED light for the metronome. Instead, it controls the Heartbeat LED on the XIAO nRF54L15 board, allowing us to confirm that the program is running normally.
In this article, we focus on the Bluetooth LE implementation, so the details of the metronome timing generation and external LED control code will not be covered. Likewise, rather than explaining the GATT implementation code in detail, we will focus on the overall structure and data flow. The complete implementation code will be provided as a downloadable project at the end of the article.
Now that the GATT Service and Characteristics have been configured, we will build and download the project and then use nRF Connect for Mobile on a smartphone to verify that they work as expected.
Build and Download
Now that the Bluetooth LE and metronome program configuration is complete, we can build the project and download it to the XIAO nRF54L15.
In this project, the build targets the my_xiao_nrf54l15 custom board created earlier.
From the project directory, build the project using the following command.
west build -b my_xiao_nrf54l15/nrf54l15/cpuapp -p always -- -DBOARD_ROOT="D:/Zephyr/workspace/my_boards"-b option specifies the board target, which in this project is my_xiao_nrf54l15/nrf54l15/cpuapp.The BOARD_ROOT option specifies the location of the custom board definition. In my development environment, the custom board is located in:
D:/Zephyr/workspace/my_boardswest flashNext, we will run nRF Connect for Mobile on the smartphone and verify that Bluetooth LE communication is working correctly.
Testing with nRF Connect for Mobile
So far, we have initialized Bluetooth LE on the XIAO nRF54L15 and configured Advertising, the GATT Service, and Characteristics.
Now, we will use nRF Connect for Mobile on a smartphone to discover and connect to the BLE device, and then verify that the implemented GATT communication works correctly.
nRF Connect is a Bluetooth LE development and testing application provided by Nordic Semiconductor. Without creating a separate smartphone application, it allows us to scan for and connect to BLE devices, inspect their Services and Characteristics, and directly test functions such as Read, Write, and Notify.
nRF Connect for Mobile Official Page
In this project, we will verify the operation in the following sequence.
nRF Connect
    |
    ▼
Scan for BLE Devices
    |
    ▼
Discover XIAO_NRF54L15_METRONOME
    |
    ▼
Connect
    |
    ▼
Check GATT Service / Characteristics
    |
    ├── Control Write
    |       ├── 0x00 : STOP
    |       ├── 0x01 : START
    |       └── 0x02 : STATUS REQUEST
    |
    ├── BPM Write
    |
    └── Check Notify
Device Discovery and Connection
First, download the program to the XIAO nRF54L15 and run it.
Once the program starts successfully, Bluetooth LE Advertising begins, and the XIAO nRF54L15 becomes a Peripheral device that can be discovered by nearby smartphones.
Run nRF Connect for Mobile on the smartphone and start a scan.
Search for the device name configured in prj.conf:
XIAO_NRF54L15_METRONOMEThe screen below shows the device discovered during the scan.
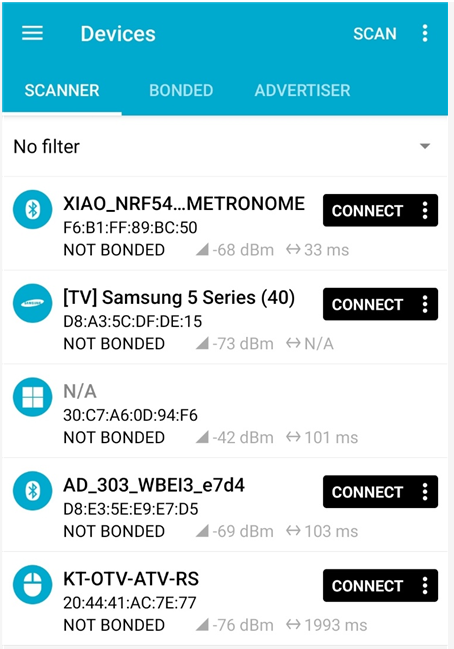
Once the device is discovered, select CONNECT to establish a connection with the XIAO nRF54L15.
After the connection is successfully established, nRF Connect displays the GATT Services and Characteristics provided by the XIAO nRF54L15.
The screen below shows the connected device.
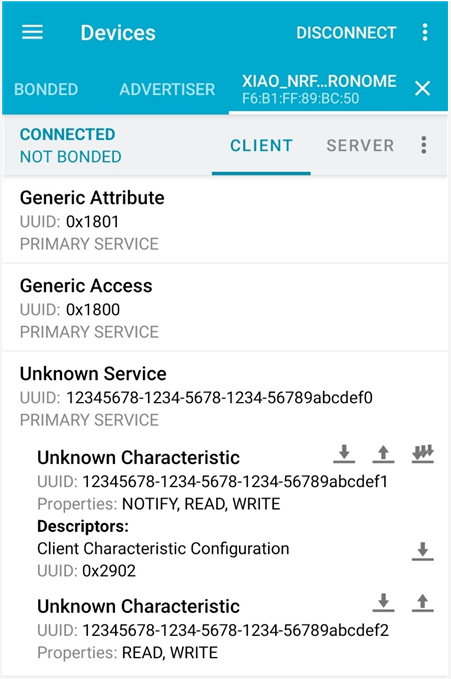
Once the connection is established, nRF Connect reads the GATT information provided by the XIAO nRF54L15 and displays it on the screen.
Along with the Generic Attribute and Generic Access Services that are commonly used in Bluetooth, the Unknown Service created specifically for this project also appears.
The reason it is displayed as Unknown does not indicate an error. Since this project uses Custom UUIDs defined specifically for the application, nRF Connect does not know the names of the corresponding Service and Characteristics.
Expanding the Custom Service created in this project reveals two Characteristics.
Unknown Service
(Metronome Service)
      |
      ├── Unknown Characteristic
      |       └── Control Characteristic
      |
      └── Unknown Characteristic
              └── BPM Characteristic
The second is the BPM Characteristic, which is used to set the metronome’s BPM value or read the current value.
On the nRF Connect screen, the functions available for each Characteristic are also indicated by icons. The Control Characteristic supports Read, Write, and Notify, while the BPM Characteristic is configured to support Read and Write.
Therefore, even without creating a separate smartphone application, nRF Connect allows us to directly access the GATT Service and Characteristics implemented in Zephyr and exchange data with them.
Now, we will first Write a value to the Control Characteristic to Start and Stop the metronome.
Metronome Operation
Now, we will use nRF Connect to operate the metronome.
Start/Stop
Click the upward arrow icon displayed on the right side of the Control Characteristic. The following screen will appear.
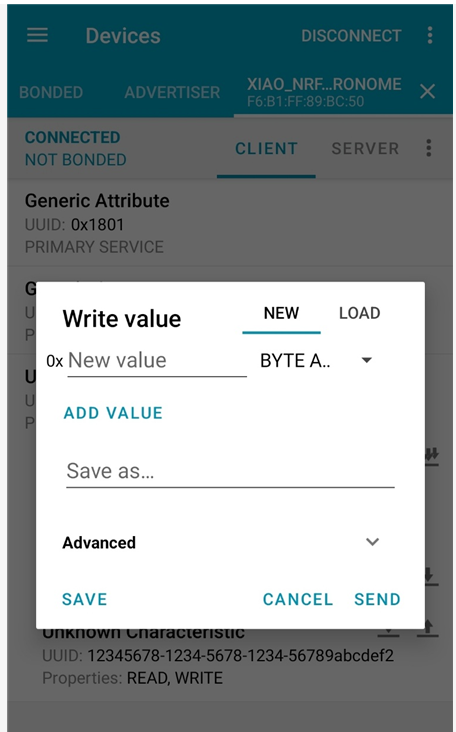
When the Write button for the Control Characteristic is selected, the Write value screen appears as shown above.
In this project, the Control commands are defined as 1-byte values.
0x00 : STOP
0x01 : START
0x02 : STATUS REQUEST0x01 and press SEND.Control Characteristic
|
| Write : 0x01
▼
XIAO nRF54L15
|
▼
START
|
▼
According to the configured BPM,
the external LED lighting flashes0x01 is received, the write_control() callback function on the XIAO nRF54L15 is called. The Start command is then processed, and the metronome begins operating.Next, write 0x00 in the same way. Since 0x00 is the Stop command, the metronome stops operating and the LED stops flashing.
This confirms that the actual metronome running on the XIAO nRF54L15 can be Started and Stopped simply by writing values directly to the Control Characteristic from nRF Connect.
Next, we will Write a value to the BPM Characteristic to change the LED flashing rate.
Now that we have confirmed that the metronome can Start and Stop correctly, we will change the BPM value.
Changing the BPM
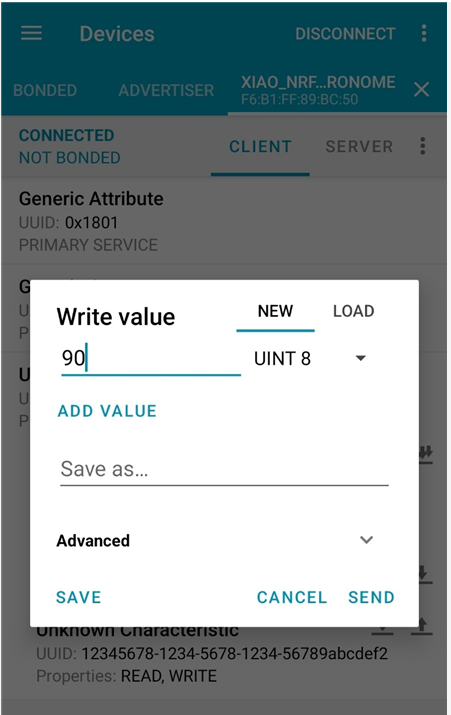
The second BPM Characteristic is used to configure the BPM. In nRF Connect, select the Write button for the BPM Characteristic to open the screen where a value can be entered.
The BPM value is transferred as a 1-byte uint8 value. By selecting UINT8 as the input format in nRF Connect, the BPM value can be entered directly as a decimal number without converting it to hexadecimal.
For example, to set the BPM to 90, enter the following:
Data type : UINT8
Value : 9090 is then transferred to the XIAO nRF54L15 through the BPM Characteristic.nRF Connect
|
| BPM Characteristic
| Write : 90
▼
XIAO nRF54L15
|
▼
write_bpm()
|
▼
BPM = 90
|
▼
Change Metronome Timing
|
▼
External LED Lighting FlashesOn the XIAO nRF54L15, when a value is received through the BPM Characteristic, the write_bpm() callback function is called and the new BPM value is applied to the metronome.
By changing the BPM to values such as 90 or 120, you can verify that the flashing rate of the external LED lighting changes accordingly.
The screen below shows the value entry process.
Sending Status Using Notify
In Bluetooth LE, communication is not limited to Write, where the smartphone sends data to the device. The Notify function can also be used to send data from the device to the smartphone.
In this project, Notify functionality was added to the Control Characteristic. When Notify is enabled on the smartphone, the XIAO nRF54L15 can send changes in the metronome status to the smartphone.
In addition, when 0x02 is Written to the Control Characteristic, the current Control status and BPM value are sent through Notify.
nRF Connect
    |
    | Write : 0x02
    ▼
XIAO nRF54L15
    |
    ├── Control Status
    └── BPM Value
    |
    | Notify
    ▼
nRF Connect
This confirms that communication works in both directions: the smartphone can control the device, and the device can send its current status back to the smartphone.
The detailed implementation of Notify is not covered in this article, but it can be found in the complete project source code.
Project Source Code Download
The complete source code for the XIAO nRF54L15 + Zephyr Bluetooth LE Metronome project used in this article is available for download.
The project includes not only the Bluetooth LE implementation but also the metronome and external LED control code, allowing you to test the complete operation.
src/
├── main.c
├── ble.c
├── ble.h
├── metronome.c
├── metronome.h
├── led.c
└── led.h

CMakeLists.txt
prj.conf
The main Bluetooth LE implementation can be found in ble.c and ble.h, while the BPM processing and LED flashing intervals can be found in metronome.c and led.c.
[Download the Complete Project Source Code]
When using the downloaded project, check the board configuration and BOARD_ROOT path according to your own Zephyr development environment before building the project.