Introduction
In the previous labs, we implemented UDP and TCP communication using the Wi-Fi functionality of the ESP32. In particular, the TCP lab allowed us to understand the basic structure of socket-based network communication by directly connecting the ESP32 and a PC to exchange data.
In this lab, we will take one step further and implement MQTT (Message Queuing Telemetry Transport) communication, which is widely used in IoT systems.
MQTT operates over TCP, but instead of devices communicating through direct connections, messages are exchanged through an MQTT Broker. A sender publishes a message to a specific Topic, and devices that subscribe to that Topic receive the message through the Broker.
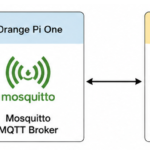
For this lab, we will use the Mosquitto MQTT Broker running on the Orange Pi One that we previously configured.
The related article is linked below.
Orange Pi IoT Server #1 – Building a Linux-Based Mosquitto MQTT Broker and FastAPI Server
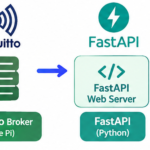
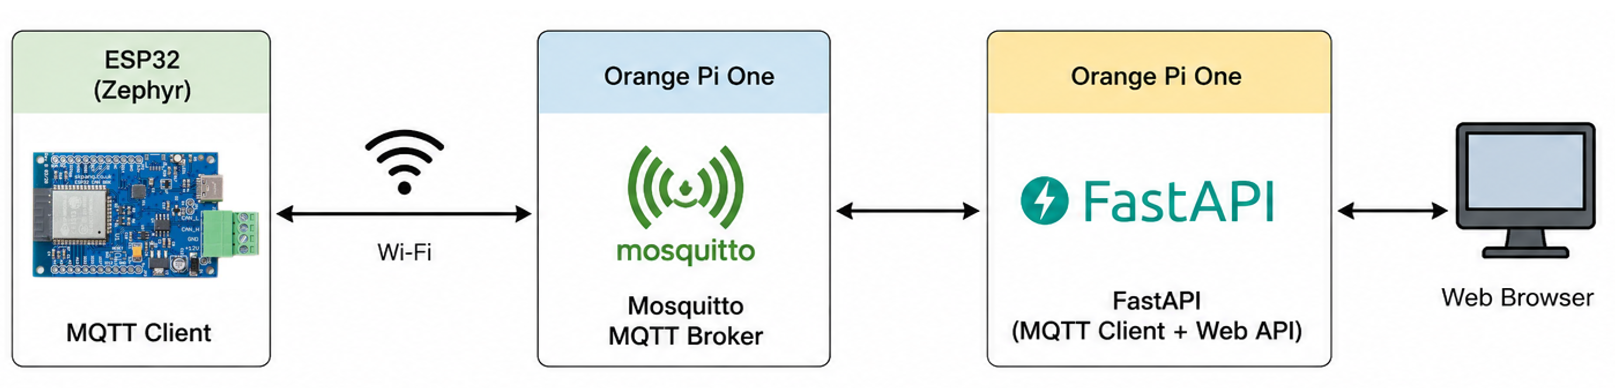
On the ESP32, we will implement a Zephyr-based MQTT Client that connects to the Broker and sends and receives messages. We will also connect FastAPI and MQTT running on the Orange Pi to verify the overall communication structure shown below.
ESP32 ↔ Mosquitto MQTT Broker ↔ FastAPI
Through this lab, we will expand beyond the direct network communication covered with UDP and TCP and explore an MQTT-based IoT communication architecture in which multiple devices and servers exchange data through a Broker.
What Is MQTT?
MQTT (Message Queuing Telemetry Transport) is a lightweight messaging protocol widely used in IoT environments to efficiently exchange data between devices. Because its TCP/IP-based communication structure is simple and requires relatively little data overhead, it is commonly used in embedded devices such as the ESP32.
The most important characteristic of MQTT is that, unlike TCP communication where two devices directly exchange data with each other, communication takes place through an intermediate Broker.
There are three key concepts in MQTT communication:
- Broker: A server that relays MQTT messages.
- Publisher: Sends (publishes) messages to a specific Topic.
- Subscriber: Subscribes to a specific Topic and receives messages published to that Topic.
The following figure shows an example of the communication structure implemented with MQTT.
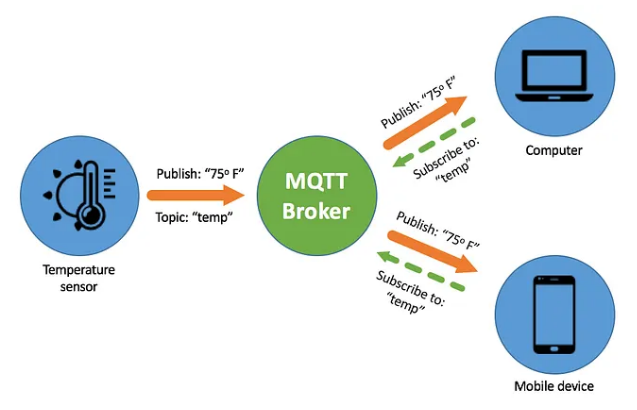
The source of the figure above is as follows:
Getting Started with MQTT — Part 1
In the figure, the temperature sensor publishes temperature data to a Topic named temp. The Broker receives this message and delivers it to computers or mobile devices that have subscribed to the temp Topic.
Here, a Topic can be considered a type of address or channel used to distinguish MQTT messages.
The Publisher does not directly specify the device that will receive the data. Instead, it simply specifies a Topic and publishes the message. Likewise, the Subscriber does not directly specify the device sending the data, but instead subscribes to the Topic it needs.
This communication method is called the Publish/Subscribe (Pub/Sub) model. Since the sender and receiver do not need to be directly connected, it is easy to add new devices or allow multiple devices to share the same data.
In addition, a message published by one Publisher can be received simultaneously by multiple Subscribers, and a single device can publish or subscribe to multiple Topics. This structure makes it easy to connect multiple sensors and control devices in an IoT system.
In this way, MQTT differs from conventional TCP socket communication in that it uses a structure where the Broker and Topics serve as the central mechanism for separating Publishers and Subscribers.
MQTT Lab Setup
In this lab, we will build an MQTT communication environment using an ESP32, Orange Pi One, and PC.
The overall lab setup is shown below.
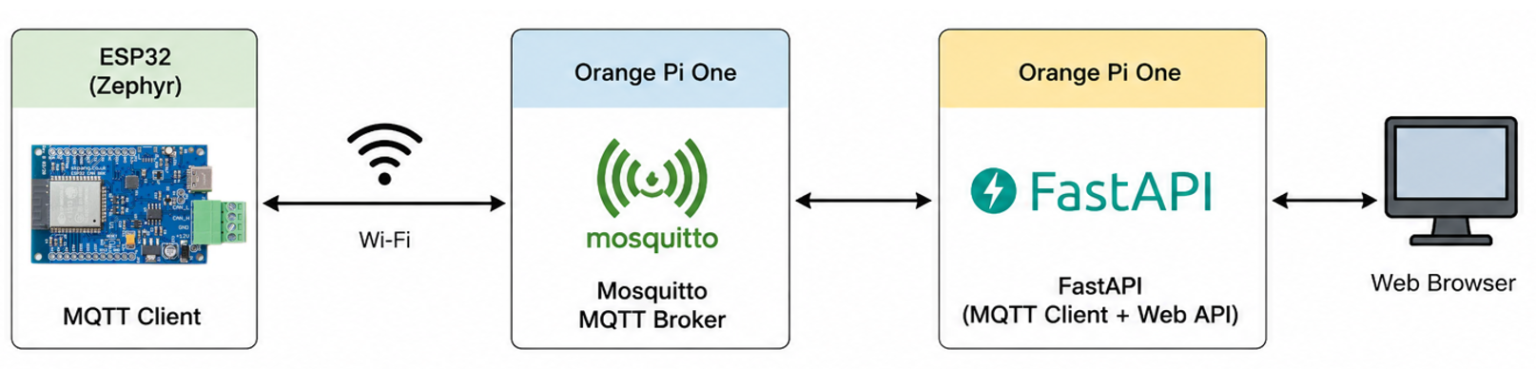
The ESP32 operates as a Zephyr-based MQTT Client and connects via Wi-Fi to the Mosquitto MQTT Broker installed on the Orange Pi One. The ESP32 publishes messages to a specific Topic and subscribes to another Topic to receive messages from the Broker.
On the Orange Pi One, Mosquitto and FastAPI run together. Mosquitto acts as the MQTT message broker, while FastAPI is connected to the Broker through Python’s paho.mqtt MQTT Client library.
Therefore, the ESP32 and FastAPI do not communicate directly. Instead, they exchange messages through Mosquitto as shown below.
ESP32 (Zephyr) ↔ Mosquitto MQTT Broker ↔ FastAPI
FastAPI stores data received through MQTT so that it can be viewed in a web browser. Conversely, commands entered through the Web API can also be published as MQTT messages.
The role of each device can be summarized as follows:
- ESP32 (Zephyr): Operates as an MQTT Client and publishes/subscribes to messages.
- Mosquitto (Orange Pi One): Operates as the MQTT Broker and relays messages between Publishers and Subscribers.
- FastAPI (Orange Pi One): Communicates with Mosquitto as an MQTT Client while also providing a Web API.
- PC Web Browser: Connects to FastAPI to view data received through MQTT or send commands.
In this lab, we will use this configuration to verify bidirectional message exchange between ESP32 ↔ Mosquitto ↔ FastAPI.
Through this process, we will move beyond direct communication between the ESP32 and another device and examine the basic structure of an IoT communication system in which multiple devices and servers can be connected through an MQTT Broker.
Creating the MQTT Project
This MQTT project is created based on the Wi-Fi TCP communication project implemented in the previous lab.
Since the TCP lab already implemented the ESP32 Wi-Fi connection and IP address assignment using DHCP, we will keep these parts unchanged and modify the TCP communication section to use MQTT communication.
First, copy the existing project folder and rename the project as follows:
skpang_esp32_can_wifimqtt
The basic project structure is the same as that of the previous TCP project, and we will continue to use the previously created skpang_esp32_can custom board.
The following shows the folder structure of this project.
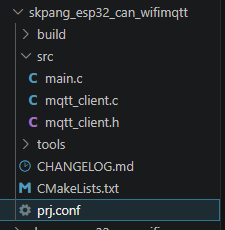
Among the files in the src folder, rename tcp_client.c and tcp_client.h to mqtt_client.c and mqtt_client.h, respectively.
We will not modify their contents yet. Instead, we will update them step by step as we proceed.
First, we will modify the basic configuration files—CMakeLists.txt, prj.conf, and CHANGELOG.md—to match the new MQTT project.
The following is the CMakeLists.txt file.
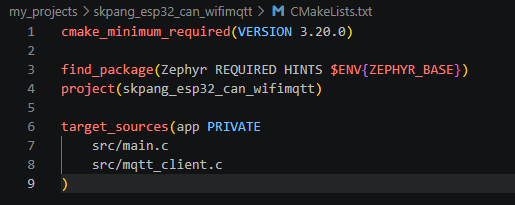
The project name has been changed to skpang_esp32_can_wifimqtt, and the target_sources section has also been modified to include src/main.c and src/mqtt_client.c.
Next is the prj.conf file.
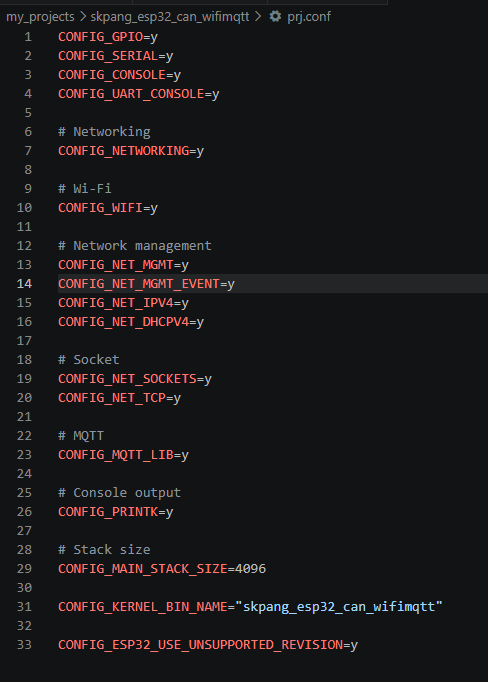
The MQTT-related configuration has been added to the settings previously used for TCP communication.
Next is the CHANGELOG.md file.
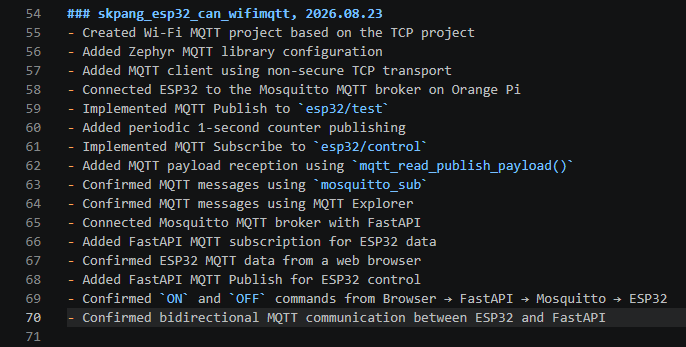
Here as well, the MQTT-related content has been added to the existing file.
Initially, we recorded only Start, and then gradually added entries as the project progressed. This approach is recommended, although the entire changelog can also be organized at once after the project is completed.
Implementing the MQTT Program
Overview
Now that the basic project configuration is complete, we will implement the MQTT program that runs on the ESP32.
In this project, the program is divided into two main parts: Wi-Fi connection and MQTT communication.
The Wi-Fi connection uses the code implemented in the previous TCP project without modification, while MQTT-related functions are handled separately in the mqtt_client.c file.
The overall program flow is as follows:
- Initialize the ESP32 Wi-Fi.
- Connect to the configured AP.
- Obtain an IP address through DHCP.
- Connect to the Mosquitto MQTT Broker.
- Subscribe to the specified Topic.
- Periodically publish data from the ESP32.
- Process MQTT messages received from the Broker.
In the previous TCP lab, we created a socket directly, connected to the server, and exchanged data. In this lab, however, Zephyr’s MQTT API handles the connection to the Broker and message transmission.
We will examine the program by dividing it into the following two files according to their main functions:
- main.c: Handles the Wi-Fi connection and starts the MQTT Client
- mqtt_client.c: Handles the MQTT Broker connection and Publish/Subscribe operations
First, let’s take a look at main.c.
main.c
main.c is responsible for initializing the ESP32 Wi-Fi connection and starting the MQTT Client after an IP address has been assigned.
Most of the Wi-Fi-related code is reused from the previous TCP project, so we will not explain it again here. Instead, we will focus on the parts newly added for the MQTT program.
First, add the following header file to main.c to use the MQTT Client.
#include "mqtt_client.h"Once the ESP32 is connected to the AP and successfully obtains an IP address through DHCP, the MQTT Client is started.
The MQTT Client can be started from the ipv4_addr_handler() function, which is the IPv4 address event handler.
The function call is as follows:
mqtt_app_start();To connect to the MQTT Broker, network communication must first be available. Therefore, mqtt_app_start() is called only after confirming that an IPv4 address has been successfully assigned through DHCP.
The following is the code for the handler function that starts the MQTT Client.
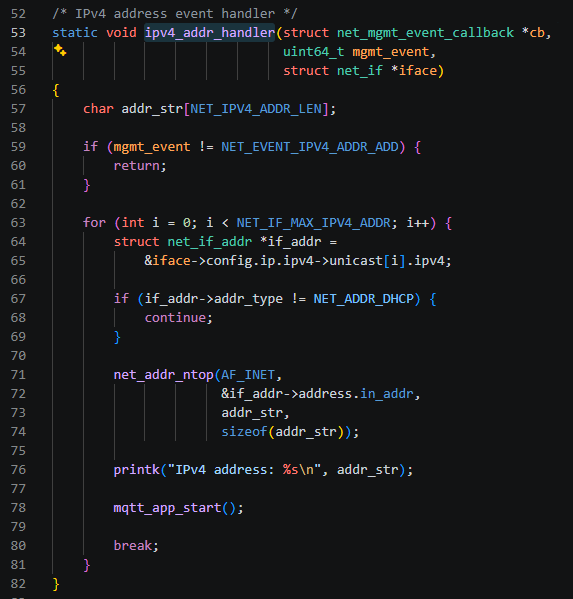
The basic Wi-Fi connection code in main.c can be found in the previous article, Zephyr ESP32 Tutorial #5 – Wi-Fi TCP Communication. In this project, we simply added the part that starts the MQTT Client.
The overall execution flow is as follows:
ESP32 Start → Wi-Fi Initialization → AP Connection → IP Address Assignment → MQTT Client Start
In other words, main.c prepares the network connection environment, while the actual MQTT Broker connection and Publish/Subscribe operations are handled by mqtt_client.c.
By separating the Wi-Fi connection and MQTT functions in this way, we can prevent main.c from becoming unnecessarily long and manage the MQTT-related functions in a separate file.
Next, let’s take a look at mqtt_client.c, which handles the core functions of MQTT communication.
mqtt_client.c
mqtt_client.c handles the MQTT communication functions of the ESP32.
In this file, we configure the MQTT Broker address and port, initialize the MQTT Client, and then connect to the Broker. Once the connection is established, the ESP32 subscribes to the esp32/control Topic and publishes a number to the esp32/test Topic every second.
When a message is received from the Broker, the MQTT Event Handler reads the Topic and Payload and prints them.
The main operation flow is as follows:
Broker Configuration → MQTT Client Initialization → Broker Connection → Subscribe → Publish / Message Reception → Maintain Connection
We will examine the code by dividing it into the following functional sections:
- Basic Broker and MQTT Client Configuration
- MQTT Event Handler
- Broker Initialization
- MQTT Client Initialization
- MQTT Broker Connection and Processing Loop
- MQTT Publish
- MQTT Subscribe
MQTT Client Basic Configuration
The following code defines the basic configuration for the Broker and MQTT Client.
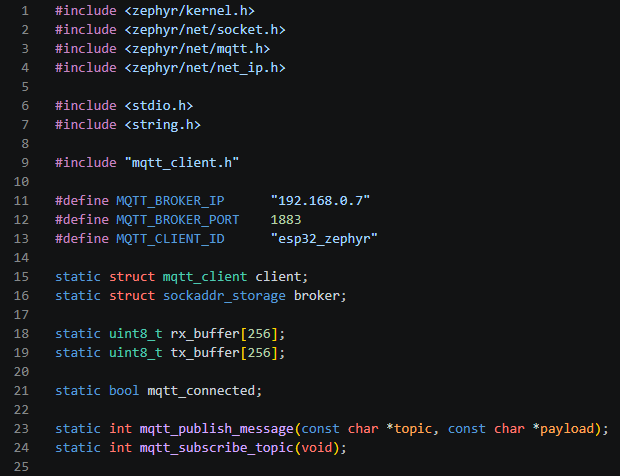
First, we define the Broker information and Client ID required for MQTT communication.
#define MQTT_BROKER_IP      "192.168.0.7"
#define MQTT_BROKER_PORT    1883
#define MQTT_CLIENT_ID      "esp32_zephyr"
MQTT_BROKER_IP is the IP address of the Orange Pi One on which the Mosquitto MQTT Broker is running.
MQTT_BROKER_PORT specifies the port number used for MQTT communication. Here, we use Mosquitto’s default MQTT port, 1883.
MQTT_CLIENT_ID is a name used to identify the Client connecting to the MQTT Broker. In this lab, the ESP32 Client ID is set to esp32_zephyr.
Next, we declare variables to store information about the MQTT Client and Broker.
static struct mqtt_client client;
static struct sockaddr_storage broker;
client is a struct mqtt_client structure provided by Zephyr and manages the configuration and current communication state of the MQTT Client.
broker stores network address information such as the IP address and port number of the MQTT Broker to which the Client will connect.
We also prepare the transmit and receive buffers used for MQTT communication.
static uint8_t rx_buffer[256];
static uint8_t tx_buffer[256];
rx_buffer is used to process MQTT data received from the Broker, while tx_buffer is used to process MQTT data sent to the Broker. In this lab, a 256-byte buffer is used for each.
Finally, we declare a variable to keep track of the connection status with the Broker.
static bool mqtt_connected;This variable is set to true when the connection to the MQTT Broker is successfully established. The program then checks this value to publish messages only while the Broker connection is active.
The following two functions are implemented later in the file, so we first declare their function prototypes.
static int mqtt_publish_message(const char *topic, const char *payload);
static int mqtt_subscribe_topic(void);
mqtt_publish_message() publishes a message to the specified Topic, while mqtt_subscribe_topic() subscribes to the Topic from which the ESP32 will receive messages.
After preparing the basic information required for MQTT communication, we will next implement the MQTT Event Handler.
MQTT Event Handler
When the connection state of the MQTT Client changes or a message is received, Zephyr’s MQTT library generates an Event.
In this program, these events are handled by the mqtt_evt_handler() function.
The following is the code for the mqtt_evt_handler() function.
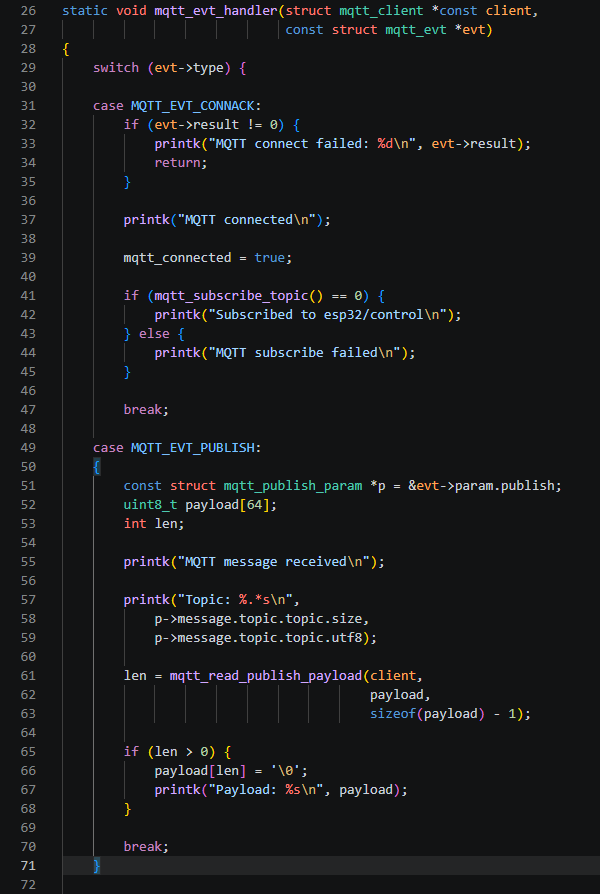
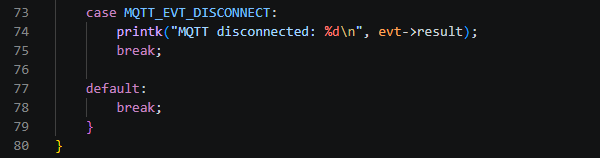
The type of MQTT Event is passed through evt->type, and the switch statement performs the appropriate operation for each Event.
MQTT_EVT_CONNACK
MQTT_EVT_CONNACK occurs when the ESP32 receives a connection response from the Broker after requesting a connection to the MQTT Broker.
If evt->result is 0, the connection to the Broker has been successfully established.
Once the connection is complete, mqtt_connected is set to true, and mqtt_subscribe_topic() is then called to subscribe to the esp32/control Topic.
In other words, immediately after the MQTT connection is established, the ESP32 is configured to be ready to receive control messages.
MQTT_EVT_PUBLISH
MQTT_EVT_PUBLISH occurs when a message is delivered to a Topic to which the ESP32 has subscribed.
First, the received message information is obtained from evt->param.publish.
The received Topic information is stored in p->message.topic.topic, so printk() is used to print the Topic name.
The actual message content, or Payload, is read using the following function:
mqtt_read_publish_payload()After reading the data, '\0' is added to the end so that the Payload can be handled and printed as a string.
For example, if a message such as ON is published to the esp32/control Topic, the ESP32 can receive and display it as follows.
MQTT message received
Topic: esp32/control
Payload: ON
Therefore, this Event is the key part that processes MQTT messages delivered from the Broker to the ESP32.
MQTT_EVT_DISCONNECT
When the MQTT connection to the Broker is terminated, the MQTT_EVT_DISCONNECT Event occurs.
In the current program, only the fact that the connection has been terminated and the result value are printed.
In this way, mqtt_evt_handler() is a Callback function that handles important MQTT state changes such as Broker connection completion, message reception, and disconnection.
Next, we will examine the broker_init() function, which configures the actual IP address and port of the Broker.
Broker Initialization
The broker_init() function configures the network address of the MQTT Broker to which the ESP32 will connect.
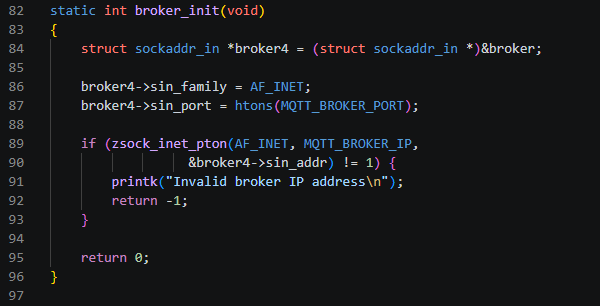
First, the previously declared broker variable is used as a sockaddr_in structure for storing an IPv4 address.
struct sockaddr_in *broker4 = (struct sockaddr_in *)&broker;Next, the address family and port number used to communicate with the Broker are configured.
broker4->sin_family = AF_INET;
broker4->sin_port = htons(MQTT_BROKER_PORT);
AF_INET indicates that IPv4 is used, and MQTT_BROKER_PORT is set to 1883, as defined earlier.
The htons() function converts the port number to the Network Byte Order used for network communication.
Next, the Broker IP address defined as a string is converted into an actual network address format.
zsock_inet_pton(AF_INET, MQTT_BROKER_IP,
                &broker4->sin_addr)
In this program, MQTT_BROKER_IP is defined as follows:
#define MQTT_BROKER_IP "192.168.0.7"Therefore, zsock_inet_pton() converts the string "192.168.0.7" into an IPv4 network address and stores it in broker4->sin_addr.
If the conversion fails, an error message is printed and the function returns -1.
In summary, the role of broker_init() is to prepare the IP address and port of the Mosquitto MQTT Broker in a network address format that can be used by Zephyr’s MQTT Client.
Next, we will examine the client_init() function, which configures the Zephyr MQTT Client itself using this Broker information.
MQTT Client Initialization
The client_init() function initializes Zephyr’s MQTT Client and configures various settings required to connect to the Broker.
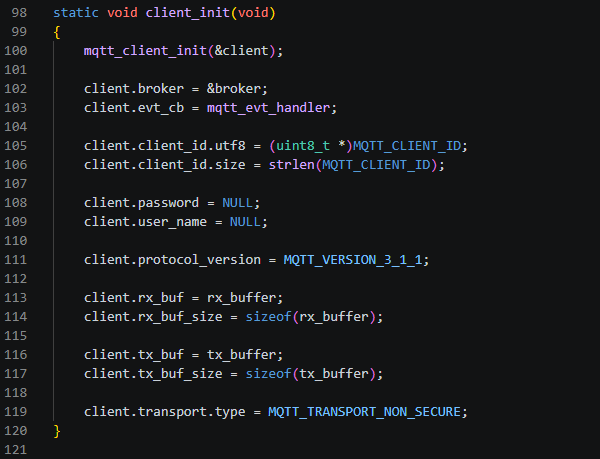
First, mqtt_client_init() is called to initialize the MQTT Client structure with its default values.
mqtt_client_init(&client);Next, the Broker address configured earlier in broker_init() and the MQTT Event Handler are registered.
client.broker = &broker;
client.evt_cb = mqtt_evt_handler;
client.broker is assigned the address of the Broker to connect to, and the mqtt_evt_handler() function described earlier is registered in client.evt_cb.
Therefore, whenever an MQTT Event such as a Broker connection or message reception occurs, mqtt_evt_handler() is called.
Next, we configure the MQTT Client ID.
client.client_id.utf8 = (uint8_t *)MQTT_CLIENT_ID;
client.client_id.size = strlen(MQTT_CLIENT_ID);
Earlier, MQTT_CLIENT_ID was defined as follows:
#define MQTT_CLIENT_ID "esp32_zephyr"Therefore, this ESP32 connects to the Broker using the Client ID esp32_zephyr. The MQTT Broker uses the Client ID to distinguish between connected MQTT Clients.
In this lab, we do not use separate user authentication, so the user name and password are set to NULL.
client.password = NULL;
client.user_name = NULL;
For the MQTT Protocol Version, we use MQTT 3.1.1.
client.protocol_version = MQTT_VERSION_3_1_1;Next, we configure the receive and transmit buffers used for MQTT communication.
client.rx_buf = rx_buffer;
client.rx_buf_size = sizeof(rx_buffer);

client.tx_buf = tx_buffer;
client.tx_buf_size = sizeof(tx_buffer);
The rx_buffer and tx_buffer, each declared earlier as 256 bytes, are assigned as the receive and transmit buffers of the MQTT Client.
Finally, we configure the MQTT transport type.
client.transport.type = MQTT_TRANSPORT_NON_SECURE;MQTT_TRANSPORT_NON_SECURE specifies a standard TCP connection without TLS. Therefore, this lab uses the standard MQTT port 1883 to connect to the Broker.
In summary, client_init() configures all the information required for the MQTT Client to connect to the Broker, including the Broker address, Event Callback, Client ID, Protocol Version, transmit/receive buffers, and Transport Type.
Now that the Broker and MQTT Client configurations are ready, we will next examine the process of actually connecting to the Broker and starting the MQTT communication in mqtt_app_start().
MQTT Broker Connection and Processing Loop
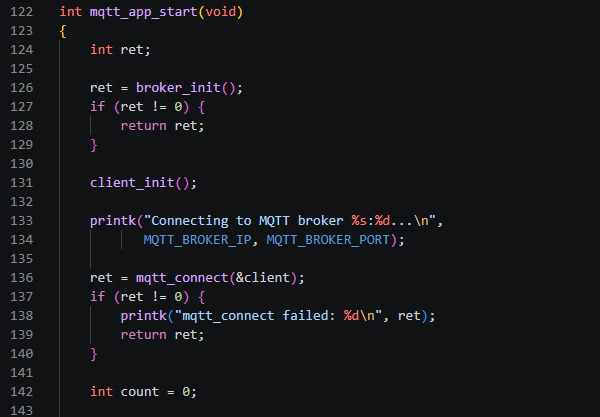
The mqtt_app_start() function initializes the Broker and MQTT Client configured earlier and then connects to the actual Mosquitto MQTT Broker. After the connection is established, a loop repeatedly processes incoming MQTT messages, maintains the connection, and periodically publishes messages.
First, initialize the Broker and MQTT Client.
ret = broker_init();
if (ret != 0) {
    return ret;
}

client_init();
broker_init() configures the Broker’s IP address and port, while client_init() configures the information required by the MQTT Client.
Next, call mqtt_connect() to request a connection to the Broker.
printk("Connecting to MQTT broker %s:%d...\n",
       MQTT_BROKER_IP, MQTT_BROKER_PORT);

ret = mqtt_connect(&client);
if (ret != 0) {
    printk("mqtt_connect failed: %d\n", ret);
    return ret;
}
An important point here is that even if mqtt_connect() succeeds, the mqtt_connected variable discussed earlier does not immediately become true.
The Client must first receive the MQTT connection acknowledgment packet, CONNACK, from the Broker. When this packet is processed through mqtt_input(), the MQTT_EVT_CONNACK Event is generated.
In the Event Handler implemented earlier, the connection state is changed as follows at this point:
mqtt_connected = true;Then, mqtt_subscribe_topic() is called to subscribe to the esp32/control Topic.
Therefore, the connection process can be understood as follows:
mqtt_connect() → Broker Connection Request → CONNACK Reception → MQTT_EVT_CONNACK → Subscribe
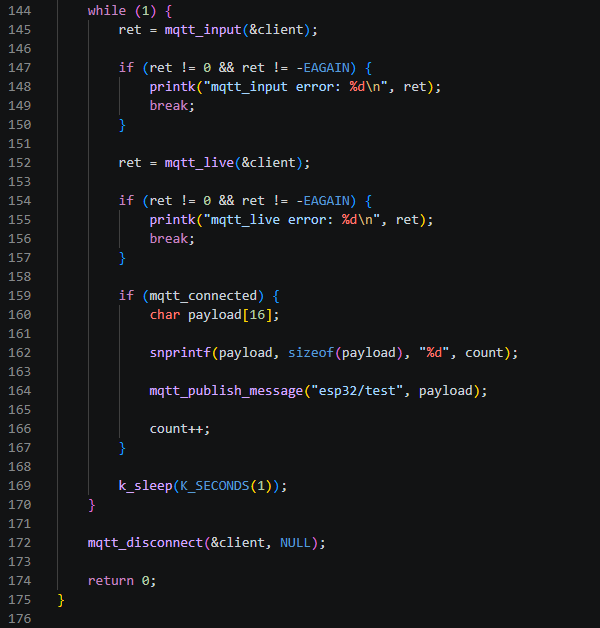
After that, the program continuously processes MQTT communication in a while loop.
while (1) {
    ret = mqtt_input(&client);

    if (ret != 0 && ret != -EAGAIN) {
        printk("mqtt_input error: %d\n", ret);
        break;
    }

    ret = mqtt_live(&client);

    if (ret != 0 && ret != -EAGAIN) {
        printk("mqtt_live error: %d\n", ret);
        break;
    }

    ...
}
mqtt_input() processes MQTT packets received from the Broker. Events such as MQTT_EVT_CONNACK and MQTT_EVT_PUBLISH, which we examined earlier, are generated when the corresponding received packets are processed by this function.
if (mqtt_connected) {
    char payload[16];

    snprintk(payload, sizeof(payload), "%d", count);

    mqtt_publish_message("esp32/test", payload);

    count++;
}

k_sleep(K_SECONDS(1));
The count value is converted to a string and then published to the esp32/test Topic. As a result, the Broker receives values such as:
esp32/test → 0
esp32/test → 1
esp32/test → 2
esp32/test → 3
...
These numbers do not have any special meaning. In this lab, they are simply test data used to verify that the ESP32 is successfully publishing MQTT messages.
If the loop terminates due to an error or another condition, the connection to the Broker is finally closed.
mqtt_disconnect(&client, NULL);Therefore, mqtt_app_start() can be considered the main function of the MQTT program, responsible for establishing the MQTT Broker connection, processing incoming packets and Keep Alive operations, and periodically publishing Test Data.
The following is the complete code for the mqtt_app_start() function.
Publishing MQTT Messages
The mqtt_publish_message() function is responsible for publishing an MQTT message to a specified Topic.
Since the function accepts the Topic and Payload as parameters, the same function can be used to send different types of data to multiple Topics.
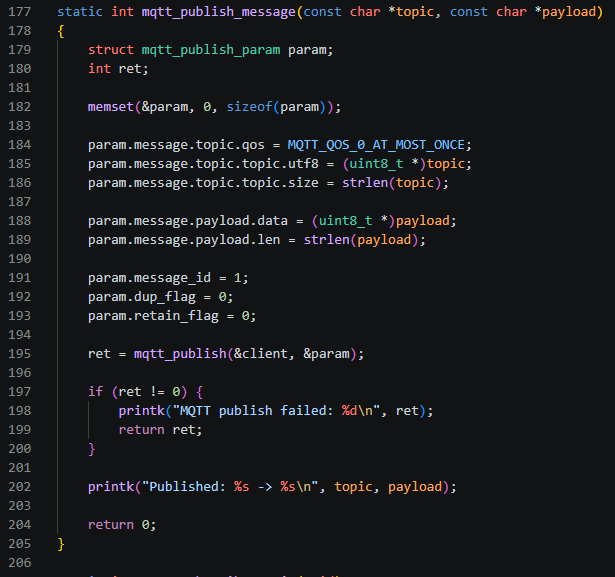
First, declare and initialize the mqtt_publish_param structure, which stores the information required for MQTT Publish.
struct mqtt_publish_param param;
memset(¶m, 0, sizeof(param));Next, configure the Topic and QoS for the message to be published.
param.message.topic.qos = MQTT_QOS_0_AT_MOST_ONCE;
param.message.topic.topic.utf8 = (uint8_t *)topic;
param.message.topic.topic.size = strlen(topic);
In this lab, we use QoS 0.
MQTT_QOS_0_AT_MOST_ONCE is the simplest transmission method, where a message is sent once without requiring acknowledgment of its reception. Therefore, it has low communication overhead but does not guarantee message delivery.
The actual data to be transmitted is configured as the Payload.
param.message.payload.data = (uint8_t *)payload;
param.message.payload.len = strlen(payload);
An MQTT message basically requires information about which Topic the message should be sent to and what data should be sent.
For example, if the function is called as follows:
mqtt_publish_message("esp32/test", "10");The Topic is esp32/test, and "10" becomes the Payload.
Next, configure the remaining Publish parameters.
param.message_id = 1;
param.dup_flag = 0;
param.retain_flag = 0;
dup_flag indicates whether the message is a retransmitted message, while retain_flag specifies whether the Broker should store the message as a Retained Message. In this lab, neither option is used, so both are set to 0.
Once the configuration is complete, call mqtt_publish() to actually send the message to the Broker.
ret = mqtt_publish(&client, ¶m);If the transmission is successful, the Topic and Payload are printed so that the transmitted data can be verified.
Published: esp32/test -> 0
Published: esp32/test -> 1
Published: esp32/test -> 2
Therefore, in this program, the ESP32 acts as a Publisher, and esp32/test is the Publish Topic.
The mqtt_publish_message() function configures the Topic, Payload, QoS, and other information required for an MQTT message, and then sends the message to the Broker using Zephyr’s mqtt_publish() API.
Next, we will examine the mqtt_subscribe_topic() function, which registers the ESP32 to receive messages published to the esp32/control Topic.
Subscribing to MQTT Topics
The mqtt_subscribe_topic() function is responsible for subscribing to a specific Topic so that the ESP32 can receive messages from the Broker.
In this program, the ESP32 subscribes to the esp32/control Topic.
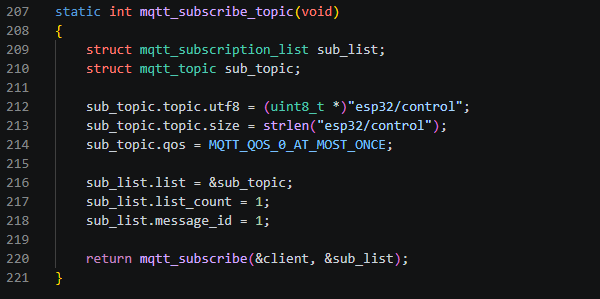
First, declare an mqtt_topic structure to store the information about the Topic to subscribe to.
struct mqtt_topic sub_topic;Next, configure the Topic and QoS.
sub_topic.topic.utf8 = (uint8_t *)"esp32/control";
sub_topic.topic.size = strlen("esp32/control");
sub_topic.qos = MQTT_QOS_0_AT_MOST_ONCE;
therefore, the ESP32 subscribes to the esp32/control Topic using QoS 0.
Next, the Topic to subscribe to is registered in an mqtt_subscription_list structure.
sub_list.list = &sub_topic;
sub_list.list_count = 1;
sub_list.message_id = 1;
list specifies the Topic information to subscribe to, while list_count indicates the number of Topics to be registered. Since only the esp32/control Topic is subscribed to in this example, it is set to 1.
Once the configuration is complete, mqtt_subscribe() is called to send a Subscribe request to the Broker.
return mqtt_subscribe(&client, &sub_list);This function is called when the MQTT_EVT_CONNACK Event described earlier occurs. Therefore, the ESP32 subscribes to the esp32/control Topic after the connection to the Broker has been successfully established.
After that, when another MQTT Client publishes a message to the esp32/control Topic, the Broker delivers the message to the ESP32.
The communication flow is as follows:
Another MQTT Client → Publish (esp32/control) → Mosquitto Broker → ESP32
When the message arrives at the ESP32, the MQTT_EVT_PUBLISH Event described earlier is generated, and the Event Handler reads and processes the Topic and Payload.
Therefore, in this program, the ESP32 performs two roles simultaneously:
Publish
esp32/test → Sends Test Data every second
Subscribe
esp32/control → Receives control messages sent from external devices
This completes our examination of the main functions of mqtt_client.c. As a single MQTT Client, the ESP32 performs the roles of both Publisher and Subscriber simultaneously and can exchange messages bidirectionally with other MQTT Clients through the Mosquitto Broker.
Connecting FastAPI and MQTT
In the previous section, we examined how the ESP32 connects to the Mosquitto MQTT Broker to publish and subscribe to messages.
Now, we will connect FastAPI running on the Orange Pi One to the MQTT Broker, allowing data to be exchanged between the ESP32 and the Web API.
FastAPI itself is an HTTP-based Web API server and does not directly process MQTT messages. Therefore, an MQTT Client is also run in main.py to connect to the Mosquitto Broker.
The overall structure is as follows:
ESP32 ↔ Mosquitto MQTT Broker ↔ FastAPI
Here, Mosquitto relays MQTT messages, while FastAPI connects to the Broker as an MQTT Client and simultaneously provides a Web API that can be accessed from a browser or other applications.
In this configuration, FastAPI subscribes to the esp32/test Topic and stores the values published by the ESP32. The latest received value can then be checked by calling the FastAPI API from a web browser.
In the opposite direction, FastAPI publishes a message to the esp32/control Topic, and the ESP32, which subscribes to this Topic, receives the message.
Therefore, the bidirectional communication is configured as follows:
ESP32 → FastAPI
ESP32
→ Publish: esp32/test
→ Mosquitto Broker
→ FastAPI Subscribe
→ Check the latest value in a Web Browser
FastAPI → ESP32
Web Browser
→ Call FastAPI API
→ Publish: esp32/control
→ Mosquitto Broker
→ ESP32 Subscribe
In this structure, the ESP32 and FastAPI are not directly connected to each other. Instead, both devices connect independently to the Mosquitto Broker and exchange messages based on Topics.
The advantage of this architecture is that FastAPI does not need to directly manage the ESP32’s IP address or connection information. In addition, even if devices other than the ESP32 are added or other programs are connected, the system can be easily expanded around the MQTT Broker.
Next, we will add MQTT functionality to main.py on the Orange Pi One and connect FastAPI to Mosquitto.
To modify the server’s main.py, connect to the Orange Pi One using Visual Studio Code Remote SSH.
The following is the complete code for main.py.
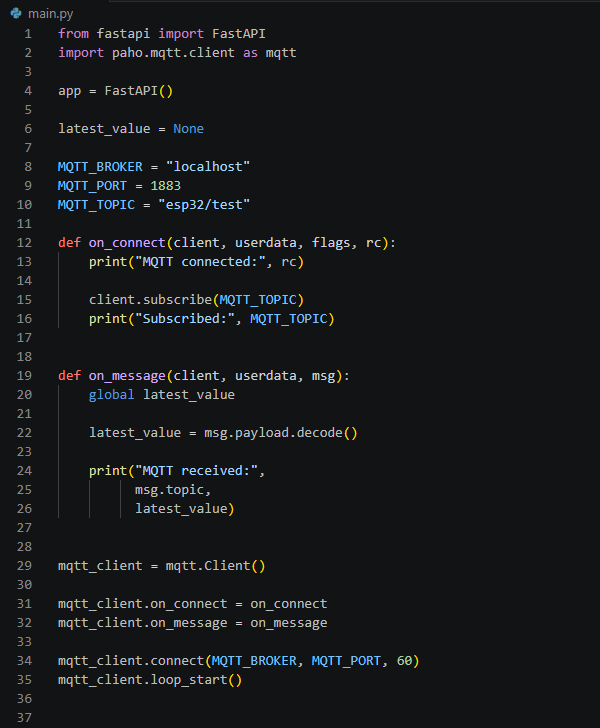
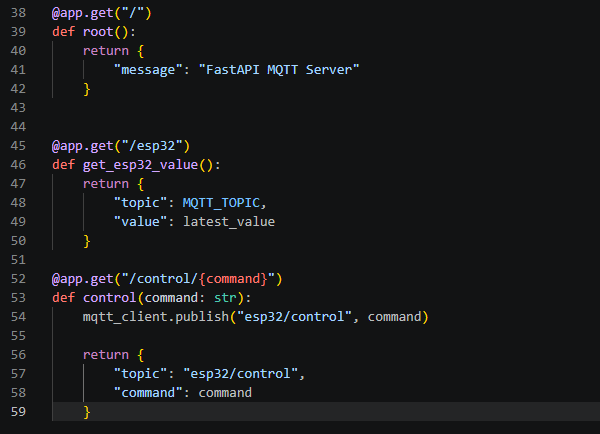
MQTT Client Setup and Message Reception
First, import the Paho MQTT Client library to use MQTT in FastAPI.
import paho.mqtt.client as mqttConfigure the MQTT Broker and the Topic to subscribe to as follows:
MQTT_BROKER = "localhost"
MQTT_PORT = 1883
MQTT_TOPIC = "esp32/test"
Since Mosquitto and FastAPI are running on the same Orange Pi One, localhost is used as the Broker address. The port is set to Mosquitto’s default MQTT port, 1883.
FastAPI subscribes to the esp32/test Topic, where the ESP32 publishes its data.
When the connection to the MQTT Broker is established, the on_connect() Callback function is called.
def on_connect(client, userdata, flags, rc):
    print("MQTT connected:", rc)

    client.subscribe(MQTT_TOPIC)
print("Subscribed:", MQTT_TOPIC)def on_message(client, userdata, msg):
global latest_value
latest_value = msg.payload.decode()
print("MQTT received:",
msg.topic,
latest_value)The received Payload is converted into a string using msg.payload.decode() and stored in latest_value.
Therefore, when the ESP32 publishes a value, the data flows as follows:
ESP32 → esp32/test → Mosquitto → FastAPI
FastAPI stores the most recently received value in latest_value.
Finally, create the MQTT Client, register the Callback functions, and connect to Mosquitto.
mqtt_client = mqtt.Client()

mqtt_client.on_connect = on_connect
mqtt_client.on_message = on_message

mqtt_client.connect(MQTT_BROKER, MQTT_PORT, 60)
mqtt_client.loop_start()
loop_start() runs MQTT network processing in a separate Thread. Therefore, MQTT messages can continue to be received while the FastAPI Web Server is running.
As a result, both the FastAPI Web Server and MQTT Client operate simultaneously within a single main.py file.
Checking and Controlling MQTT Data in FastAPI
FastAPI provides APIs that allow data received through MQTT to be checked from a web browser.
First, the root path / is used to simply verify that the server is running normally.
@app.get("/")
def root():
    return {
        "message": "FastAPI MQTT Server"
    }
When you access the root address of FastAPI from a web browser, you can see a message like the following:
{"message":"FastAPI MQTT Server"}Next, the /esp32 API returns the most recently received value from the ESP32 through MQTT.
@app.get("/esp32")
def get_esp32_value():
    return {
        "topic": MQTT_TOPIC,
        "value": latest_value
    }
The ESP32 continuously publishes numbers to the esp32/test Topic, while FastAPI subscribes to this Topic and stores the latest received value in latest_value.
Therefore, the data flow is as follows:
ESP32 → Publish esp32/test → Mosquitto → FastAPI → /esp32 → Web Browser
By accessing /esp32 from a web browser, you can check the latest MQTT value received by FastAPI.
Control in the opposite direction is handled by the /control/{command} API.
@app.get("/control/{command}")
def control(command: str):
    mqtt_client.publish("esp32/control", command)

    return {
        "topic": "esp32/control",
        "command": command
    }
The command value received from the web browser is published to the esp32/control Topic through FastAPI’s mqtt_client.publish().
Since the ESP32 is configured to subscribe to the esp32/control Topic, it receives this command through the Mosquitto Broker.
For example, when an ON command is sent from the web browser, the overall flow is as follows:
Web Browser → FastAPI → Publish esp32/control → Mosquitto → ESP32
On the ESP32, the MQTT_EVT_PUBLISH Event occurs, and the received Payload can be checked as ON.
Therefore, /esp32 and /control/{command} handle data flows in opposite directions.
/esp32: MQTT → FastAPI → Browser/control/{command}: Browser → FastAPI → MQTT
By connecting FastAPI and MQTT in this way, the browser can exchange data with the ESP32 through an HTTP API without directly using the MQTT protocol.
Ultimately, FastAPI serves as an intermediate interface between the Web and MQTT.
Build and Overall Operation Verification
ESP32 Project Build, Flash, and Execution Verification
Now that everything is ready, we can build the project and verify its operation.
As with the previous project, copy the Build command from CHANGELOG.md and run it.
Of course, this command must be executed after moving to the folder of the corresponding project.
The Build command is as follows:
west build -b skpang_esp32_can/esp32/procpu -p always -- -DBOARD_ROOT="D:/Zephyr/workspace/my_boards"The following screen shows that the Build was completed successfully.
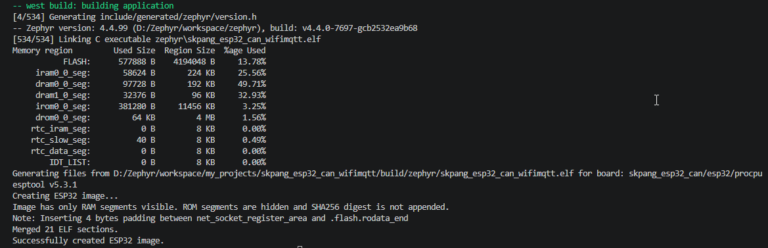
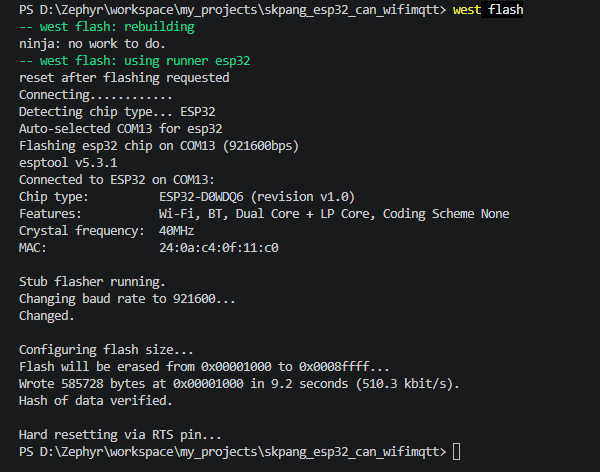
Next, run west flash to download the firmware to the target board.
west flashWhen a message like the following appears, the firmware has been downloaded successfully.
Open the Console to verify the operation.
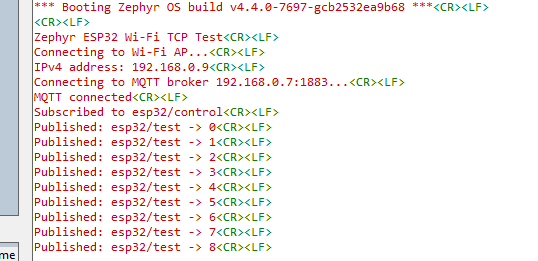
From the Console output, we can confirm that the ESP32 successfully connects to Wi-Fi and is assigned the IP address 192.168.0.9.
The ESP32 then connects to the Mosquitto MQTT Broker running on the Orange Pi One at 192.168.0.7:1883. The following messages confirm that the MQTT connection and Topic subscription were completed successfully.
MQTT connected
Subscribed to esp32/control
After that, numbers such as 0, 1, and 2 are continuously published to the esp32/test Topic at one-second intervals.
Published: esp32/test -> 0
Published: esp32/test -> 1
Published: esp32/test -> 2
...
So far, we have confirmed that the MQTT connection and Publish operation in the ESP32 → Mosquitto MQTT Broker direction are working correctly.
Next, we will use MQTT Explorer to verify that the esp32/test messages are actually being delivered to the Broker.
Verifying Message Reception in MQTT Explorer
Next, we will use MQTT Explorer, an MQTT tool for Windows, to verify that messages published by the ESP32 are being received.
Enter 192.168.0.7 as the Host and 1883 as the Port, and then click CONNECT.
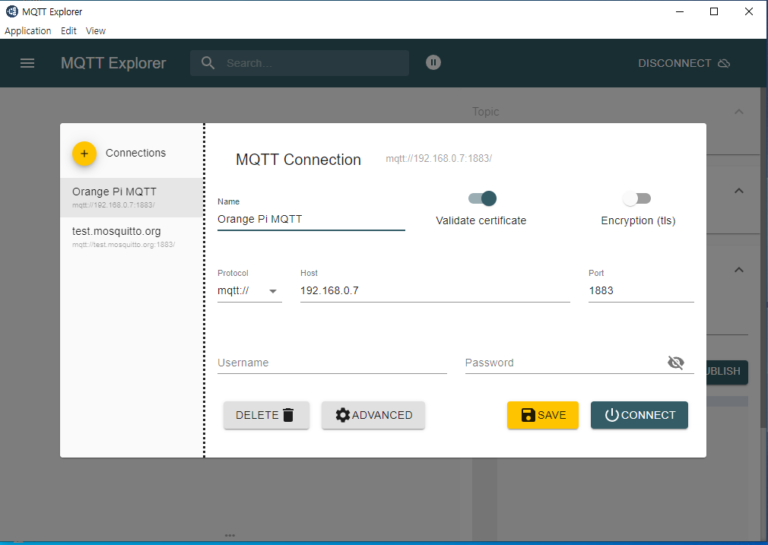
When you click the CONNECT button, the following screen appears.
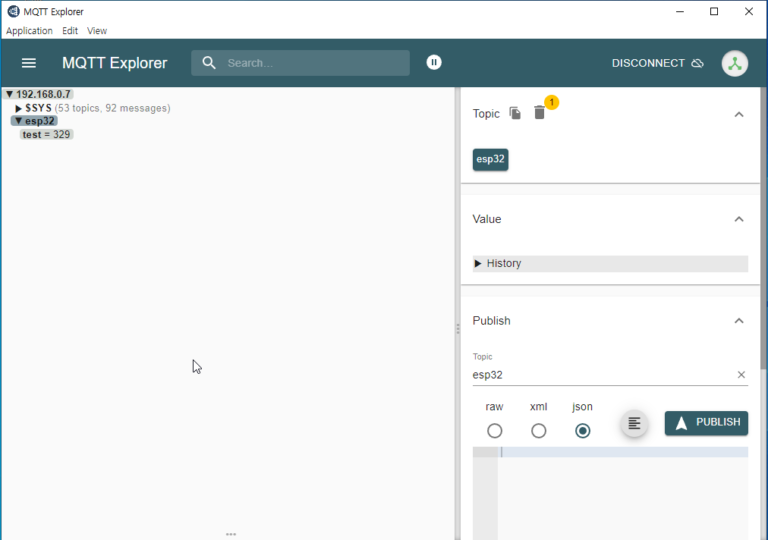
Under the esp32 Topic, you can see that test = 329 is displayed.
The ESP32 continuously publishes an incrementing number to the esp32/test Topic every second, and MQTT Explorer displays the latest value received for that Topic.
The following screen captures MQTT Explorer and the ESP32 Console together.
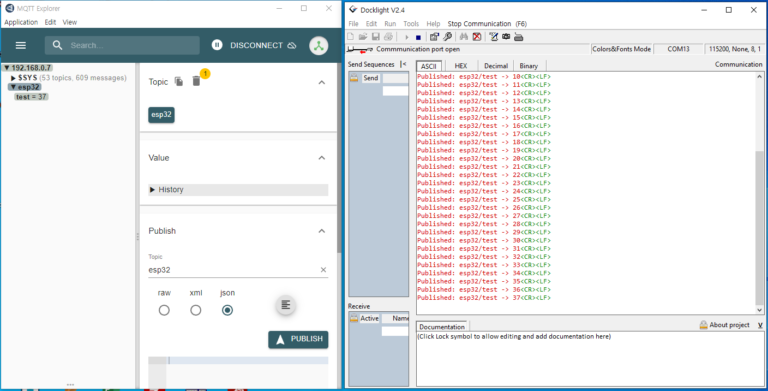
The last value published in the ESP32 Console is 370, which matches the value 370 shown for esp32/test in MQTT Explorer.
This confirms that the MQTT messages published by the ESP32 are being successfully delivered through the Mosquitto Broker.
Publishing Messages from MQTT Explorer
Next, we will publish a message from MQTT Explorer and verify that the ESP32 receives it.
Set the Topic to esp32/control, enter On or Off in the message input field, and click the PUBLISH button. The message is then published, and the ESP32 receives it through the Broker.
The ESP32 is already subscribed to the esp32/control Topic in the program.
The following screen shows the test in operation.
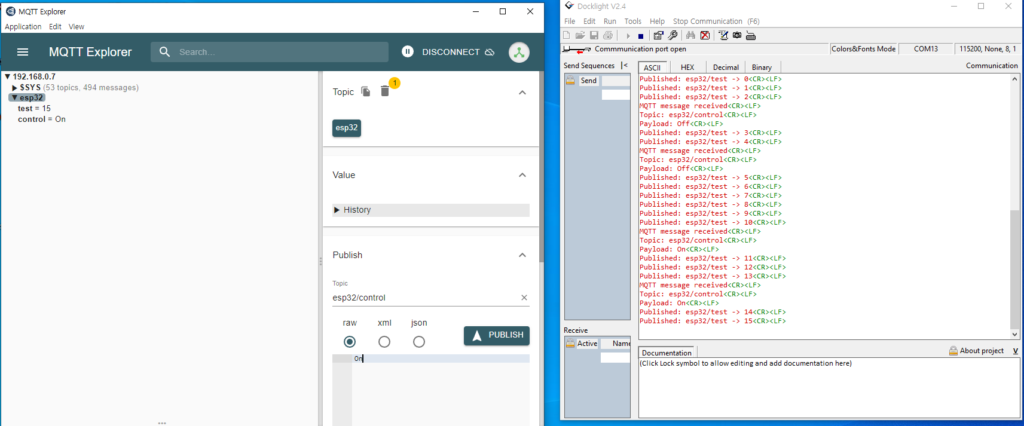
When the On message is published to the esp32/control Topic from MQTT Explorer, the Mosquitto MQTT Broker delivers the message to the ESP32, which is subscribed to that Topic.
On the ESP32 Console, the received Topic and Payload can be verified as follows:
MQTT message received
Topic: esp32/control
Payload: On
Therefore, the message flow is as follows:
MQTT Explorer → Publish (esp32/control) → Mosquitto MQTT Broker → ESP32
Previously, we confirmed that the ESP32 publishes messages to the esp32/test Topic. This time, we verified communication in the opposite direction by confirming that the ESP32 receives messages published to the esp32/control Topic.
Through these tests, we can confirm that bidirectional MQTT communication between the ESP32 ↔ Mosquitto MQTT Broker is working correctly.
Verifying Bidirectional Communication Between FastAPI and MQTT
This step is the final goal of this project.
When the ESP32 publishes an MQTT message, the value can be checked in a web browser through FastAPI. In the opposite direction, a command entered from the web browser can be published as an MQTT message through FastAPI and received by the ESP32.
On the Orange Pi One, the Mosquitto MQTT Broker and FastAPI Web Server run together, while FastAPI also acts as an MQTT Client.
Therefore, the overall bidirectional data flow is as follows:
ESP32 → Mosquitto → FastAPI → Web Browser
Web Browser → FastAPI → Mosquitto → ESP32
Now, we will verify that communication works correctly in both directions.
The first step is to start the web server.
Run the uvicorn web server from the Visual Studio Code Remote SSH Terminal.
Make sure to activate the Python virtual environment (venv) configured earlier before running the server.
The following screen shows uvicorn running.
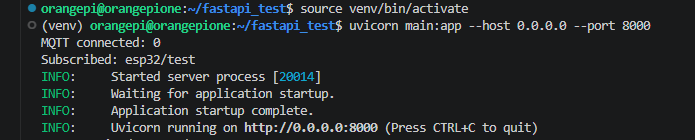
Now that the web server is running, we will use a web browser to verify that the Topic published by the ESP32 is being received correctly.
Enter the following address in the browser’s address bar:
When you access this address, "topic" and "value" are displayed as shown below.
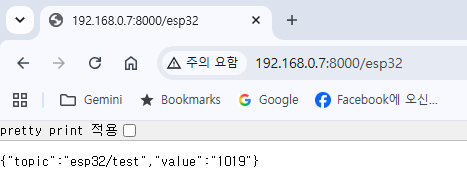
In the web browser, the topic and value most recently received by FastAPI through MQTT are displayed.
If you repeatedly refresh the page, you can see that the value continues to increase. This means that the values published by the ESP32 to the esp32/test Topic every second are being successfully delivered to FastAPI through the Mosquitto MQTT Broker.
Therefore, we have confirmed that the following data path is operating correctly:
ESP32 → Mosquitto MQTT Broker → FastAPI → Web Browser
Next, we will call the FastAPI control API from the web browser and verify that FastAPI publishes an MQTT message that is received by the ESP32.
Enter the following address in the web browser:
http://192.168.0.7:8000/control/On
The result is shown below.
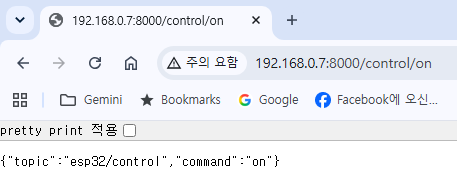
When FastAPI receives this request, it publishes an on message to the esp32/control Topic through the Mosquitto Broker.
On the ESP32 Console, you can confirm that the message is received and displayed as follows:
Topic: esp32/control, Payload: on
This time, enter /control/off in the web browser.
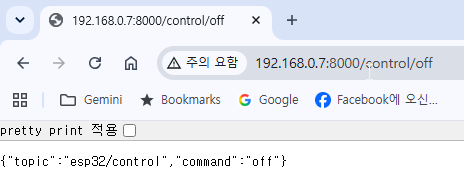
Similarly, FastAPI publishes off to the esp32/control Topic, and the ESP32 receives Payload: off.
The following is the Console output.
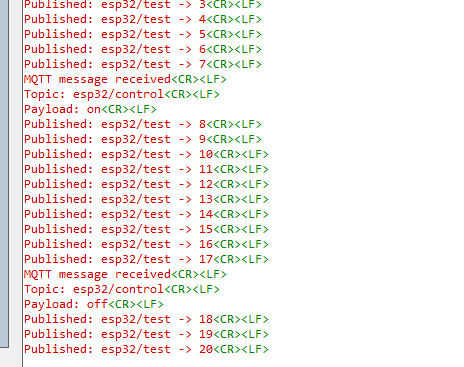
Through this test, we confirmed that communication in the following control direction is working correctly:
Web Browser → FastAPI → Mosquitto → ESP32
The ESP32 continuously publishes numbers to the esp32/test Topic while simultaneously subscribing to the esp32/control Topic to receive on and off messages.
Therefore, we have confirmed that both data transmission and control command reception can operate simultaneously through a single MQTT connection.
Conclusion
In this lab, we connected a Zephyr-based ESP32 to Wi-Fi and implemented MQTT communication using the Mosquitto Broker running on the Orange Pi.
The ESP32 periodically publishes data to the esp32/test Topic, and we verified through MQTT Explorer that the messages were successfully delivered. We also configured the ESP32 to subscribe to the esp32/control Topic and confirmed that it could receive on and off messages.
Finally, by connecting MQTT with FastAPI, we completed the following bidirectional communication structure:
ESP32 → Mosquitto → FastAPI → Web Browser
ESP32 ← Mosquitto ← FastAPI ← Web Browser
Through this structure, data generated by the ESP32 can be monitored from the Web, while commands sent from the Web can be delivered to the ESP32.
In the previous UDP and TCP labs, we examined a communication structure in which the ESP32 communicated directly with another device. In this MQTT lab, we learned how a Broker and Topics can be used to separate devices and applications while allowing them to exchange data.
Although simple numbers and on/off messages were used for testing, this structure can be extended to actual sensor data and the control of GPIOs, relays, and other devices, making it possible to build an IoT system for remote monitoring and control.
Through this lab, we implemented and verified the basic IoT communication architecture of:
Zephyr ESP32 → MQTT → FastAPI → Web