Introduction
So far, we have conducted a series of hands-on exercises using the ESP32 and Zephyr RTOS, including Wi-Fi Scan, AP connection, UDP, and TCP communication. Through these exercises, we learned the basic network communication process of connecting the ESP32 to a Wi-Fi network and exchanging data with a PC.
Starting with this article, we will expand the scope a little further and build an IoT server environment using Orange Pi and Linux.
Orange Pi is an SBC (Single Board Computer) capable of running a Linux operating system. In this article, we will install Linux on an Orange Pi and connect it to the network. We will then configure a remote access environment using SSH and build a Mosquitto MQTT Broker and FastAPI server.
Mosquitto acts as a broker that relays MQTT messages, while FastAPI provides an interface that allows a PC or web application to control IoT devices through an HTTP API. Finally, we will connect FastAPI and Mosquitto to verify a structure in which MQTT messages can be transmitted and received.
Rather than covering Linux itself in depth, this article will focus on the essential Linux commands, network configuration, SSH remote access, and basic virtual environment setup required to configure the Orange Pi as an IoT server.
This will provide the foundation for adding MQTT communication to the ESP32 later and expanding the system into an IoT architecture like the following:
PC / Web → FastAPI → Mosquitto MQTT Broker → ESP32 → IoT Device
Orange Pi as an IoT Server
Why Use Orange Pi as an IoT Server?
Although an MCU such as the ESP32 can implement simple server functions through network communication, a more scalable system is required to collect data from multiple devices or to use MQTT Broker, Web API, database, and other functions together.
Orange Pi is an SBC (Single Board Computer) based on an ARM processor that can run Linux. Unlike a typical MCU, it operates with an operating system, making it easy to install and run various software packages such as Mosquitto, Python, and FastAPI.
Its compact size and low power consumption also make it suitable for use as a small IoT server that needs to run continuously. Once a remote access environment such as SSH is configured, there is no need to keep a monitor or keyboard connected to the Orange Pi.
In this exercise, the Orange Pi will serve the following roles as an IoT server:
- Linux: Operating system environment for running server programs
- Mosquitto: Broker that relays MQTT messages between the ESP32 and the server
- FastAPI: API for accessing server functions from a PC or web application using HTTP
- SSH: Remote access method for managing the Orange Pi from a PC
With this configuration, the MCU can focus on controlling sensors and devices, while the Linux server handles communication and data processing, allowing each part to perform a clearly defined role.
I purchased this Orange Pi quite some time ago and had left it unused, but this IoT project gave me a reason to finally put it to use and explore it again.
The Orange Pi used in this project is configured as follows.
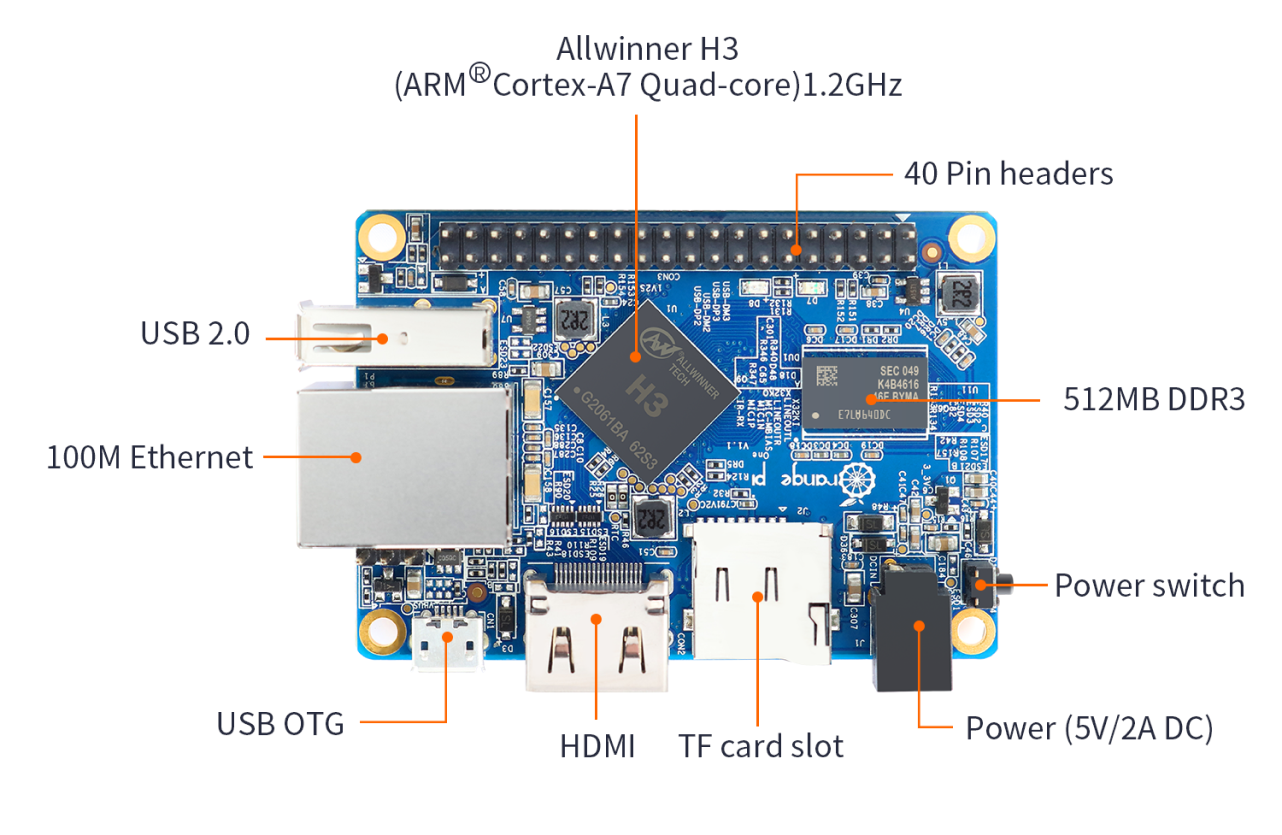
More detailed information can be found on the official Orange Pi website.
Overall System Architecture
In this exercise, we will install Linux on the Orange Pi and run both the Mosquitto MQTT Broker and FastAPI server on it.
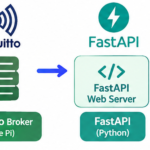
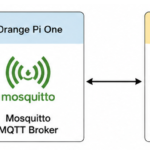
The basic architecture of the overall system is shown below.
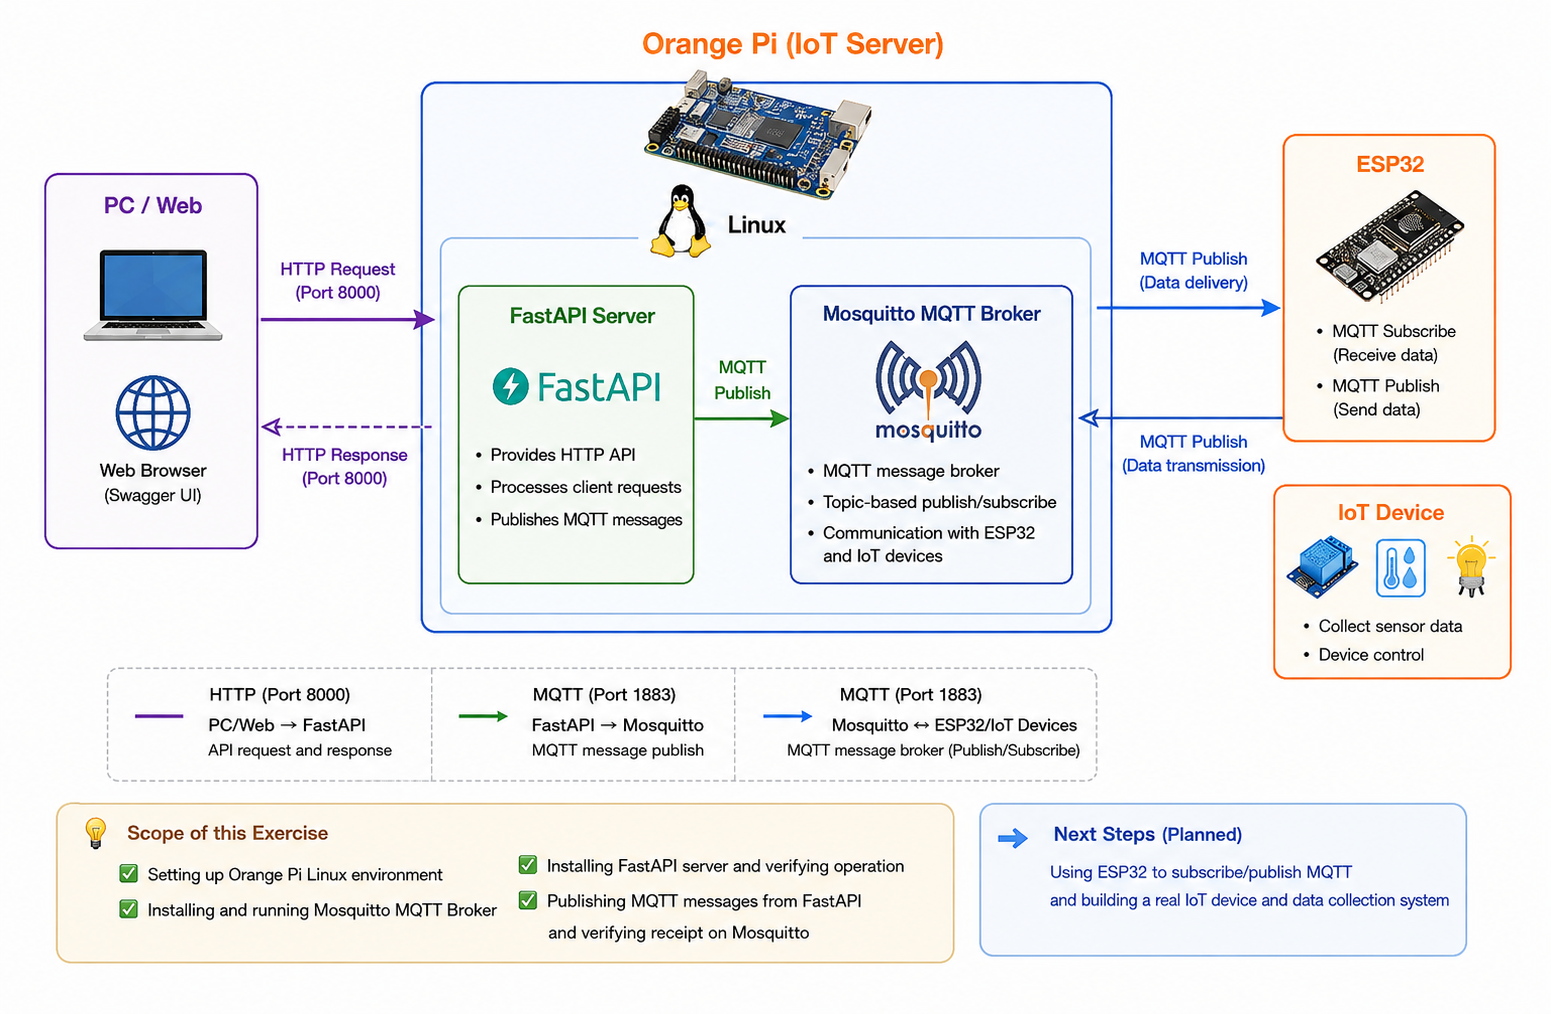
From a PC or web application, an HTTP request can be sent to FastAPI. FastAPI processes the request and, when necessary, publishes an MQTT message to the Mosquitto MQTT Broker.
Mosquitto delivers the MQTT message to an IoT device such as the ESP32 that subscribes to the corresponding topic. In the opposite direction, sensor data or device status information from the ESP32 can be published via MQTT and delivered to the Orange Pi.
In this article, we will first set up the Linux environment on the Orange Pi, install Mosquitto and FastAPI, and verify that each of them operates correctly. Finally, we will publish an MQTT message from FastAPI and confirm that the message is received by Mosquitto.
Actual MQTT communication with the ESP32 will be covered later in the Zephyr ESP32 MQTT exercise.
Therefore, this article can be considered a process of configuring the Orange Pi as a Linux-based IoT server and preparing the server-side foundation for connecting the ESP32 in the next step.
Setting Up the Orange Pi Linux Environment
Preparing Armbian Imager
To use the Orange Pi as an IoT server, we first need to prepare a Linux operating system that will run on the Orange Pi.
Unlike an MCU such as the ESP32, where compiled firmware is downloaded directly to flash memory and executed, an SBC (Single Board Computer) such as the Orange Pi installs an operating system on a storage device and boots from it.
In this exercise, we will use Armbian to set up the Linux environment on the Orange Pi. Armbian is a Linux distribution designed for ARM-based SBCs and supports a wide range of boards, including Orange Pi.
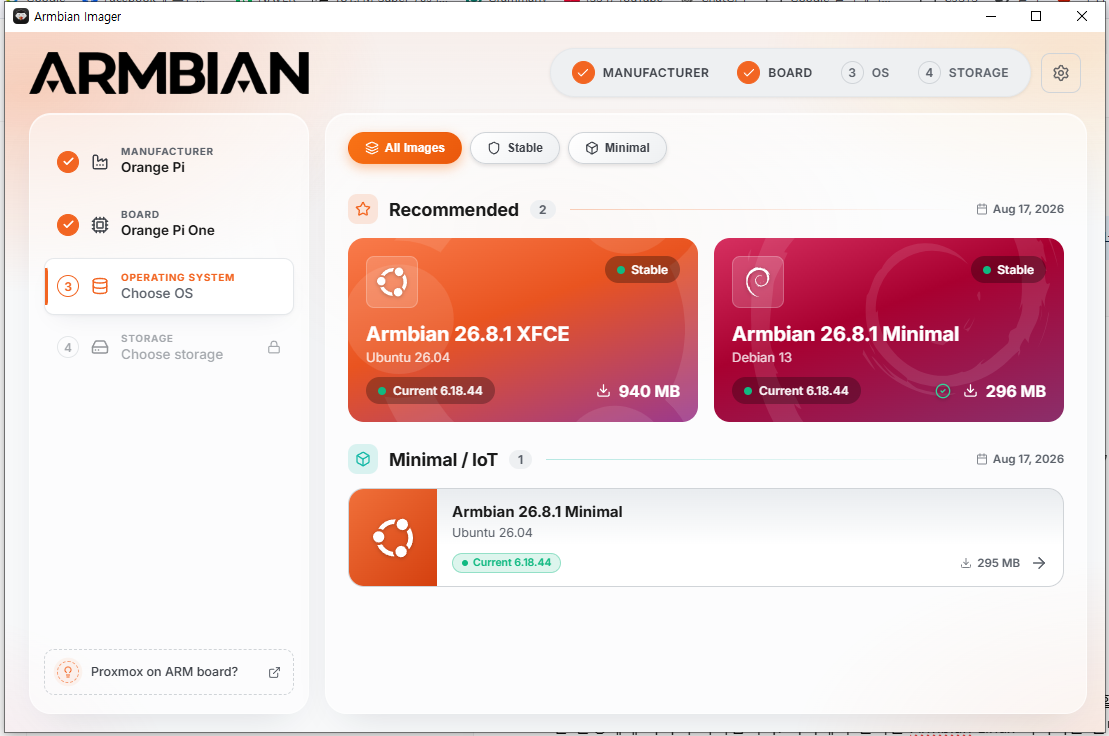
To install Linux, we first need to prepare Armbian Imager on the PC. Armbian Imager is a program that allows users to select the required Linux image and write it to a storage device such as a microSD card.
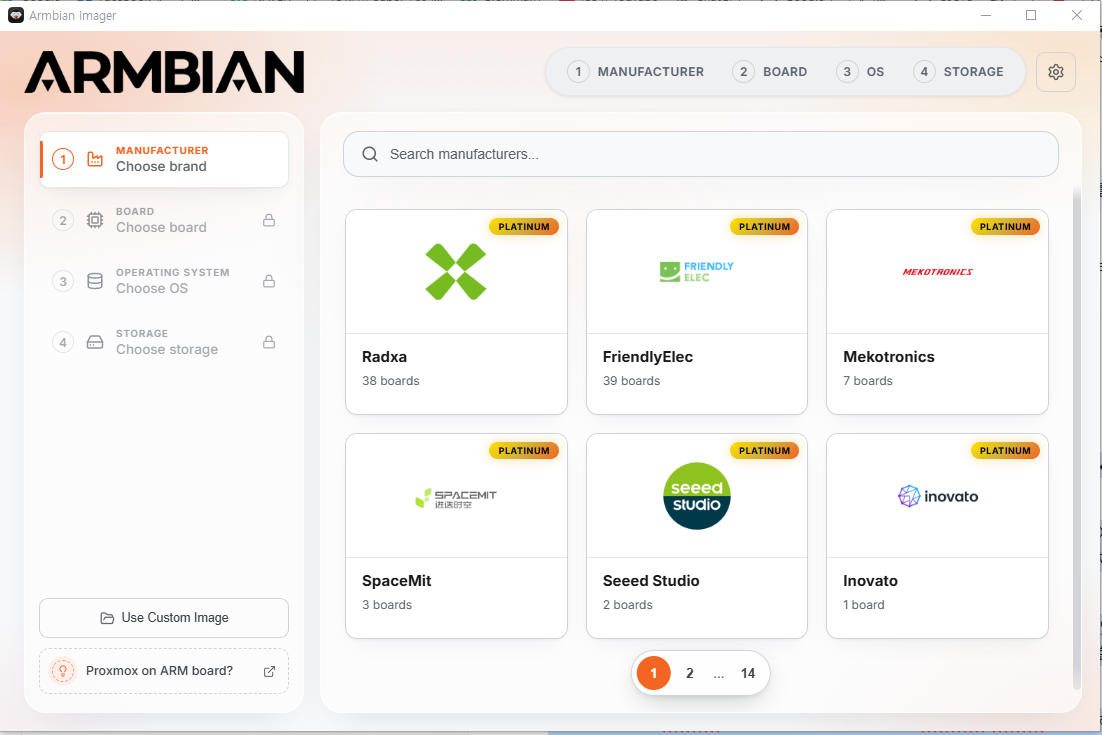
Instead of downloading the Linux image separately and then writing it to the card, Armbian Imager allows the entire process to be performed in sequence:
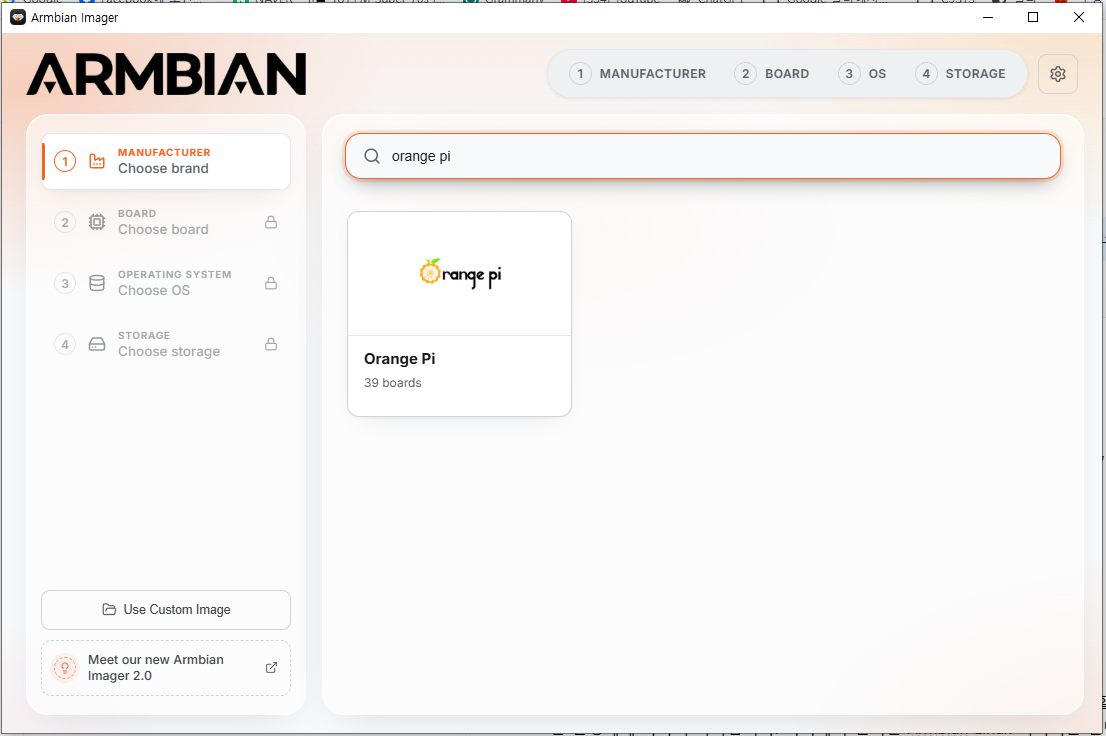
Select Manufacturer → Select Board → Select Operating System → Select Storage Device → Download Linux Image → Write to microSD Card
First, download and install Armbian Imager on the PC, and then launch it.
When Armbian Imager starts, the initial screen appears as shown below.
Booting the Orange Pi
After inserting the microSD card containing the Armbian Linux image into the Orange Pi One, connect the power.
Unlike a typical MCU board, where the user program starts running immediately after power is applied, the Orange Pi goes through the process of booting the Linux operating system installed on the microSD card. Therefore, the first boot may take some time due to initial system setup.
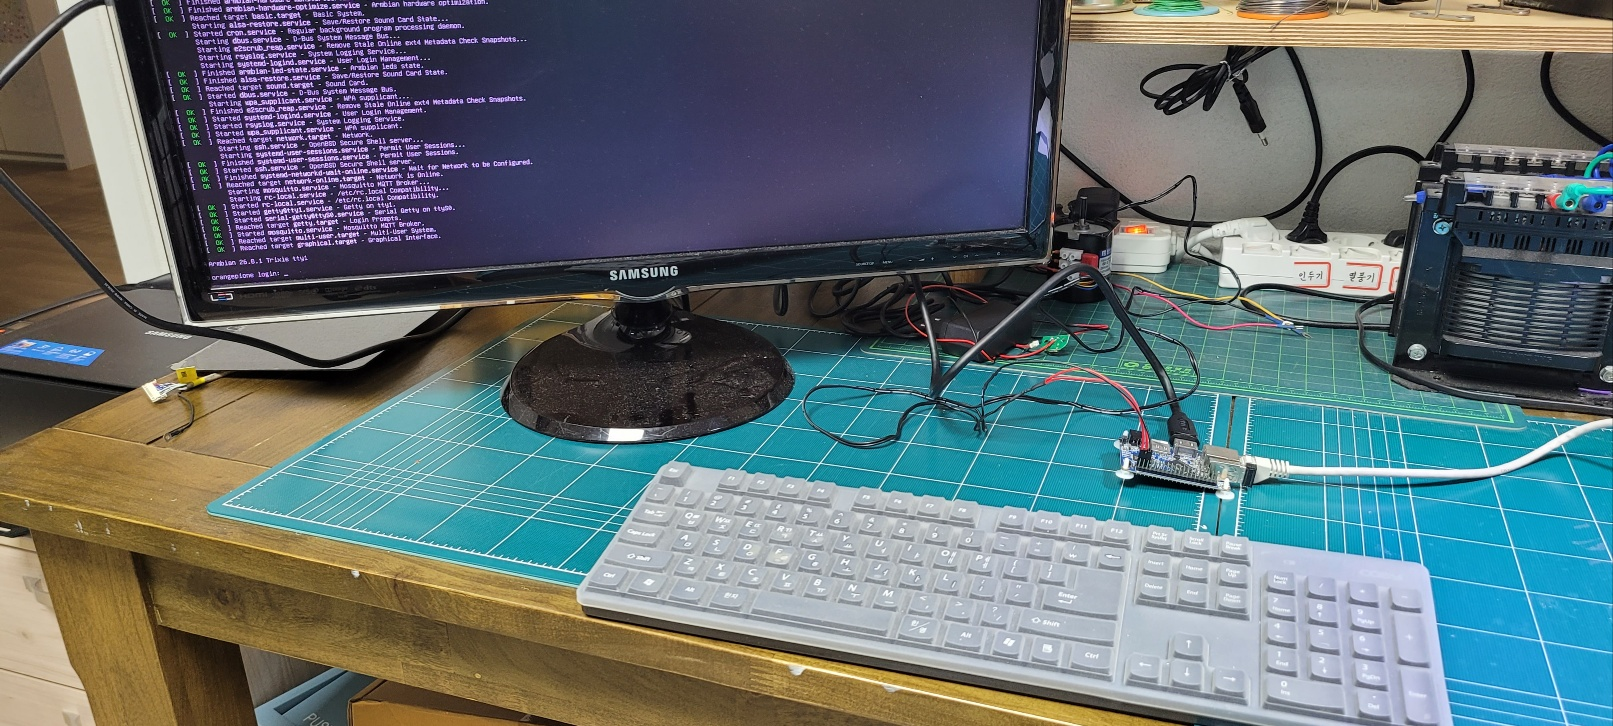
On the first boot, Armbian guides you through the initial login and user account setup process.
The initial login procedure may vary depending on the Armbian image and version. Follow the instructions displayed on the screen and enter the Login ID and Password to log in.
After the first login, you may be prompted to change the password for security or create a new standard user account.
Linux provides a root account, which has system administration privileges, and a user account, which is used for normal operations.
The root account is a superuser account that can manage the entire Linux system. It can modify all files and system settings, so it is not recommended to perform everyday tasks using the root account.
Therefore, during the initial setup process, configure the Login ID and Password for the standard user account that will be used later.
The screen below shows the system after logging in with the newly created user account.
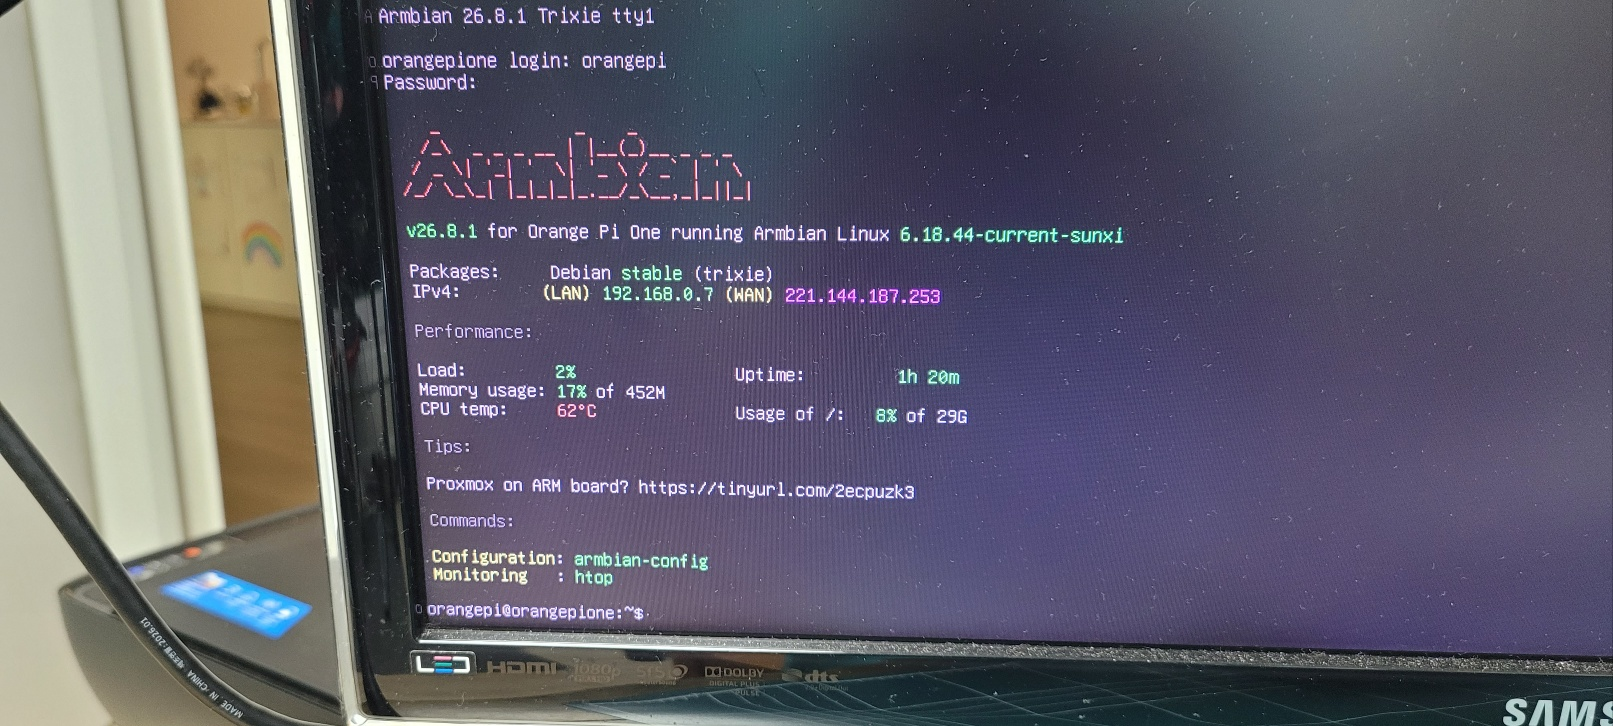
I set the user account name to orangepi.
After that, we will log in with the newly created user account and use the Orange Pi. For tasks that require administrator privileges, such as changing system settings or installing software, the sudo command can be used from the standard user account.
For example, when installing Mosquitto later, the following command will be used:
sudo apt install mosquittoHere, sudo allows a standard user to execute commands that require administrator privileges.
The Login ID and Password created during this setup process will also be used later when connecting remotely from the PC to the Orange Pi via SSH, so remember them.
Once the initial login and user account setup are complete, the basic Linux boot environment of the Orange Pi is ready.
Checking the Network Connection and IP Address
Once Linux has booted successfully on the Orange Pi, the next step is to check the network connection status and IP address.
In this exercise, the Ethernet port of the Orange Pi One is connected to a router using a LAN cable. When the network connection is established successfully, an IP address is automatically assigned to the Orange Pi through the router’s DHCP (Dynamic Host Configuration Protocol) service.
To check the network interfaces and IP addresses from the Linux terminal, use the following command:
ip addr
When the command is executed, the network interfaces currently being used by the Orange Pi and their corresponding IP addresses are displayed.
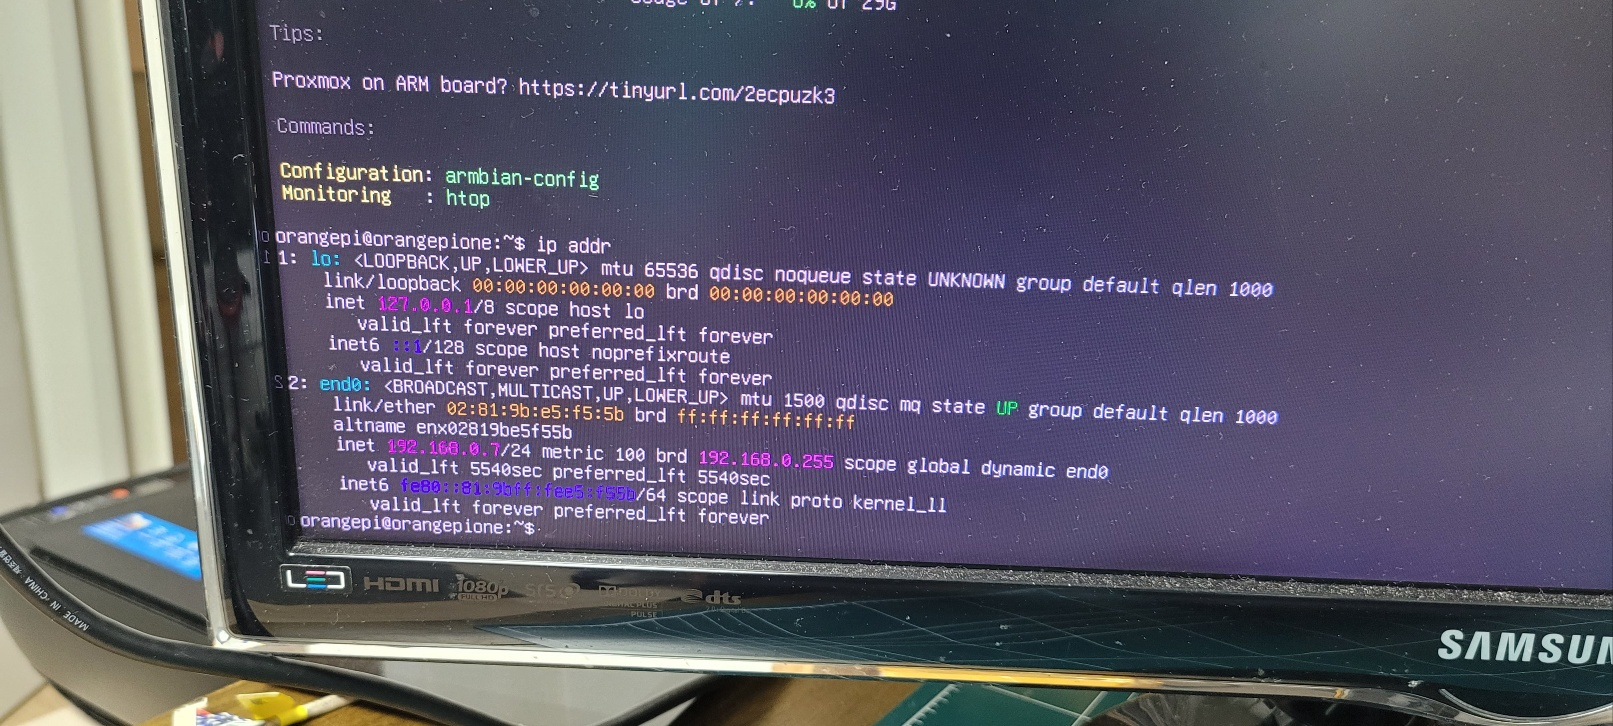
Under the Ethernet interface, check the address displayed after inet, as shown below.
inet 192.168.x.x/24Here, 192.168.x.x is the IPv4 address currently assigned to the Orange Pi.
This IP address will later be used when connecting remotely to the Orange Pi via SSH from the PC, accessing the FastAPI server, or connecting the ESP32 to the Mosquitto MQTT Broker.
If the Orange Pi and PC are connected to the same router, they are generally on the same local network, allowing the PC to communicate with the Orange Pi using its IP address.
Using DHCP makes network configuration simple because the router automatically assigns an IP address. However, when the Orange Pi is used continuously as an IoT server, its IP address may change after a reboot or depending on the network environment.
Therefore, we will first verify the initial operation using DHCP and then, if necessary, configure a Static IP so that the Orange Pi can always use the same IP address.
Now that the network connection and IP address of the Orange Pi have been confirmed, we can remotely access the Orange Pi Linux terminal via SSH from the PC without directly using a monitor and keyboard.
Connecting via SSH
Connecting via Windows PowerShell
Now that we have confirmed the Orange Pi’s network connection and IP address, we can remotely access the Orange Pi from the PC using SSH (Secure Shell).
SSH is a protocol that allows secure access to the terminal of another computer over a network. Using SSH, you can run Linux commands and manage the server directly from the PC without connecting a monitor or keyboard to the Orange Pi.
In this exercise, we will connect to the Orange Pi using PowerShell on a Windows PC.
Open PowerShell and enter the following ssh command:
ssh orangepi@192.168.x.xHere, orangepi is the Linux user account (Login ID) created earlier, and 192.168.x.x is the IP address of the Orange Pi confirmed using the ip addr command.
When connecting via SSH for the first time, a message may appear asking whether you trust the host. Check that the address belongs to the Orange Pi you want to connect to, and then enter yes.
Next, enter the password for the user account. For security reasons, Linux terminals do not display the password while you type it. The input is still being processed normally, so enter the password and press Enter.
If the connection is successful, the Orange Pi’s Linux prompt will appear in the PC’s PowerShell window as shown below.
orangepi@orangepione:~$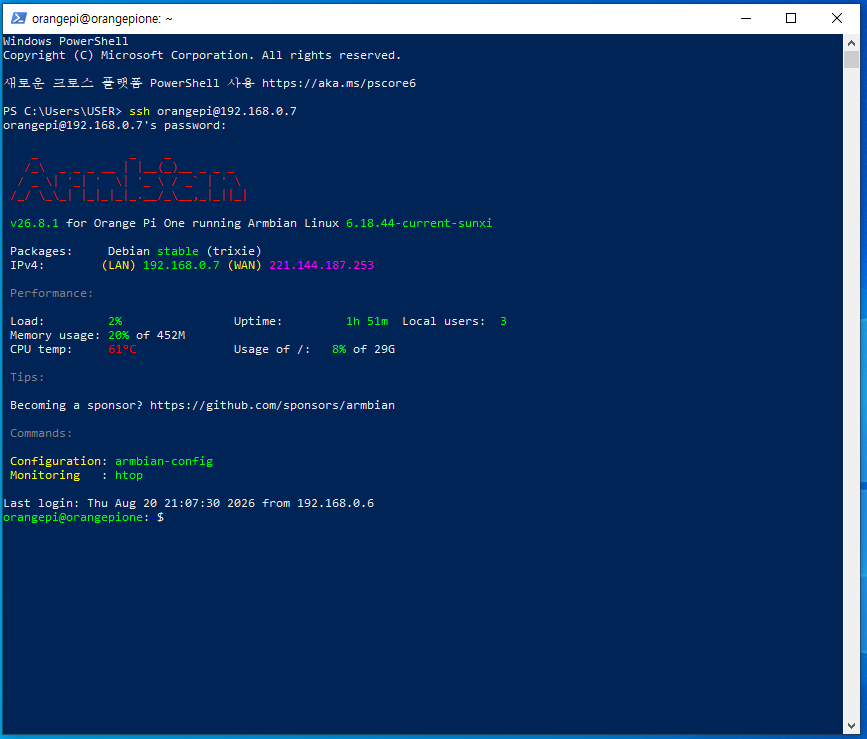
exitConnecting via VS Code Remote SSH
Once you have confirmed that the SSH connection works correctly in PowerShell, you can use the Remote – SSH feature in Visual Studio Code to make further development and configuration more convenient.
With Remote – SSH, Visual Studio Code running on the Windows PC can connect to the Orange Pi over the network. You can then directly open and edit files on the Orange Pi and use its Linux terminal from within Visual Studio Code.
First, install the Remote – SSH extension in Visual Studio Code.
The installation procedure will not be covered separately here, as there are many resources available online for reference.
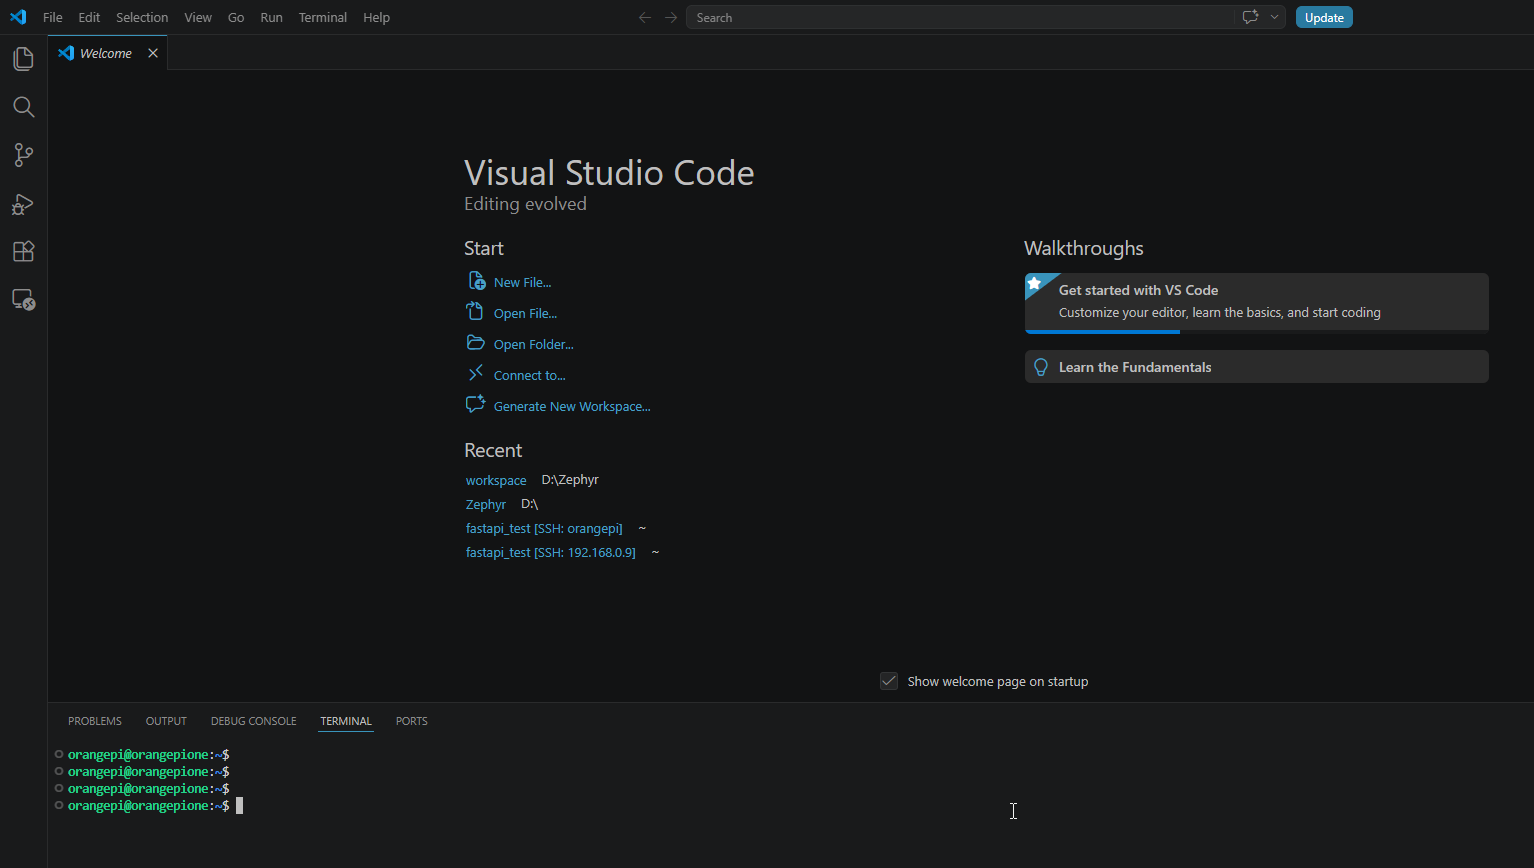
The screen below shows Visual Studio Code connected to the Orange Pi using Remote – SSH.
Checking the Linux Environment
Now that we have connected to the Orange Pi using Remote – SSH in Visual Studio Code, let’s briefly check some basic Linux commands before installing Mosquitto and FastAPI.
The purpose of this article is not to study Linux itself in detail, so we will only cover the basic commands required for the IoT server setup process.
When you open a Terminal in VS Code, you can directly use the Linux terminal of the Orange Pi.
To check the current working directory, use the pwd command.
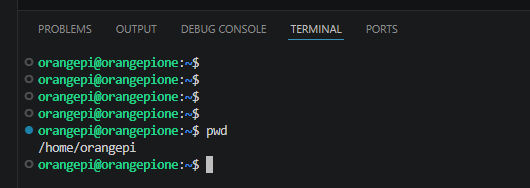
To check the files and directories in the current directory, use the ls command.

To move to another directory, use the cd command.

In Linux, required programs can be installed and managed in the form of packages. Since the Armbian distribution installed in this exercise is based on Debian Linux, it uses APT (Advanced Package Tool) for package management.
Before installing programs, you can update the information about available packages using the following command:
sudo apt update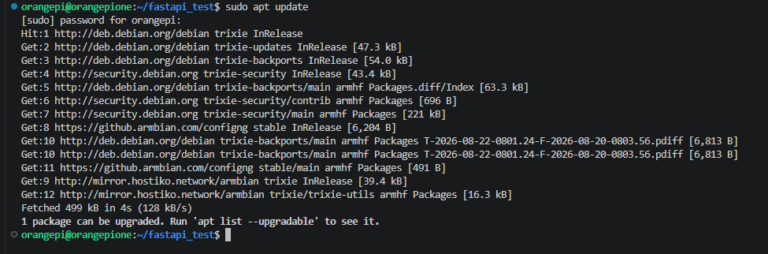
After running apt update, a message like the following may appear:
1 package can be upgraded. Run 'apt list --upgradable' to see it.This means that one of the currently installed packages can be updated to a newer version.
To check which packages can be upgraded, use the following command:
apt list --upgradableTo actually upgrade the installed packages to their latest available versions, run:
sudo apt upgradeDuring this process, a list of packages to be upgraded and the required disk space may be displayed, along with a prompt asking whether you want to continue. After reviewing the information and confirming the upgrade, the packages will be downloaded and installed.
Therefore, apt update and apt upgrade have different roles:
sudo apt update: Retrieves the latest package list from the package repositories.sudo apt upgrade: Actually upgrades the currently installed packages based on the updated package list.
When preparing a Linux system for the first time, you can run them in the following order:
sudo apt update
sudo apt upgrade
After that, required programs can be installed using the apt install command:
sudo apt install package-nameIn this exercise, we will follow the same process to update the Linux package information and prepare the required packages in their latest available state before installing the Mosquitto MQTT Broker.
Setting Up the Mosquitto MQTT Broker
Installing Mosquitto
Now that the Linux environment on the Orange Pi is ready, we will install the Mosquitto MQTT Broker.
MQTT is a lightweight messaging protocol widely used in IoT environments. Instead of devices connecting directly to each other to exchange messages, MQTT delivers messages through an intermediary called a Broker.
In this exercise, we will install Eclipse Mosquitto on the Orange Pi and use it as the MQTT Broker.
Using APT, which we covered earlier, Mosquitto can be installed easily. The Mosquitto Broker and the client tools required for MQTT communication tests can be installed with the following command:
sudo apt install mosquitto mosquitto-clientsHere, two packages are installed together:
mosquitto: MQTT Broker programmosquitto-clients: Command-line tools for testing MQTT message transmission and reception
The mosquitto-clients package includes mosquitto_pub and mosquitto_sub, which will be used later for MQTT Publish / Subscribe tests.
Mosquitto and mosquitto-clients are already installed on the Orange Pi used in this exercise, so rather than repeating the installation process, we will first check the currently installed Mosquitto packages.
Run the following command:
dpkg -l | grep mosquittoThis command searches the list of packages currently installed on Linux and displays the entries containing mosquitto.

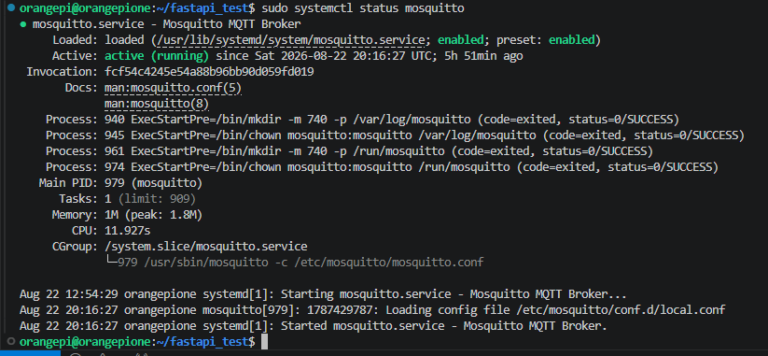
The screen above shows the result from the Orange Pi currently being used.
First, in the following section, we can confirm that the Mosquitto service has been properly registered with Linux and is configured to start automatically when the system boots.
Loaded: loaded (...; enabled; preset: enabled)Here, loaded means that the Mosquitto service has been successfully loaded, while enabled means that the Mosquitto service will start automatically when the Orange Pi boots.
The current operating status of Mosquitto can be checked in the following section:
Active: active (running)Since active (running) is displayed, we can confirm that the Mosquitto MQTT Broker is currently running normally.
We can also check the currently running Mosquitto process as follows:
Main PID: 979 (mosquitto)In Linux, each running process is assigned a PID (Process ID). In this example, Mosquitto is running as process ID 979. The PID may be different each time the program runs, so the number itself is not important.
At the bottom of the screen, the log messages generated when the Mosquitto service started are also displayed.
Loading config file /etc/mosquitto/conf.d/local.conf
Started mosquitto.service - Mosquitto MQTT Broker.
This confirms that Mosquitto read the /etc/mosquitto/conf.d/local.conf configuration file and then successfully started the MQTT Broker service.
Therefore, we can confirm that Mosquitto is registered as a Linux service on the Orange Pi, starts automatically when the Orange Pi boots, and runs in the background as an MQTT Broker.
Now that we have confirmed that the Broker itself is running normally, in the next step, we will use mosquitto_pub and mosquitto_sub to verify that actual MQTT messages are successfully delivered through the Broker.
Checking the Mosquitto Service Status
Now that Mosquitto has been installed, we will check the MQTT Broker configuration and run the service.
Mosquitto can be used in a local environment with its default configuration. However, for an external MQTT client such as a PC or ESP32 to connect to the Broker on the Orange Pi, additional configuration is required to allow network connections.
In this exercise, we will create an additional Mosquitto configuration file named local.conf and configure it to accept connections from external clients on port 1883, the default MQTT port.
Run the following command in the VS Code Terminal:
sudo nano /etc/mosquitto/conf.d/local.confnano is a simple text editor that can be used from the Linux terminal. With the command above, you can create or edit the local.conf file with administrator privileges.
Enter the following content in local.conf:
listener 1883
allow_anonymous true
listener 1883 configures Mosquitto to listen for MQTT client connections on TCP port 1883. Port 1883 is the default port commonly used for unencrypted MQTT communication.
allow_anonymous true allows MQTT clients to connect to the Broker without username and password authentication. In this exercise, this setting is used only for a simple test to verify basic MQTT operation on the local network. In an actual external network or production environment, it is recommended to use authentication and security settings.
The following shows the actual contents of the configured local.conf file.

After editing the file in nano, save it and exit in the following order:
Ctrl + O → Enter → Ctrl + X
After modifying the configuration file, restart the service to apply the changes to Mosquitto.
sudo systemctl restart mosquittoCheck whether Mosquitto has restarted successfully using the following command:
sudo systemctl status mosquittoIf the following message appears in the output, the Mosquitto MQTT Broker is running normally:
Active: active (running)You can also check messages like the following in the service status log:
Loading config file /etc/mosquitto/conf.d/local.conf
Started mosquitto.service - Mosquitto MQTT Broker.
This indicates that Mosquitto successfully read the local.conf configuration file created earlier and started the Broker service.
If enabled appears in the Loaded section, you can also confirm that the Mosquitto service is configured to start automatically when the Orange Pi boots.
If necessary, automatic startup can be enabled using the following command:
sudo systemctl enable mosquittoNow, Mosquitto on the Orange Pi is ready to operate as a Broker that can accept connections from external MQTT clients on TCP port 1883.
In the next section, we will use the mosquitto_pub and mosquitto_sub commands to actually Publish and Subscribe to MQTT messages and verify the operation of the Broker.
MQTT Publish / Subscribe Test
Now that we have checked the configuration and operating status of the Mosquitto MQTT Broker, we will actually Publish and Subscribe to MQTT messages to verify that the Broker is delivering messages correctly.
In MQTT communication, the side that sends a message is called the Publisher, and the side that receives a message is called the Subscriber. The Publisher and Subscriber do not communicate directly with each other; instead, messages are delivered through the MQTT Broker.
MQTT also uses Topics to distinguish messages.
In this test, we will use the following Topic:
test/topicFirst, open a Terminal in VS Code and run the following command to start a Subscriber:
mosquitto_sub -h localhost -t test/topicThe options have the following meanings:
mosquitto_sub: Client program for subscribing to MQTT messages-h localhost: Address of the MQTT Broker to connect to-t test/topic: MQTT Topic to subscribe to
Here, localhost refers to the Orange Pi itself, where the command is currently being executed. Therefore, this command subscribes to test/topic on the Mosquitto Broker running on the Orange Pi.
When the command is executed, no particular message appears, and the Terminal seems to be waiting for input. In fact, the Subscriber is connected to the Broker and is waiting for a message to arrive on test/topic.
In this state, open another Terminal in VS Code and run the following command:
mosquitto_pub -h localhost -t test/topic -m "Hello MQTT"Here, mosquitto_pub is the client program used to Publish MQTT messages, and the -m option specifies the message to be sent.
The command above publishes the following message to the Topic test/topic:
Hello MQTTWhen the Publisher sends the message, the Mosquitto Broker receives it and delivers it to the Subscriber that is subscribed to the same Topic.
Therefore, the following message appears in the Subscriber Terminal that was started earlier:
Hello MQTTThe structure of this process can be represented as follows.
Run Subscriber
    mosquitto_sub -h localhost -t test/topic

        |
        | Subscribe : test/topic
        ▼
    Mosquitto MQTT Broker
        |
        | Waiting for message
        |

Run Publisher
    mosquitto_pub -h localhost -t test/topic -m "Hello MQTT"

        |
        | Publish
        | Topic : test/topic
        ▼
    Mosquitto MQTT Broker
        |
        | Deliver to test/topic subscriber
        ▼
    Subscriber
        |
        ▼
        Hello MQTT
Through this test, we can confirm that the Mosquitto MQTT Broker running on the Orange Pi successfully receives a message from the Publisher and delivers it to the Subscriber.
In the current test, the Publisher, Broker, and Subscriber are all running on the same Orange Pi, so localhost was used.
However, in an actual IoT system, the Publisher and Subscriber do not need to be on the same computer. A PC or ESP32 on another device can connect to the MQTT Broker using the Orange Pi’s IP address.
For example, if the IP address of the Orange Pi is 192.168.0.70, another device can specify the Broker address as follows:
192.168.0.7This is why we configured listener 1883 in local.conf earlier, allowing external MQTT clients to connect to the Broker.
Through this test, we verified the basic MQTT message delivery process:
Publish → Broker → Subscriber
The basic environment for the Mosquitto MQTT Broker on the Orange Pi is now complete. In the next section, we will set up a FastAPI server and create an environment where the Orange Pi’s functions can be accessed via HTTP.
Setting Up the FastAPI Server
Preparing the Python Virtual Environment
Now that we have verified the basic operation of the Mosquitto MQTT Broker, we will set up a FastAPI server environment on the Orange Pi.
FastAPI is a Web API framework written in Python. Since it can receive and process HTTP requests, it can be used as an interface for accessing Orange Pi functions from a PC or web application and, later, for controlling IoT devices in conjunction with MQTT.
First, check whether Python is installed.
Run the following command in the VS Code Terminal:
python3 --versionIf Python is installed correctly, the currently installed Python version will be displayed.

FastAPI can be installed directly into the system-wide Python environment, but in this exercise, we will use a Python Virtual Environment.
A virtual environment allows the Python packages used by a project to be managed separately from other Python programs on the system. Therefore, even when installing FastAPI or MQTT client libraries, the required versions can be managed independently without affecting other projects.
First, create a directory for the FastAPI project.
mkdir fastapi_test
cd fastapi_test
Now, create a Python virtual environment using the following command:
python3 -m venv venvOnce the command is completed, a virtual environment directory named venv will be created in the current directory.
To use the virtual environment, activate it with the following command:
source venv/bin/activateWhen the virtual environment is successfully activated, (venv) will appear at the beginning of the Terminal prompt as shown below:
(venv) orangepi@orangepione:~/fastapi_test$The screen below shows the Terminal with the virtual environment activated.

In this state, any Python packages installed using pip will be installed only in the currently active venv virtual environment, rather than system-wide.
To exit the virtual environment, use the following command:
deactivateIn this FastAPI exercise, whenever we begin working, we will first move to the fastapi_test directory and activate the virtual environment.
In the next section, we will install FastAPI and Uvicorn in this virtual environment and create a simple API server.
Installing FastAPI
Now that the Python virtual environment has been prepared in the previous section, we will install FastAPI and Uvicorn, which is required to run the server.
First, move to the fastapi_test directory and activate the virtual environment.
cd ~/fastapi_test
source venv/bin/activate
When the virtual environment is activated successfully, (venv) appears at the beginning of the Terminal prompt.
(venv) orangepi@orangepione:~/fastapi_test$Now, install FastAPI and Uvicorn using pip, Python’s package management tool.
pip install fastapi uvicornHere, FastAPI is a Python framework for creating Web APIs that receive and process HTTP requests, while Uvicorn is an ASGI server used to run the FastAPI application as an actual web server.
In simple terms, the roles of the two programs can be summarized as follows.
FastAPI
    |
    | Write API
    ▼
main.py
    |
    | Run
    ▼
Uvicorn
    |
    | HTTP
    ▼
PC / Web Browser
FastAPI and Uvicorn are already installed on the Orange Pi used in this exercise, so instead of installing them again, we will check the packages currently installed in the virtual environment.
First, with the virtual environment activated, run the following command:
pip listYou can confirm fastapi and uvicorn in the list of installed Python packages.
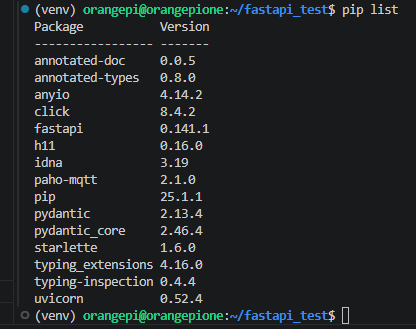
Alternatively, you can check only the required packages as follows:
pip show fastapipip show uvicornRunning each command displays information such as the installed version and installation location.
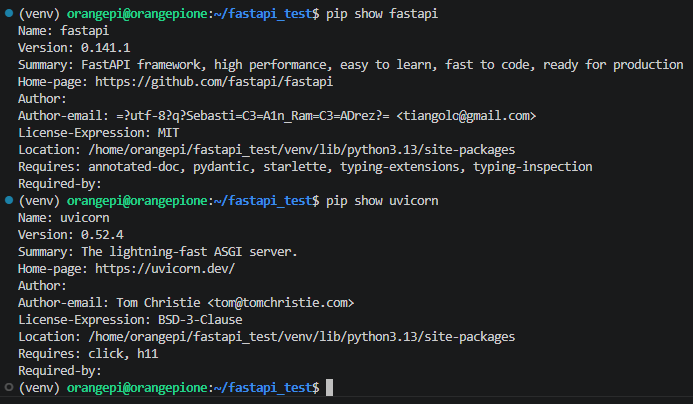
The important point is that these packages are not installed in the Orange Pi’s system-wide Python environment, but only inside the fastapi_test/venv virtual environment created earlier.
Therefore, when running the FastAPI server later, we will first activate the virtual environment before starting the server.
Now the Orange Pi is ready to create and run a FastAPI application.
In the next section, we will create a main.py file and build a simple FastAPI server.
Creating a Simple FastAPI Server
Now that FastAPI and Uvicorn have been installed, let’s take a look at the FastAPI server program.
In this exercise, main.py includes both FastAPI and MQTT functionality so that it can later be connected to the Mosquitto MQTT Broker. In this section, however, we will focus only on the FastAPI-related parts and explain the MQTT-related code later.
In the VS Code Remote – SSH environment, create a main.py file in the fastapi_test directory.
First, import the module required to use FastAPI and create an application object:
from fastapi import FastAPI

app = FastAPI()
The app object created using FastAPI() is the FastAPI application for this program.
Now, define an API that responds to HTTP requests.
The simplest API can be written as follows:
@app.get("/")
def root():
    return {"message": "Hello FastAPI"}
@app.get("/") specifies that when an HTTP GET request is received for the / path, the root() function below will be executed.
The root() function returns data in the form of a Python Dictionary.
{"message": "Hello FastAPI"}FastAPI converts this into an HTTP Response in JSON format and sends it to the client.
Therefore, when you later access the Orange Pi’s IP address and FastAPI port from a web browser on the PC, you can see a result like the following:
http://192.168.0.7:8000/{
"message": "Hello FastAPI"
}This main.py also includes an API for checking sensor values.
@app.get("/soil")
def soil():
    return {
        "sensor": 1,
        "moisture": soil_moisture
    }
When a GET request is sent to the /soil path, the currently stored soil moisture value, soil_moisture, is returned in JSON format.
In other words, the structure is as follows:
GET /soil
    |
    ▼
soil()
    |
    ▼
soil_moisture
    |
    ▼
JSON Response
Currently, the initial value of soil_moisture is set to 0 as follows:
soil_moisture = 0Therefore, if no sensor data has yet been received through MQTT, the /soil API returns the initial value of 0.
main.py also includes a POST API for controlling a valve, as shown below.
@app.post("/valve/1/on")
def valve_on():
    mqtt_client.publish("garden/valve/1/set", "ON")

    return {
        "valve": 1,
        "state": "ON"
    }
Here, an HTTP POST request is used.
However, the valve_on() function contains code that publishes an MQTT message through Mosquitto. Since this is the part where FastAPI and Mosquitto are actually connected, we will examine it in more detail later in the Connecting FastAPI and Mosquitto section.
At this stage, it is enough to understand that FastAPI can connect URL paths to Python functions to create APIs such as the following:
GET /: Check the basic response from the FastAPI serverGET /soil: Check the soil moisture valuePOST /valve/1/on: Request to turn Valve 1 ON
In this way, FastAPI provides an HTTP-based interface between Python programs running on the Orange Pi and a PC or web client.
However, simply creating the main.py file does not make these APIs accessible from outside. The FastAPI application must be run as an actual web server.
The following is the complete code for main.py.
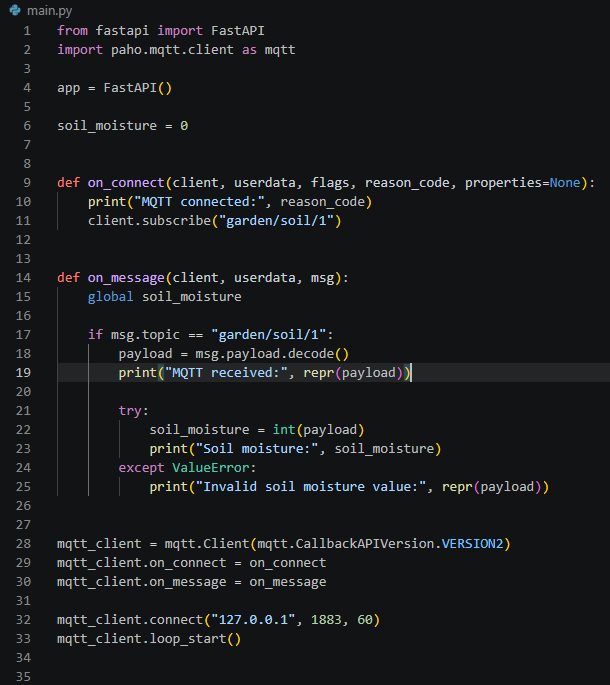
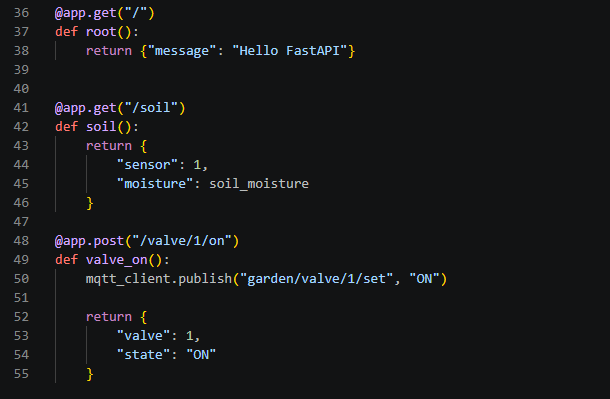
In the next section, we will use Uvicorn to run the current main.py application.
Running the Server with Uvicorn
Once main.py has been created, we can now run the FastAPI server using Uvicorn.
First, in the VS Code Terminal, move to the fastapi_test directory and activate the Python virtual environment.
cd ~/fastapi_test
source venv/bin/activate
Check that (venv) appears at the beginning of the Terminal prompt.
(venv) orangepi@orangepione:~/fastapi_test$Now, run the FastAPI server with the following command:
uvicorn main:app --host 0.0.0.0 --port 8000Each part of the command has the following meaning.
main:app means to run the app object defined in the main.py file.
app = FastAPI()--host 0.0.0.0 allows the FastAPI server to accept connections through the Orange Pi’s network interfaces, rather than limiting access to the local machine only.
--port 8000 configures the FastAPI server to listen for HTTP connections on TCP port 8000.
When Uvicorn is started, main.py is loaded and the FastAPI application begins running.
Since the current main.py also includes MQTT Client code, the following code is executed during this process:
mqtt_client.connect("127.0.0.1", 1883, 60)
mqtt_client.loop_start()
127.0.0.1 refers to the Orange Pi itself. Therefore, the MQTT Client in main.py connects to port 1883 of the Mosquitto MQTT Broker running on the same Orange Pi.
Once the connection to the Broker is established, the on_connect() callback defined earlier is called.
def on_connect(client, userdata, flags, reason_code, properties=None):
    print("MQTT connected:", reason_code)
    client.subscribe("garden/soil/1")
Therefore, when main.py is run with Uvicorn, the FastAPI server starts, while the MQTT Client also connects to Mosquitto and subscribes to the garden/soil/1 Topic.
The overall execution process can be summarized as follows.
Run Uvicorn
    |
    ▼
Load main.py
    |
    ├───────────────┐
    ▼               ▼
FastAPI         MQTT Client
    |               |
Port 8000           | Connect
HTTP                ▼
                Mosquitto
                Port 1883
                    |
                    ▼
                Subscribe
                garden/soil/1
If everything runs correctly, you can see the Uvicorn startup messages along with the MQTT connection message in the Terminal.
MQTT connected: SuccessOnce Uvicorn is running normally, the server waits for HTTP requests on port 8000.
At this point, the Terminal does not return to the command prompt. This is because the Uvicorn server continues running and waiting for incoming HTTP requests.
To stop the server, press Ctrl + C in the Terminal.
Now, the Orange Pi is running the following two server functions together:
Mosquitto: MQTT Broker – TCP 1883
FastAPI + Uvicorn: Web API – TCP 8000
The screen below shows the Terminal with Uvicorn running.
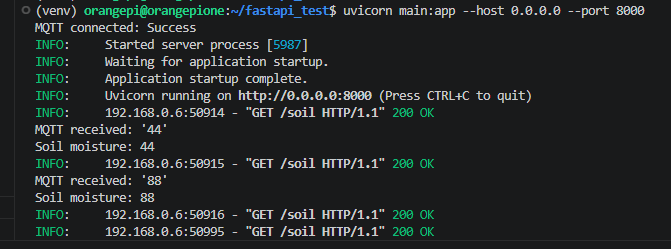
In the next section, we will access the FastAPI server on the Orange Pi from a web browser on the PC and verify the operation of the API.
Connecting FastAPI and Mosquitto
MQTT Connection Structure in main.py
In the previous sections, we confirmed that FastAPI and the Mosquitto MQTT Broker are each operating correctly.
Now, we will connect these two functions.
Mosquitto and FastAPI are not directly connected to each other. In this exercise, we implement an MQTT Client inside main.py, which runs FastAPI, and use it to connect to the Mosquitto Broker.
For this purpose, main.py uses the Paho MQTT Client library together with FastAPI.
from fastapi import FastAPI
import paho.mqtt.client as mqtt

app = FastAPI()

soil_moisture = 0
FastAPI processes HTTP requests from a PC or web client, while paho.mqtt.client is responsible for exchanging messages with the Mosquitto MQTT Broker.
In other words, main.py acts as a bridge between HTTP and MQTT.
Connecting to the MQTT Broker
First, create an MQTT Client.
mqtt_client = mqtt.Client(mqtt.CallbackAPIVersion.VERSION2)Then, register the callbacks for the MQTT connection and incoming messages.
mqtt_client.on_connect = on_connect
mqtt_client.on_message = on_message
The MQTT Client then connects to the Mosquitto Broker using the following code:
mqtt_client.connect("127.0.0.1", 1883, 60)
mqtt_client.loop_start()
127.0.0.1 refers to the Orange Pi itself. Therefore, the MQTT Client in main.py connects to port 1883 of the Mosquitto Broker running on the same Orange Pi.
loop_start() runs MQTT network communication in the background. This allows FastAPI to continue processing HTTP requests while MQTT messages are also received and handled.
MQTT Topic Subscribe
When the connection to Mosquitto is established, the on_connect() callback is called.
def on_connect(client, userdata, flags, reason_code, properties=None):
    print("MQTT connected:", reason_code)
    client.subscribe("garden/soil/1")
Here, the MQTT Client subscribes to the garden/soil/1 Topic.
Therefore, when the ESP32 or another MQTT Publisher later publishes a soil moisture value to garden/soil/1, the Mosquitto Broker delivers the message to the MQTT Client in main.py.
When a message arrives, the on_message() callback is executed.
def on_message(client, userdata, msg):
    global soil_moisture

    if msg.topic == "garden/soil/1":
        payload = msg.payload.decode()

        try:
            soil_moisture = int(payload)
        except ValueError:
            print("Invalid soil moisture value:", repr(payload))
The received MQTT Payload is converted to an integer and stored in the soil_moisture variable.
FastAPI then provides this value to external clients through the /soil API.
@app.get("/soil")
def soil():
    return {
        "sensor": 1,
        "moisture": soil_moisture
    }
Therefore, the data flow is as follows.
MQTT Publisher
      |
      | garden/soil/1
      ▼
Mosquitto Broker
      |
      ▼
main.py MQTT Client
      |
      ▼
soil_moisture
      |
      ▼
FastAPI GET /soil
      |
      ▼
PC / Web
Control in the opposite direction is also possible.
In main.py, a FastAPI endpoint for turning the valve ON is defined as follows:
@app.post("/valve/1/on")
def valve_on():
    mqtt_client.publish("garden/valve/1/set", "ON")

    return {
        "valve": 1,
        "state": "ON"
    }
When an HTTP POST request is sent from the PC to /valve/1/on, FastAPI executes the valve_on() function.
PC / Web
    |
    | HTTP POST
    ▼
FastAPI
    |
    | valve_on()
    ▼
main.py MQTT Client
    |
    | Publish
    | garden/valve/1/set : ON
    ▼
Mosquitto Broker
    |
    ▼
MQTT Subscriber
As a result, main.py connects both the MQTT → HTTP and HTTP → MQTT directions.
Sensor data can be received by the Orange Pi through MQTT and made available externally through FastAPI. In the opposite direction, control requests received through FastAPI can be converted into MQTT messages and delivered to IoT devices.
This is the core structure that connects FastAPI and Mosquitto in this exercise.
Checking MQTT Sensor Data in FastAPI
Since the ESP32 has not yet been connected, we will use MQTT Explorer on the PC to test MQTT communication in place of the ESP32. MQTT Explorer can be downloaded from the Internet and installed on the PC.
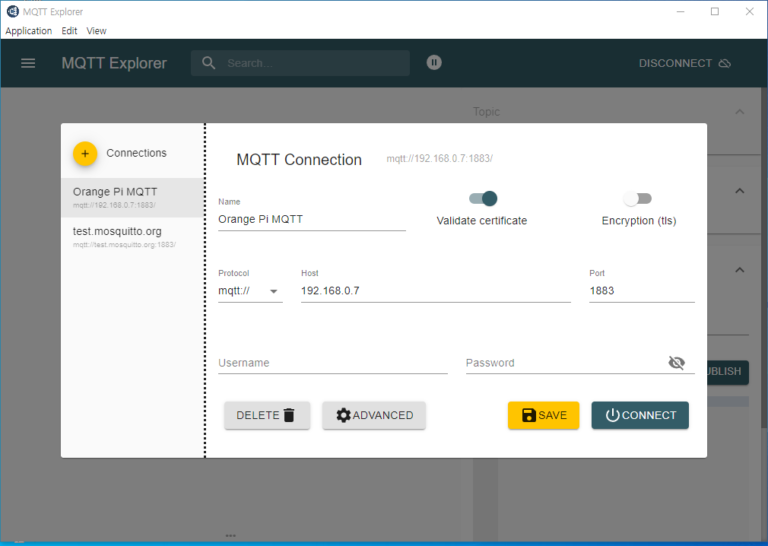
Set Protocol to mqtt://, Host to 192.168.0.7, and Port to 1883, and then click CONNECT. Once the connection is established, the screen shown below will appear.
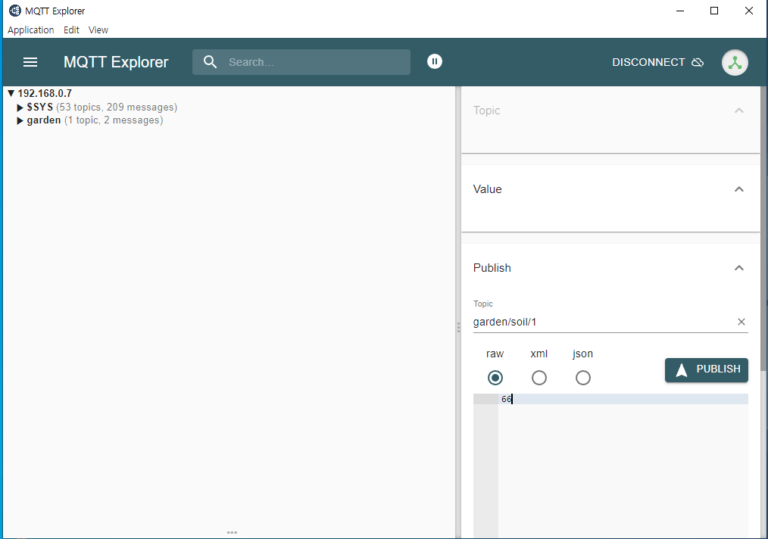
Enter garden/soil/1 in the Topic field, select raw directly below it, and enter 66 in the input field.
This means that MQTT Explorer will publish the value 66 to the garden/soil/1 Topic.
Click the PUBLISH button on the right to publish the message, and then check whether the published value can be retrieved from the web page.
Enter the following address in the web browser:
http://192.168.0.7:8000/soilThe result will be displayed as shown below.
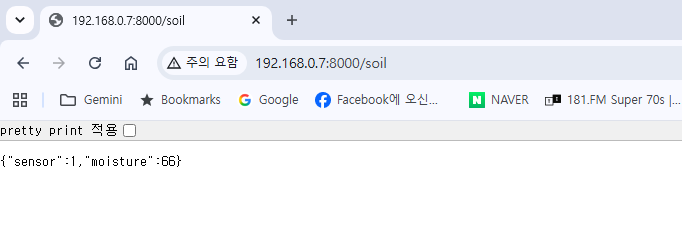
In the web browser, you can confirm that the moisture value is displayed as 66.
{"sensor":1,"moisture":66}This number is the value that was published to the garden/soil/1 Topic using MQTT Explorer.
In other words, the value 66 sent from MQTT Explorer was delivered through the Mosquitto MQTT Broker to the on_message() callback in main.py, and then stored in the soil_moisture variable by the following code.
soil_moisture = int(payload)Then, when the /soil API is requested from the web browser, FastAPI reads and returns the currently stored soil_moisture value.
The overall data flow can be summarized as follows:
MQTT Explorer
      |
      | Publish
      | garden/soil/1 : 66
      ▼
Mosquitto MQTT Broker
      |
      ▼
main.py
      |
      | on_message()
      ▼
soil_moisture = 66
      |
      ▼
FastAPI GET /soil
      |
      ▼
Web Browser
{"sensor":1,"moisture":66}
Through this test, we confirmed that the Mosquitto MQTT Broker and FastAPI are successfully connected through main.py, and that data received via MQTT can be checked through an HTTP API.
At this point, MQTT Explorer is temporarily acting as the MQTT Publisher. Later, when the ESP32 publishes an actual soil moisture value to the garden/soil/1 Topic, the same structure can be used without modification.
Next, we will test the opposite direction by executing a control command from FastAPI and verifying that an MQTT message is published.
MQTT Publish from FastAPI
In the previous section, we published a sensor value to the garden/soil/1 Topic using MQTT Explorer and checked the value through FastAPI’s /soil API.
This time, we will test communication in the opposite direction.
In other words, we will send a control command from the PC to FastAPI and verify that FastAPI publishes it as an MQTT message.
Since the actual ESP32 is not yet connected in this exercise, we will use MQTT Explorer to verify the MQTT message published by FastAPI.
In main.py, an API for turning the valve ON is defined as follows:
@app.post("/valve/1/on")
def valve_on():
    mqtt_client.publish("garden/valve/1/set", "ON")

    return {
        "valve": 1,
        "state": "ON"
    }
@app.post("/valve/1/on") specifies that the valve_on() function will be executed when an HTTP POST request is received at /valve/1/on.
When the function is executed, the MQTT message is published by the following code:
mqtt_client.publish("garden/valve/1/set", "ON")Here, the MQTT Topic and Payload are as follows:
Topic   : garden/valve/1/set
Payload : ON
Therefore, the data flow is as follows:
PC
 |
 | HTTP POST
 | /valve/1/on
 ▼
FastAPI
 |
 | valve_on()
 ▼
mqtt_client.publish()
 |
 | Topic   : garden/valve/1/set
 | Payload : ON
 ▼
Mosquitto MQTT Broker
 |
 ▼
MQTT Explorer
Now, let’s verify the actual operation.
First, run MQTT Explorer on the PC and connect to the Mosquitto MQTT Broker on the Orange Pi in the same way as in the previous section.
Since MQTT Explorer can monitor MQTT messages delivered through the Broker, we will use it to check the ON message published by FastAPI to garden/valve/1/set.
Next, execute the FastAPI API.
Since /valve/1/on is a POST API, rather than a GET API, it is more convenient to use the Swagger UI provided by FastAPI than to simply enter the URL in the web browser’s address bar.
Open the following address in the web browser:
http://192.168.0.7:8000/docsThe Swagger UI automatically displays the list of APIs defined in main.py.
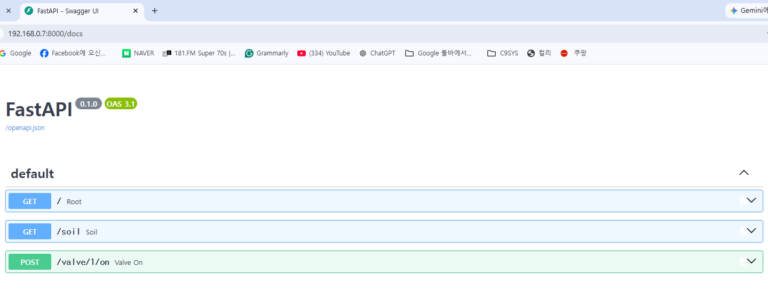
Select the following POST API:
POST /valve/1/onClick Try it out, and then click Execute.
FastAPI then executes the valve_on() function, and the following MQTT message is published to the Mosquitto Broker.
garden/valve/1/set : ONAt the same time, the Swagger UI displays the following JSON response returned by FastAPI:
{
    "valve": 1,
    "state": "ON"
}
Now, check MQTT Explorer.
If the message published by FastAPI has been successfully delivered to the Mosquitto Broker, you can see the following value under the garden/valve/1/set Topic:
ONWith this, we have also confirmed communication in the opposite direction.
In the previous section, we checked sensor data in the following direction:
MQTT Explorer → Mosquitto → FastAPI → Web Browser
This time, we confirmed control communication in the opposite direction:
Swagger UI → FastAPI → Mosquitto → MQTT Explorer
We confirmed the control command in this direction.
Currently, MQTT Explorer is acting as a substitute for the ESP32. Later, when the ESP32 subscribes to the garden/valve/1/set Topic, the ON message published by FastAPI can be received by the ESP32 and used to control an actual valve.
Through this exercise, we have confirmed that sensor data and control commands can be exchanged in both directions between FastAPI and the Mosquitto MQTT Broker running on the Orange Pi.
Conclusion
In this article, we installed Armbian Linux on the Orange Pi One and built a simple IoT server environment using the Mosquitto MQTT Broker and FastAPI.
Initially, a monitor and keyboard were connected to perform the Linux boot process and initial configuration. After that, SSH and VS Code Remote – SSH were used to create an environment where the Orange Pi could be remotely managed and developed from a Windows PC.
With Mosquitto, we verified the basic MQTT Publish / Subscribe operation. We then connected Mosquitto with FastAPI and tested data transfer between MQTT and HTTP.
For the sensor data flow, a value published by MQTT Explorer to the garden/soil/1 Topic was checked in a web browser through FastAPI’s /soil API. In the opposite direction, we executed a FastAPI API request and confirmed that the corresponding MQTT message was published through Mosquitto and received by MQTT Explorer.
Through these tests, we confirmed the basic structure of a bidirectional IoT server:
Sensor → MQTT → Mosquitto → FastAPI → HTTP → PC
PC → HTTP → FastAPI → Mosquitto → MQTT → Device
Although we used MQTT Explorer instead of connecting an actual ESP32 in this exercise, this allowed us to first verify that the server side of the Orange Pi was operating correctly.
In the next exercise, we will configure the ESP32 to directly perform the role currently handled by MQTT Explorer and implement actual MQTT communication between the ESP32 and Orange Pi.