Introduction
In the previous article, we ported Zephyr to an ESP32 CAN board and experimented with RGB LED control. Until then, STM32 had been the MCU used in our Zephyr projects, so porting Zephyr to a different target—the ESP32—was a meaningful step forward.
The ESP32 MCU includes built-in Wi-Fi functionality. Therefore, to expand our work toward IoT applications, it is worth exploring how the ESP32’s Wi-Fi features can be used within the Zephyr RTOS environment.
As the first step, this article focuses on a Wi-Fi Scan experiment. Wi-Fi Scan searches for nearby APs (Access Points) and retrieves information such as the SSID, channel, signal strength (RSSI), and security type. Since scanning allows us to inspect nearby Wi-Fi networks before actually connecting to an AP, it is one of the most fundamental Wi-Fi operations.
However, the purpose of this experiment is not simply to print a list of nearby APs. To perform a Wi-Fi Scan in Zephyr, we need to use features such as net_if, net_mgmt(), and Network Management Event Callbacks. After requesting a scan, the scan results and scan completion are delivered asynchronously through events and callbacks.
Therefore, this experiment serves not only as our first use of the ESP32’s Wi-Fi functionality, but also as an introduction to Zephyr’s Network Management framework and its event-driven approach to network processing.
In this article, we will write and run a Wi-Fi Scan program and examine how the NET_EVENT_WIFI_SCAN_RESULT and NET_EVENT_WIFI_SCAN_DONE events are generated and how their corresponding callback functions are invoked. We will also look at how the major APIs used in this process relate to the relevant sections of the official Zephyr documentation.
Creating the Project and Configuration Files
In this experiment, we will continue using the ESP32 CAN board that was ported to Zephyr in the previous article. Therefore, instead of repeating the process of creating a new board, we will create a new application project for the Wi-Fi Scan experiment.
Creating the Project
Copy the skpang_esp32_can_blinky project folder created in the previous experiment and rename the copied folder to skpang_esp32_can_wifiscan.
The structure of the newly created project folder is shown below.
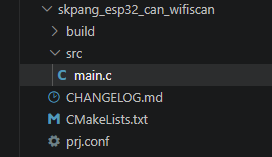
As shown in the project structure above, the build folder from the previous project has also been copied. This folder contains information related to the previous project, including build results and the CMake cache, so it should be deleted.
The build folder will be recreated later when west build is executed, using the configuration of the new project.
Since the project was copied from the previous one, files such as CMakeLists.txt, prj.conf, src/main.c, and CHANGELOG.md are also included. For this Wi-Fi Scan experiment, we will first modify the project name in CMakeLists.txt, add the configuration options required for Wi-Fi operation to prj.conf, and then write the Wi-Fi Scan program in src/main.c.
Creating the Configuration Files
CMakeLists.txt
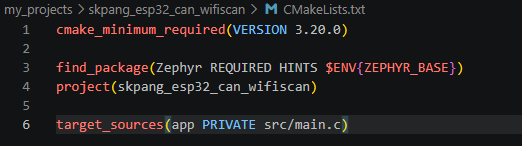
Since the new project was created by copying the existing skpang_esp32_can_blinky project, the project name defined in CMakeLists.txt also needs to be changed for this experiment.
In the existing CMakeLists.txt, the project name is defined as follows:
project(skpang_esp32_can_blinky)Change it to skpang_esp32_can_wifiscan, the name of the Wi-Fi Scan project:
project(skpang_esp32_can_wifiscan)The complete modified CMakeLists.txt is as follows:
prj.conf
The prj.conf file contains the configuration options required to enable the Zephyr features used in this Wi-Fi Scan experiment.
In Zephyr, simply using Wi-Fi-related APIs in the source code does not automatically enable the corresponding features. The required functionality must be enabled through Kconfig options, and in an application project, these settings are typically specified in the prj.conf file.
For this experiment, we configure the project as follows to enable Wi-Fi and Network Management functionality.
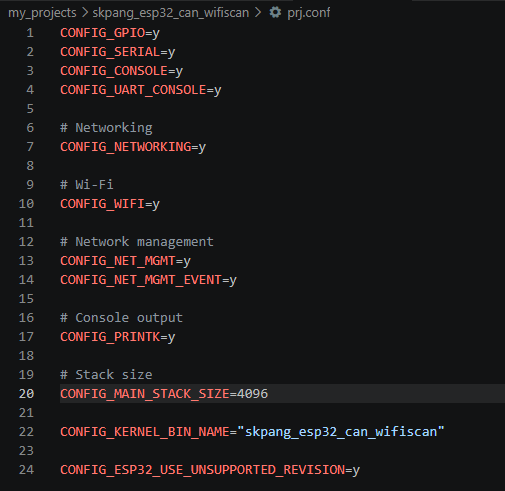
The meaning of each configuration option is as follows:
CONFIG_WIFI=y
Enables Wi-Fi functionality in Zephyr.CONFIG_NETWORKING=y
Enables the Zephyr networking stack.CONFIG_NET_MGMT=y
Enables the Network Management functionality. This option is related to thenet_mgmt()API used in this experiment.CONFIG_NET_MGMT_EVENT=y
Enables event handling in Network Management. This is required to receive Wi-Fi Scan result and scan completion events through callbacks.CONFIG_NET_L2_WIFI_MGMT=y
Enables Wi-Fi Network Management functionality. It provides Wi-Fi management features related toNET_REQUEST_WIFI_SCAN,NET_EVENT_WIFI_SCAN_RESULT, and other Wi-Fi management operations.CONFIG_WIFI_LOG_LEVEL_INF=y
Sets Wi-Fi-related logging to the Information level. This is useful for checking Wi-Fi operation during development and debugging.
Among these options, CONFIG_NET_MGMT and CONFIG_NET_MGMT_EVENT are particularly important. The Wi-Fi Scan program does not operate by calling a scan function and immediately receiving the results. Instead, after requesting a scan, the scan results and scan completion status are delivered asynchronously through events.
Therefore, the settings in prj.conf are directly related to net_mgmt(), NET_EVENT_WIFI_SCAN_RESULT, and NET_EVENT_WIFI_SCAN_DONE, which will be used later in main.c.
CHANGELOG.md
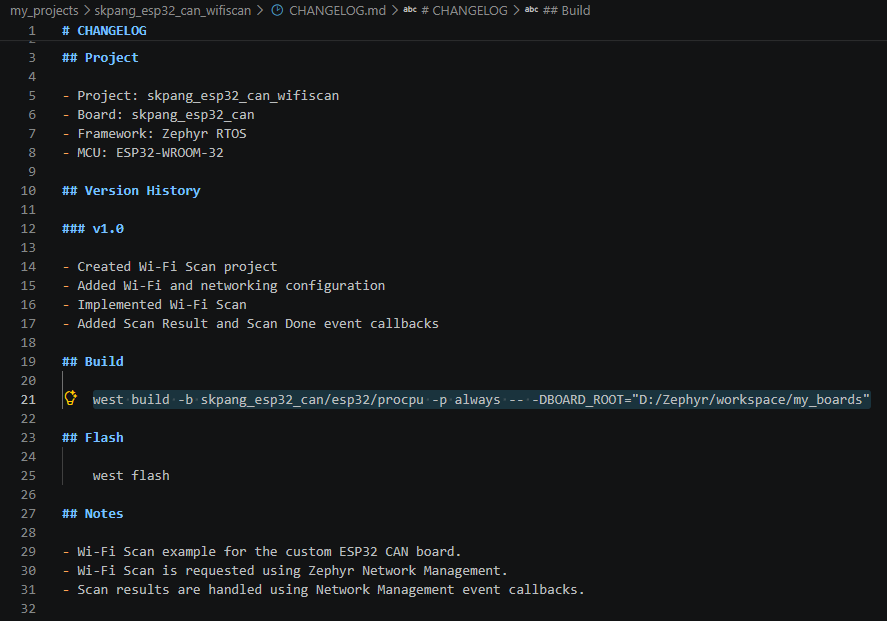
The CHANGELOG.md file is used to record changes made during project development. The .md extension stands for Markdown, indicating that the file is written in Markdown format.
In this project, we use the file not only to keep a change history, but also to record project information and the actual build command used for the project.
When working with a custom board in Zephyr, the build command may include not only the board name but also the CPU target and the BOARD_ROOT path. Re-entering these options and paths manually every time can be inconvenient and may also lead to typing errors.
Since the ESP32 CAN board used in this experiment requires the procpu target to be specified, the build command becomes relatively long, as shown below.
west build -b skpang_esp32_can/esp32/procpu -p always -- -DBOARD_ROOT="D:/Zephyr/workspace"Therefore, once a build command has been verified to work correctly, it is convenient to record it in CHANGELOG.md so that it can simply be copied and reused for subsequent builds.
For this Wi-Fi Scan project, CHANGELOG.md was written as follows.
How Zephyr Wi-Fi Scan Works
Before writing the Wi-Fi Scan program, let’s first examine how Wi-Fi scanning works in Zephyr.
Wi-Fi Scan is the process of searching for nearby APs (Access Points) and obtaining information such as their SSID, channel, RSSI, and security type.
Although the ESP32 has built-in Wi-Fi hardware, a Zephyr application does not perform a Wi-Fi Scan by directly calling a scan function in the Wi-Fi driver. Instead, the application requests a scan through Zephyr’s Network Management framework, and the scan results are delivered through events and callbacks.
Therefore, the most important concept to understand in this experiment is that requesting a scan and receiving the scan results are separate processes.
The following diagram illustrates the overall operation of a Zephyr Wi-Fi Scan.
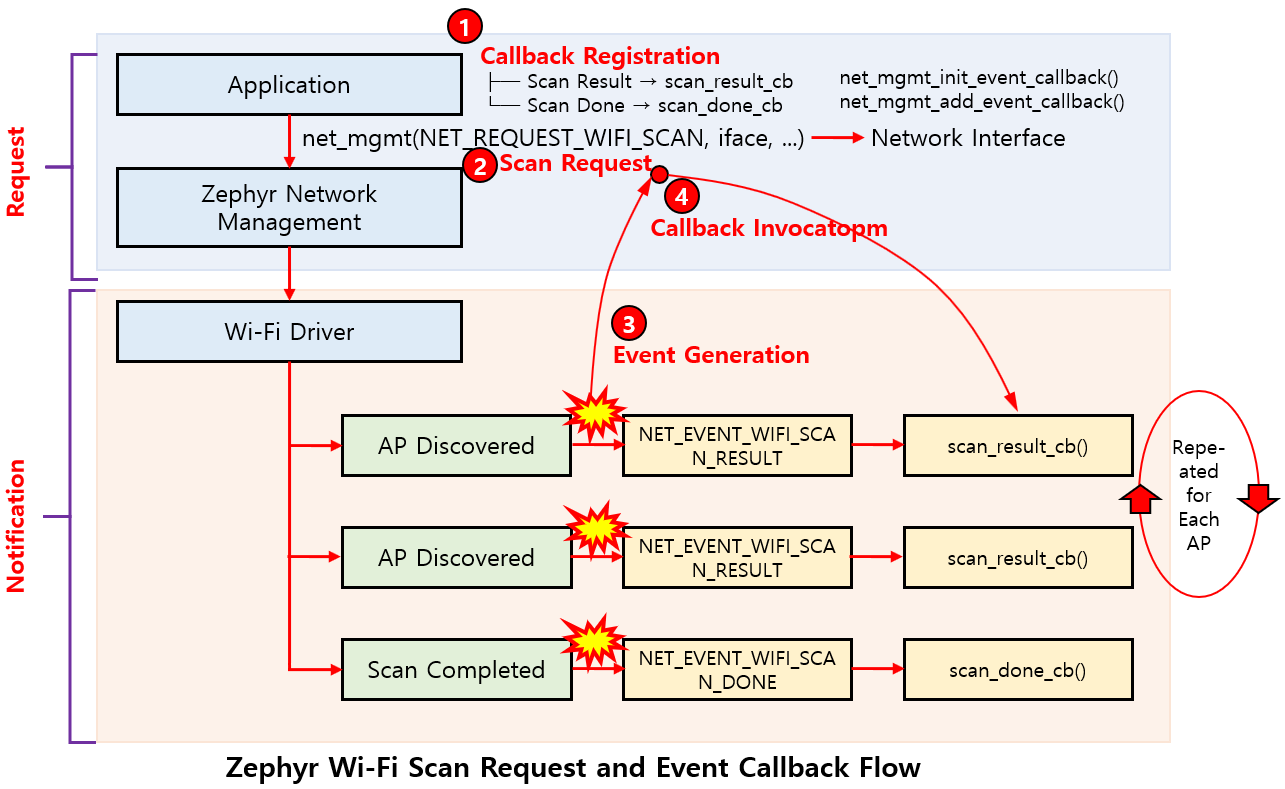
The figure above illustrates the overall flow of a Wi-Fi Scan in Zephyr. The application first ① registers callback functions that will receive the scan results and scan completion notification. It then ② requests a Wi-Fi Scan using net_mgmt(). As the Wi-Fi driver performs the scan, ③ events are generated whenever an AP is discovered or the scan is completed. Zephyr Network Management then ④ invokes the callback functions that have been registered for those events.
If multiple APs are found, the NET_EVENT_WIFI_SCAN_RESULT event is generated and scan_result_cb() is called repeatedly for each discovered AP. Once the entire scan is complete, the NET_EVENT_WIFI_SCAN_DONE event is generated and scan_done_cb() is called.
Registering Callbacks
Before starting a Wi-Fi Scan, the application first registers the callback functions that will handle events generated during the scan process.
This program uses two types of callbacks:
Scan Result → scan_result_cb
Scan Done   → scan_done_cb
scan_result_cb is the callback function used to process information about each AP discovered during the scan, while scan_done_cb is called when the entire scan operation has been completed.
The following functions are used to initialize and register the callbacks:
net_mgmt_init_event_callback()
net_mgmt_add_event_callback()
net_mgmt_init_event_callback() configures the callback structure by specifying which callback function will be used and which event it will handle.
The initialized callback is then registered with Zephyr Network Management using net_mgmt_add_event_callback().
An important point here is that the callbacks are registered before the Wi-Fi Scan is requested.
In other words, the functions that will handle events generated during the scan must be prepared in advance.
This is also why scan_result_cb and scan_done_cb are shown without parentheses in the callback registration section of the diagram. At this stage, these functions are not being executed; they are being registered as callback functions.
In contrast, scan_result_cb() and scan_done_cb() shown in the lower part of the diagram indicate that the callback functions are actually invoked after the corresponding events occur.
Requesting a Wi-Fi Scan
Once the callbacks have been registered, the application requests a Wi-Fi Scan using net_mgmt().
In the actual program, the request is made as follows:
net_mgmt(NET_REQUEST_WIFI_SCAN, iface, NULL, 0);NET_REQUEST_WIFI_SCAN is a request to Zephyr Network Management to perform a Wi-Fi Scan.iface represents the Network Interface on which the scan will be performed.
In Zephyr, network connections such as Ethernet and Wi-Fi are managed through Network Interface objects represented by struct net_if. Therefore, rather than thinking of iface simply as a pointer to the Wi-Fi hardware device, it is more accurate to understand it as a pointer to the object representing the Wi-Fi network interface within the Zephyr Network Stack.
We will examine this part in more detail later when looking at the actual main.c code.
The scan request generated by the application is passed through the following path:
Application
    ↓
Zephyr Network Management
    ↓
Wi-Fi Driver
In other words, the application does not directly control the internal scan operation of the Wi-Fi driver. Instead, it requests the scan through Zephyr Network Management.
Wi-Fi Driver Performs the Scan
Once the scan request is received, the Wi-Fi driver begins searching for nearby APs.
An important point here is that the net_mgmt() function does not wait until all nearby APs have been discovered and then return all the results at once.
A Wi-Fi Scan takes some time to complete, and scan results are generated while the scan is in progress. Zephyr delivers these results to the application through events.
Therefore, after requesting the scan, the application does not continuously wait for and retrieve the results directly. Instead, it receives events generated during the scan through registered callback functions.
This is the asynchronous operation used in this program.
AP Discovery and Event Generation
When the Wi-Fi driver discovers an AP while scanning nearby networks, the following event is generated:
NET_EVENT_WIFI_SCAN_RESULTNET_EVENT_WIFI_SCAN_RESULT represents this process.The overall flow is as follows:
AP Discovered
    ↓
NET_EVENT_WIFI_SCAN_RESULT Generated
    ↓
Registered Callback Invoked
    ↓
scan_result_cb()The Wi-Fi driver does not directly call the application’s scan_result_cb() simply because an AP has been discovered.
Instead, when an AP is discovered, a Scan Result event is generated, and Zephyr’s Network Management event-handling mechanism invokes the callback function that was previously registered for that event.
In other words, the flow should not be understood as:
AP Discovered → scan_result_cb()AP Discovered
↓
Event Generated
↓
NET_EVENT_WIFI_SCAN_RESULT
↓
Registered Callback Invoked
↓
scan_result_cb()Understanding this structure is important.
The large curved arrow labeled Callback Invocation in the diagram represents exactly this relationship.
Repeated Calls to scan_result_cb()
If only one AP exists nearby, NET_EVENT_WIFI_SCAN_RESULT may be delivered only once. In a typical environment, however, multiple APs are discovered.
For example, if three APs are discovered, the process conceptually works as follows:
AP #1 Discovered
    ↓
NET_EVENT_WIFI_SCAN_RESULT
    ↓
scan_result_cb()

AP #2 Discovered
    ↓
NET_EVENT_WIFI_SCAN_RESULT
    ↓
scan_result_cb()

AP #3 Discovered
    ↓
NET_EVENT_WIFI_SCAN_RESULT
    ↓
scan_result_cb()scan_result_cb() may be called multiple times during a single Wi-Fi Scan. This is what the Repeated for Each AP indication in the diagram represents.One point to note here is that the Wi-Fi Scan itself is not being requested multiple times.
The application requests the scan only once using NET_REQUEST_WIFI_SCAN. However, because multiple APs may be discovered during that single scan, NET_EVENT_WIFI_SCAN_RESULT is generated repeatedly, causing scan_result_cb() to be invoked for each AP.
Inside scan_result_cb(), information about each AP, such as its SSID, channel, RSSI, and security type, can be examined.
Scan Completion and NET_EVENT_WIFI_SCAN_DONE
After the Wi-Fi driver finishes scanning for nearby APs, an event is generated to indicate that the scan has been completed:
NET_EVENT_WIFI_SCAN_DONEScan Completed
↓
NET_EVENT_WIFI_SCAN_DONE Generated
↓
Registered Callback Invoked
↓
scan_done_cb()scan_result_cb is registered for Scan Result events, while scan_done_cb is registered for the Scan Done event. When each event occurs, the corresponding callback function is invoked.Another important point is that the application does not determine that the scan is complete by counting the number of APs.
There is no way for the application to know in advance how many APs will be discovered. The Wi-Fi driver and Zephyr Wi-Fi Management layer handle the completion of the scan operation, and the result is delivered to the application through the NET_EVENT_WIFI_SCAN_DONE event.
By receiving this event, the application can determine that the entire scan operation has been completed.
Difference Between scan_result_cb() and scan_done_cb()
The differences between the two callbacks can be summarized as follows:
| Callback | Event | Role | Invocation |
|---|---|---|---|
scan_result_cb() |
NET_EVENT_WIFI_SCAN_RESULT |
Processes information about a discovered AP | Called for each AP |
scan_done_cb() |
NET_EVENT_WIFI_SCAN_DONE |
Handles completion of the entire scan | Called when the scan is complete |
The most important characteristic of scan_result_cb() is that it may be called multiple times during a single scan operation.
In contrast, scan_done_cb() does not process information about individual APs. Instead, it handles the completion of the entire Wi-Fi Scan process.
Request and Notification
Now, if we return to the first diagram, the overall structure of the Zephyr Wi-Fi Scan becomes easier to understand.
In the application, calling
net_mgmt(NET_REQUEST_WIFI_SCAN, iface, NULL, 0);is a Request.
In other words, the application is asking Zephyr Network Management:
“Start a Wi-Fi Scan on this Network Interface.”
The events generated during the subsequent scan process,
NET_EVENT_WIFI_SCAN_RESULTNET_EVENT_WIFI_SCAN_DONEare Notifications.
That is, they notify the application of the status and results generated during the scan process. The overall structure can be summarized as follows:
                 Request

Application
    ↓
net_mgmt(NET_REQUEST_WIFI_SCAN, ...)
    ↓
Zephyr Network Management
    ↓
Wi-Fi Driver

              Notification

Wi-Fi Driver
    ↓
AP Discovered
    ↓
NET_EVENT_WIFI_SCAN_RESULT
    ↓
scan_result_cb()

    ...

Scan Completed
    ↓
NET_EVENT_WIFI_SCAN_DONE
    ↓
scan_done_cb()
Therefore, Zephyr Wi-Fi Scan does not work by calling a function and receiving all scan results through that function’s return value.
The application requests a scan, the actual scan proceeds separately, and the scan results and completion status generated during that process are delivered asynchronously through events and callbacks.
Understanding this Request → Event → Callback structure is the key to understanding the Wi-Fi Scan program in this experiment.
Relationship with the Official Zephyr Documentation
The features used in this experiment are not limited to Zephyr’s Wi-Fi functionality alone.
The request and Event Callback mechanism using net_mgmt() is part of Zephyr’s Network Management functionality, while iface is related to Network Interface. Meanwhile, NET_REQUEST_WIFI_SCAN, NET_EVENT_WIFI_SCAN_RESULT, and NET_EVENT_WIFI_SCAN_DONE are Wi-Fi management requests and events defined by Zephyr’s Wi-Fi Management functionality.
Therefore, when referring to the official Zephyr documentation for this experiment, it is useful to look at the following sections together:
- Network Management
- Network Interface
- Wi-Fi Management
The official documentation can be found at the links below:
When first reading Zephyr’s networking documentation, it can be difficult to understand the overall relationship because the APIs are described in separate sections. However, when viewed through the Wi-Fi Scan program in this experiment, the relationship becomes relatively clear.
net_if represents which Network Interface will be used, while net_mgmt() delivers what operation should be requested on that interface. Network Management Events then notify the application of the results or state changes generated by that operation.
This Wi-Fi Scan experiment is therefore meaningful not only as a way to search for nearby APs, but also as a practical example of the fundamental operation of Zephyr Network Management.
Next, we will write the actual main.c program and examine how the Callback Registration → Scan Request → Event Generation → Callback Invocation flow described above is implemented in code.
Writing the Wi-Fi Scan Program
In the previous section, we examined how Zephyr Wi-Fi Scan works through the sequence Callback Registration → Scan Request → Event Generation → Callback Invocation.
Now, let’s implement this operation in an actual program.
In this program, we will scan for nearby APs and print information about each discovered AP, including its SSID, channel, RSSI, and security type, to the console. Once the entire scan is complete, a scan completion message will also be displayed.
The complete code for src/main.c is shown below.
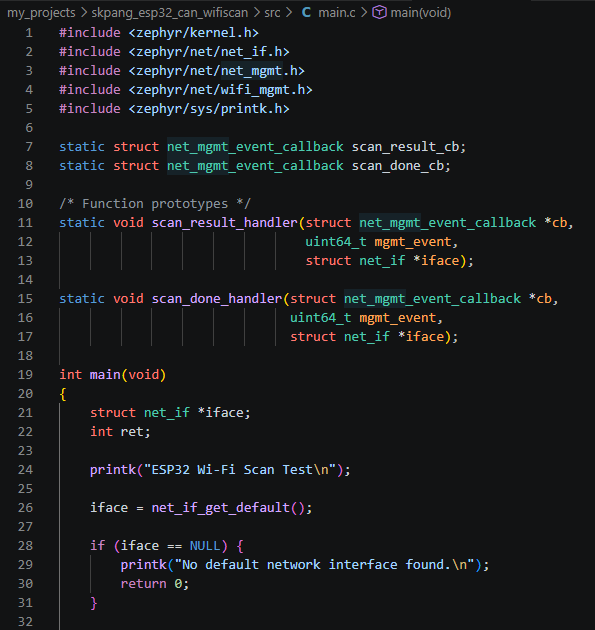
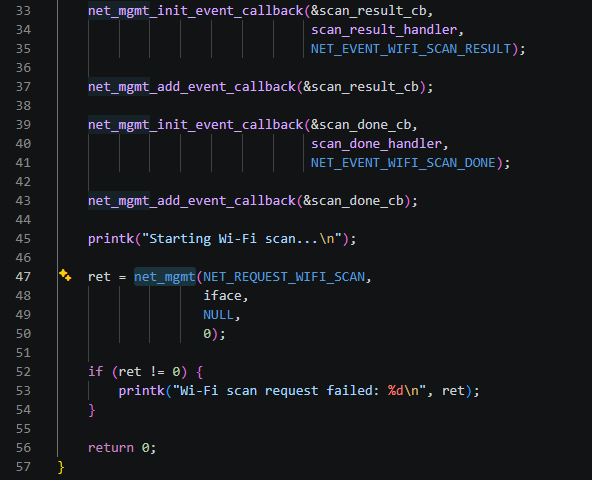
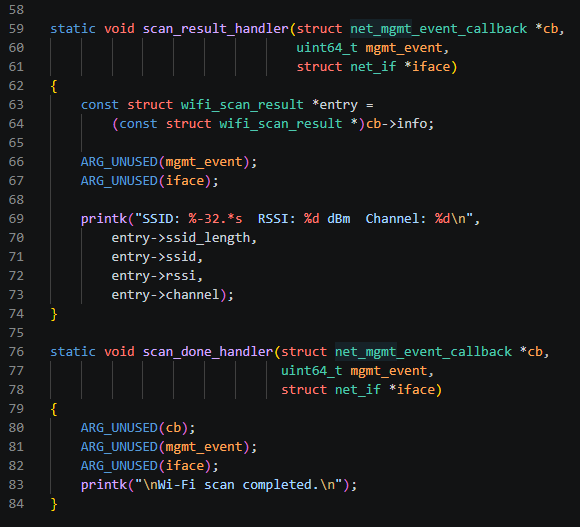
Main Parts of the Program
The program above directly implements the Wi-Fi Scan flow described in the previous section. Here, we will look only at the main parts of the code.
First, the default Network Interface is obtained with the following code:
iface = net_if_get_default();iface is later used when requesting the Wi-Fi Scan through net_mgmt().The next part corresponds to ① Callback Registration in the operation flow:
net_mgmt_init_event_callback(&scan_result_cb,
                             scan_result_handler,
                             NET_EVENT_WIFI_SCAN_RESULT);

net_mgmt_add_event_callback(&scan_result_cb);

net_mgmt_init_event_callback(&scan_done_cb,
                             scan_done_handler,
                             NET_EVENT_WIFI_SCAN_DONE);

net_mgmt_add_event_callback(&scan_done_cb);scan_result_handler is registered as the callback for NET_EVENT_WIFI_SCAN_RESULT, while scan_done_handler is registered for NET_EVENT_WIFI_SCAN_DONE.Once callback registration is complete, ② the Wi-Fi Scan is requested:
ret = net_mgmt(NET_REQUEST_WIFI_SCAN,
               iface,
               NULL,
0);NET_EVENT_WIFI_SCAN_RESULT event is generated, and the registered ④ scan_result_handler() callback is invoked.static void scan_result_handler(...)
{
const struct wifi_scan_result *entry =
(const struct wifi_scan_result *)cb->info;
printf("SSID: %-32.*s RSSI: %d dBm Channel: %d\n",
entry->ssid_length,
entry->ssid,
entry->rssi,
entry->channel);
}cb->info. In this example, the SSID, RSSI, and channel are printed to the console. If multiple APs are discovered, this callback is invoked repeatedly for each AP.When the entire scan is complete, the NET_EVENT_WIFI_SCAN_DONE event is generated and scan_done_handler() is called.
static void scan_done_handler(...)
{
    printf("\nWi-Fi scan completed.\n");
}main.c is therefore exactly the same as the structure examined earlier:① Callback Registration → ② Scan Request → ③ Event Generation → ④ Callback Invocation
Because we examined this flow before looking at the actual code, it is now easier to understand the role of each API in the program.
Next, we will build the program and check the actual Wi-Fi Scan results on the ESP32 CAN board.
Build and Execution Results
Build
Now it is time to build the project.
Move to the skpang_esp32_can_wifiscan directory.
For the build command, simply copy the command recorded in CHANGELOG.md and paste it into the terminal.
The command is as follows:

Since this project uses the esp32/procpu target of the custom skpang_esp32_can board, the correct board target and BOARD_ROOT path must be specified.
As described earlier, keeping this build command in CHANGELOG.md helps avoid mistakes when entering the board target or path again for future builds.
When the build completes successfully, a message similar to the following is displayed.
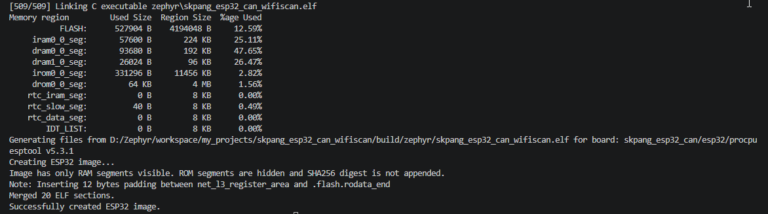
At the end of the build output, we can see:
Successfully created ESP32 image.This confirms that the image to be downloaded to the ESP32 has been successfully created.
Execution Results
After downloading the firmware to the target using west flash, we can run the program and check the results.
The execution results were monitored using Docklight, a serial terminal program on the PC.
The following screen shows the output displayed in Docklight after running the program.
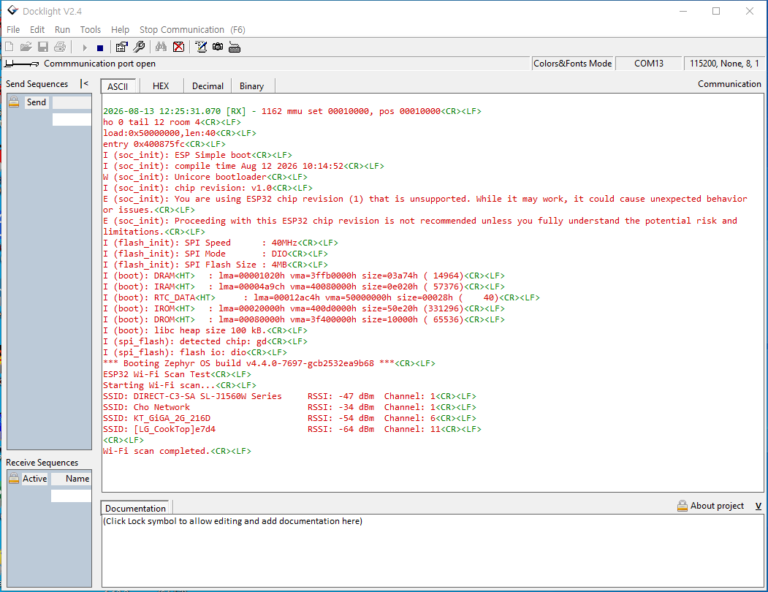
In the output above, a total of four Wi-Fi APs were discovered, and the SSID, RSSI, and channel information for each AP was displayed.
If we relate this result to the Wi-Fi Scan operation described earlier, each time an AP was discovered, the NET_EVENT_WIFI_SCAN_RESULT event was generated and scan_result_handler() was invoked, causing the information for each AP to be printed one line at a time.
In other words, in this experiment, this process was repeated four times for the four discovered APs.
After all APs had been scanned, the NET_EVENT_WIFI_SCAN_DONE event was generated and scan_done_handler() was called, displaying the following message at the end:
Wi-Fi scan completed.① Callback Registration → ② Scan Request → ③ Event Generation → ④ Callback Invocation
is actually taking place during the ESP32 Wi-Fi Scan.
Conclusion
In this experiment, we implemented the Wi-Fi Scan functionality on an ESP32 CAN board ported to Zephyr and searched for nearby APs.
At first, Wi-Fi Scan itself may appear to be a relatively simple feature. However, while writing the program, we were able to see that in Zephyr, the scan request and result processing are separated and operate through the Request and Event Callback mechanism of Network Management.
The overall flow of this experiment can be summarized as follows:
① Callback Registration → ② Scan Request → ③ Event Generation → ④ Callback Invocation
The application first registers callbacks for NET_EVENT_WIFI_SCAN_RESULT and NET_EVENT_WIFI_SCAN_DONE, and then requests a Wi-Fi Scan using net_mgmt(). Each time an AP is discovered, a NET_EVENT_WIFI_SCAN_RESULT event is generated and scan_result_handler() is invoked. When the entire scan is complete, the NET_EVENT_WIFI_SCAN_DONE event is generated and scan_done_handler() is called.
The actual execution results also showed multiple nearby APs being displayed, followed by the final Wi-Fi scan completed. message. This allowed us to confirm how the Request → Event → Callback flow examined earlier works in an actual program.
The important point of this experiment is not simply that we were able to scan for nearby Wi-Fi networks using the ESP32. More importantly, through an actual program, we were able to examine how the fundamental elements of Zephyr networking—such as net_if, net_mgmt(), Network Management Events, and callbacks—are connected and work together.
Wi-Fi Scan is the first step in discovering nearby APs before connecting to a network. In the next experiment, based on the structure examined here, we will connect to an actual AP and explore the process by which the ESP32 joins a Wi-Fi network.