Introduction
In the previous tutorial, we ported Zephyr RTOS to a custom board and created a simple LED blinking application. Through this process, we built a complete development environment capable of building and running Zephyr Thread projects, while learning the basic workflow of developing and executing Zephyr applications.
Starting with this tutorial, we will explore the core features of Zephyr RTOS one by one. Our first topic is Threads. In an RTOS, a thread is the fundamental execution unit that performs an independent task and serves as the foundation of multitasking, allowing multiple tasks to run concurrently.
In this hands-on example, we will create two threads, each independently controlling an LED. One thread will blink LED0 every 500 ms, while the other will blink LED1 every 100 ms. Since the two LEDs operate at different intervals, you will clearly see that each thread executes independently.
We will also learn how to create threads in Zephyr using the K_THREAD_DEFINE() macro and examine the role of the main() function. By the end of this tutorial, you will understand the basic structure of Zephyr Threads and establish a solid foundation for learning other essential RTOS features such as thread priorities, semaphores, and mutexes in the upcoming tutorials.
Zephyr Threads
A thread is the fundamental execution unit in Zephyr RTOS that performs an independent task. Multiple threads execute concurrently, while the Zephyr kernel scheduler manages their execution to implement multitasking.
For more detailed information about Zephyr Threads, refer to the official Zephyr documentation.
There are two primary ways to create threads in Zephyr.
Method 1: Creating Threads in main()
The first approach is to create the required threads directly within the main() function. In this method, you prepare the stack and control structures for each thread and then create them by calling k_thread_create().
The overall concept is illustrated below.
main.c
├── System Initialization
├── Create LED0 Thread
├── Create LED1 Thread
└── Other Initialization and Managementmain() function. This method is particularly useful when threads need to be created only under specific conditions or when their start time must be controlled.For this method, you typically need to define the following components.
First, define the thread stacks and thread control structures.
K_THREAD_STACK_DEFINE(led0_stack, STACK_SIZE);
K_THREAD_STACK_DEFINE(led1_stack, STACK_SIZE);

struct k_thread led0_thread_data;
struct k_thread led1_thread_data;main() function.k_thread_create(&led1_thread_data,
led0_stack,
K_THREAD_STACK_SIZEOF(led1_stack),
led1_thread,
NULL, NULL, NULL,
PRIORITY,
0,
K_NO_WAIT);k_thread_create() function are explained below.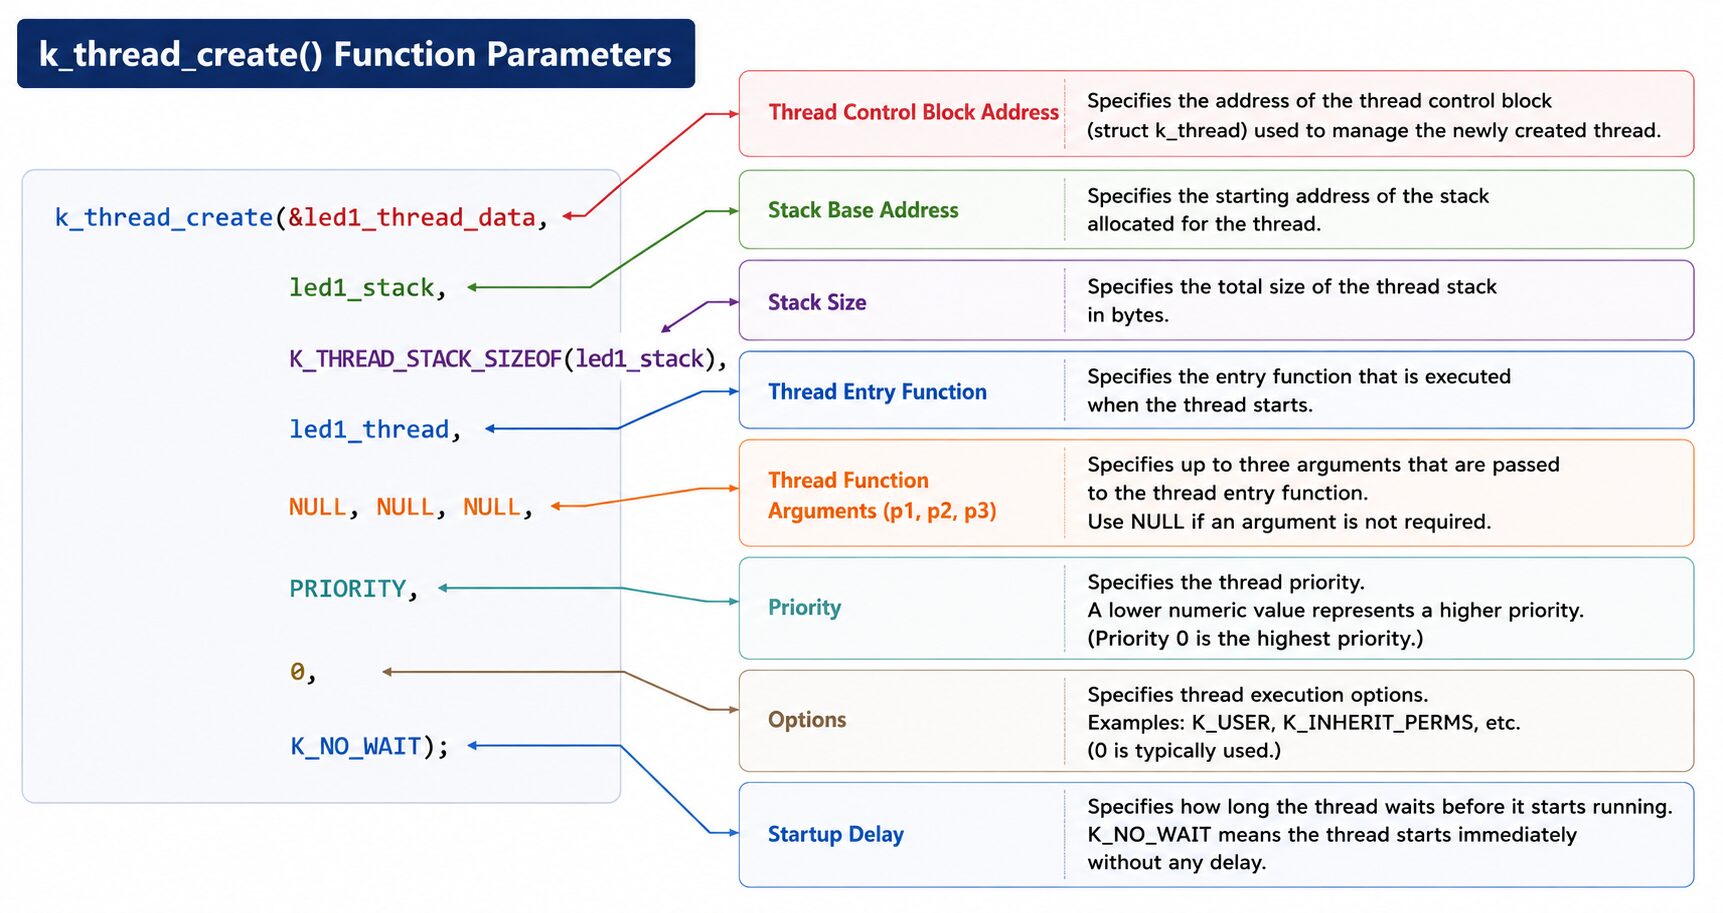
This approach allows precise control over thread creation and startup conditions. However, as more threads are added, main() tends to accumulate initialization and thread creation code, making the application harder to read and maintain.
Method 2: Using K_THREAD_DEFINE()
The second approach is to define a thread statically using the K_THREAD_DEFINE() macro.
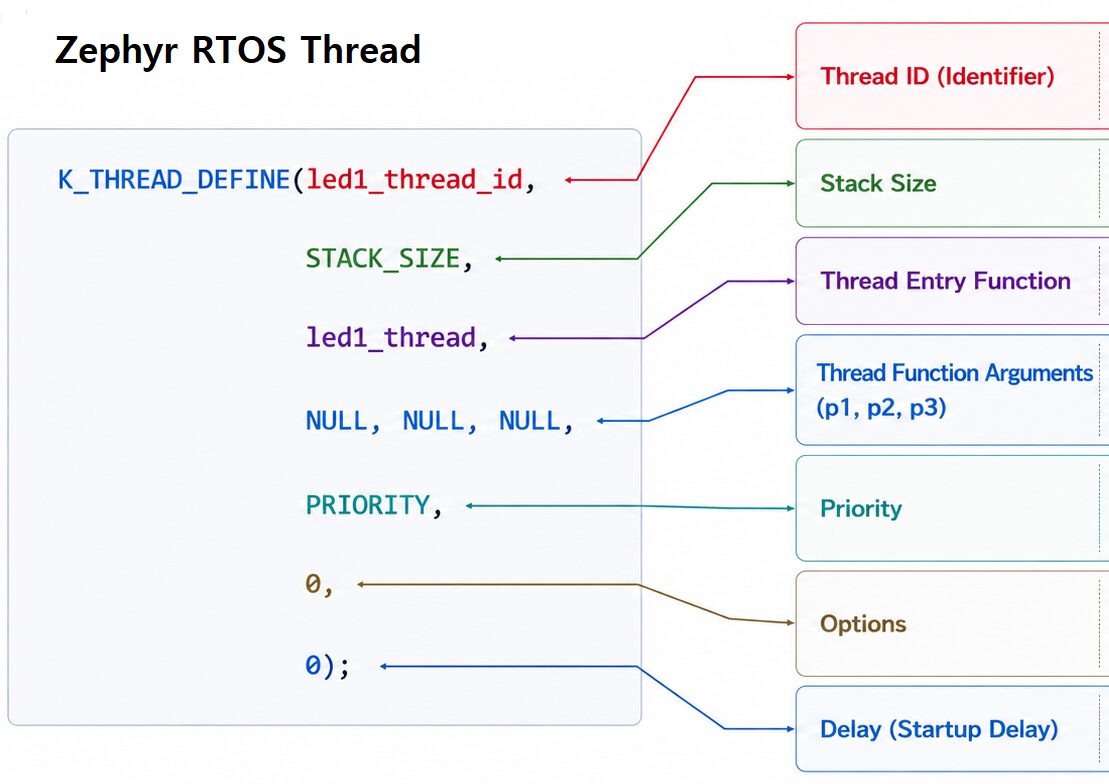
K_THREAD_DEFINE(thread_id,
                stack_size,
                entry_function,
                p1, p2, p3,
                priority,
                options,
delay);During the build process, the Zephyr kernel registers this information, and the thread is created automatically when the system starts.
Therefore, there is no need to call k_thread_create() explicitly from the main() function.
The following sections describe each parameter in detail.
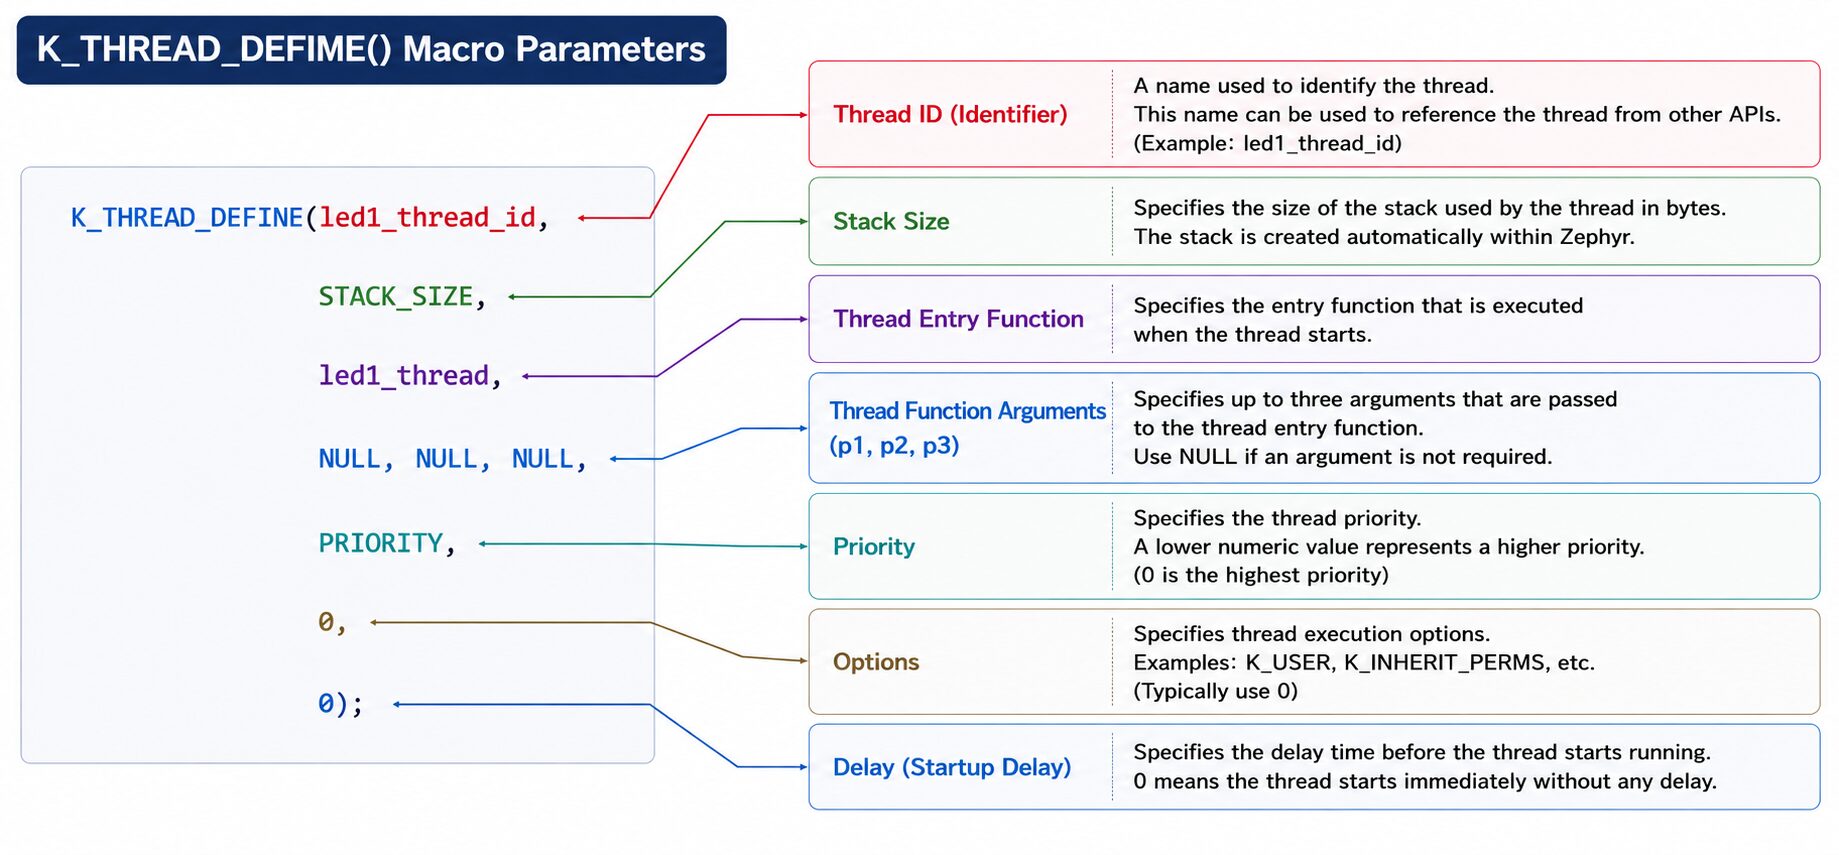
The overall structure is illustrated below.
main.c
└── No thread-specific code

led0_thread.c
├── LED0 control code
└── K_THREAD_DEFINE()

led1_thread.c
├── LED1 control code
└── K_THREAD_DEFINE()
Each thread is defined within its own source file, allowing the code to be organized and maintained by functionality.
Project Structure Used in This Tutorial
In this tutorial, we create two threads statically using the K_THREAD_DEFINE() macro.
The main.c file does not create any threads or start the scheduler.
#include <zephyr/kernel.h>

int main(void)
{
    return 0;
}led0_thread.c, while the thread that controls LED1 is implemented in led1_thread.c.src
├── main.c
├── led0_thread.c
└── led1_thread.cK_THREAD_DEFINE() macro.K_THREAD_DEFINE(led1_thread_id,
STACK_SIZE,
led0_thread,
NULL, NULL, NULL,
PRIORITY,
0,
0);Threads defined in this way are automatically created and started by the Zephyr kernel when the application boots. Therefore, even though the main() function is empty, both the LED0 and LED1 threads run normally.
Comparison of the Two Approaches
| Category | k_thread_create() |
K_THREAD_DEFINE() |
|---|---|---|
| Thread Creation Location | Usually inside main() or another function |
Global scope of a source file |
| Creation Time | When the function is called | During system startup |
| Stack Definition | Must be defined separately | Handled internally by the macro |
| Execution Control | Full control over when the thread is created and started | Automatically created and started at boot |
| Code Organization | Centralized | Well suited for modular design |
| Best Use Case | Threads created or started conditionally | Threads that should always run after system startup |
The k_thread_create() approach is useful when threads need to be created dynamically or when precise control over their startup time is required during program execution.
In contrast, K_THREAD_DEFINE() is ideal for threads that should always be created automatically and start running as soon as the system boots.
Benefits of Organizing Threads by Function
As demonstrated in this tutorial, placing each thread in its own source file allows each file to focus on a single responsibility.
led0_thread.c   → LED0 blinking
led1_thread.c → LED1 blinkingbutton_thread.c → Button input handling
uart_thread.c → UART communication
sensor_thread.c → Sensor measurementWith this organization, the main.c file remains clean even as the project grows. Each thread can be developed, tested, and maintained independently within its own source file.
In this tutorial, we adopted this modular design by keeping main.c empty and defining the LED0 and LED1 threads in their respective source files.
Creating the Project and Writing the Code
Copying and Renaming the Project
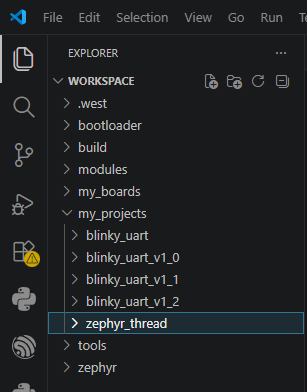
Create a new project named zephyr_thread by copying the blinky_uart_v1_0 project created in the previous tutorial.
In this tutorial, we will add thread functionality to the existing project. Therefore, instead of creating a new project from scratch, it is more efficient to reuse the previous project as the starting point.
This versioning approach allows you to preserve the previous tutorial while adding new features incrementally.
The figure below shows how the project is copied and renamed to zephyr_thread in Visual Studio Code.
After creating the project, add a CHANGELOG.md file to the project folder and record the revision history as shown below.
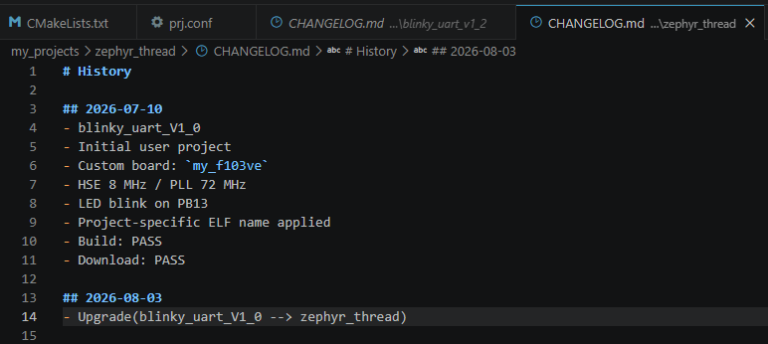
As you modify the project or add new features, continue documenting the changes in the CHANGELOG.md file. Maintaining a change log makes it easier to track the project’s evolution and compare it with previous versions.
Adding a Second LED to the Device Tree
In this tutorial, each of the two threads controls a separate LED. Therefore, the first step is to add a second LED to the Device Tree.
Add a led1 node below the leds node. In this example, PB14 is used for the second LED, and its label is set to "D3_LED".
The figure below shows where the led1 node should be added in the my_f103ve.dts file.
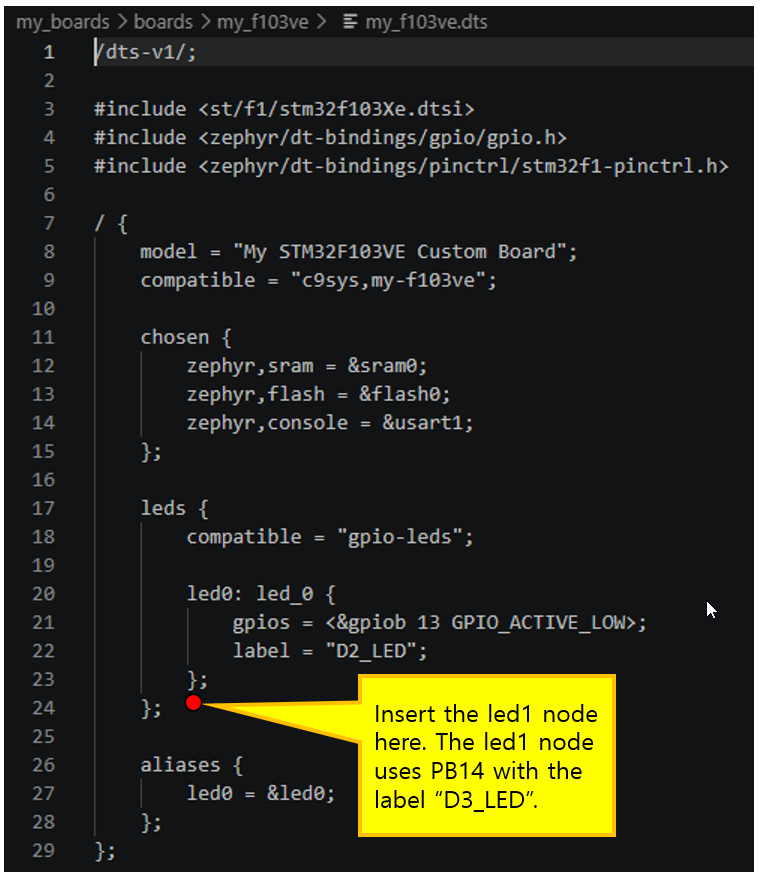
Add the led1 node as shown below.
led1: led_1 {
    gpios = <&gpiob 14 GPIO_ACTIVE_LOW>;
    label = "D3_LED";
};
Also, register led1 in the aliases node so that it can be accessed using the standard LED alias from a Zephyr application.
aliases {
    led0 = &led0;
    led1 = &led1;
};
The updated Device Tree source (.dts) file with the led1 node added is shown below.
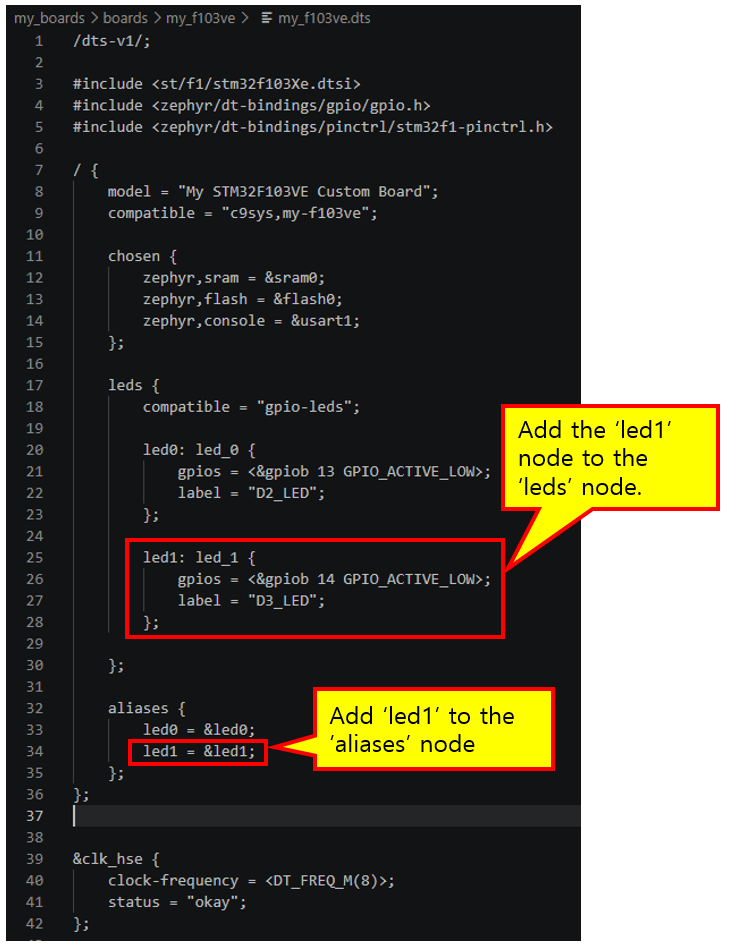
The Device Tree now defines two LEDs. The LED0 and LED1 threads can independently control their respective LEDs using the led0 and led1 aliases.
Implementing the LED Threads
Now let’s implement the threads that control each LED.
In this tutorial, the thread names follow the same naming convention as the Device Tree aliases. For example, the led0_thread thread controls led0. This naming convention makes it easy to identify the relationship between a thread and the LED it controls, improving both code readability and maintainability.
We will first implement the LED0 thread, and then create the LED1 thread using the same approach.
Create the following four files in the zephyr_thread/src folder, as shown below.
led0_thread.cled0_thread.hled1_thread.cled1_thread.h
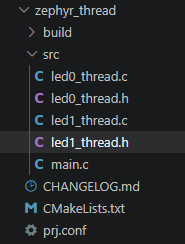
Each thread consists of a source file (.c) and a header file (.h). The source file contains the thread implementation, while the header file declares the functions and variables that are shared with other source files.
To keep the project structure consistent, each thread has its own corresponding header file.
The following sections focus on led0_thread.c and led0_thread.h. The implementation of led1_thread is identical except that led0 is replaced with led1, so the duplicated explanation is omitted.
The code in led0_thread.h is explained below.
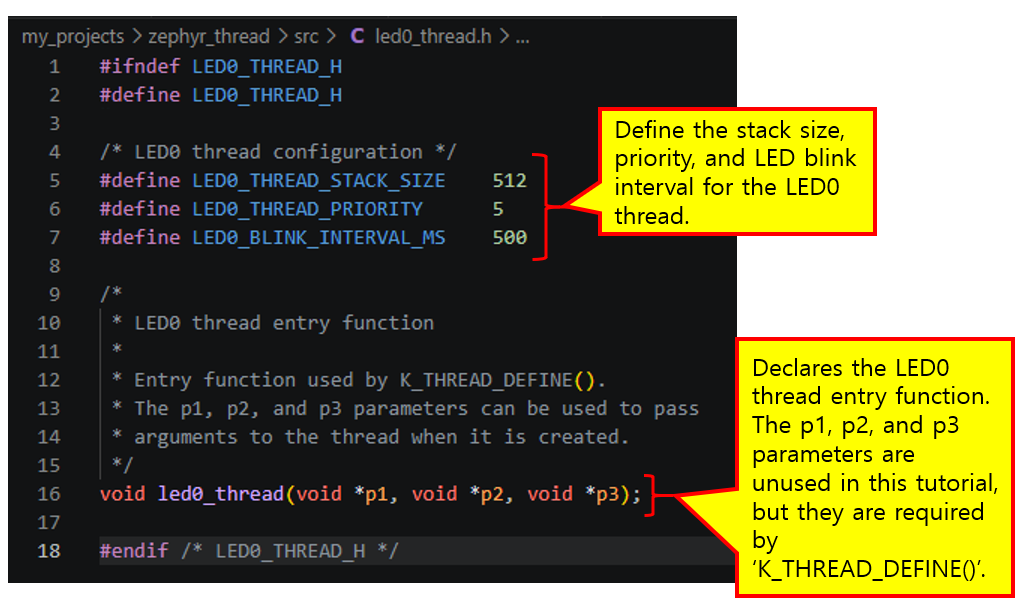
The code in led0_thread.c is explained below.
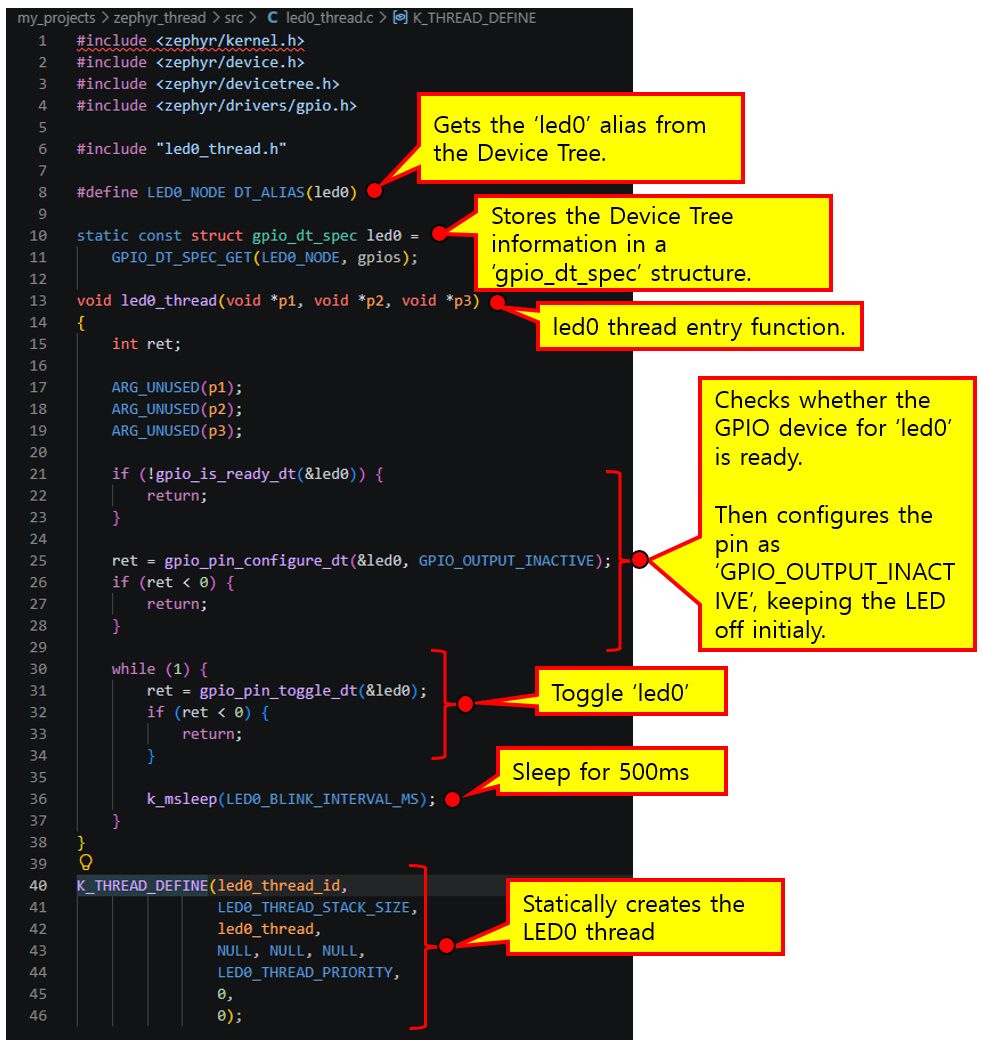
The final part of the code uses the K_THREAD_DEFINE() macro.
K_THREAD_DEFINE() is a macro that registers thread information, such as the stack size, entry function, and priority, with the Zephyr kernel.
When the system boots, the Zephyr kernel uses this information to automatically create and start the led0_thread. Therefore, there is no need to create the thread explicitly or call k_thread_create() from the main() function.
The main.c file used with K_THREAD_DEFINE() method is shown below.
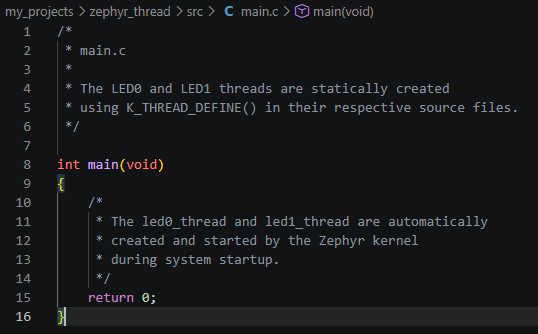
In the above code, the main() function performs no additional tasks. It simply executes return 0; and exits.
However, the led0_thread and led1_thread have already been registered with the Zephyr kernel using K_THREAD_DEFINE(). As a result, they continue running under the control of the scheduler even after the main thread has exited.
In this tutorial, the main() function is not responsible for creating threads. Instead, the led0_thread and led1_thread perform the actual LED control.
The thread execution flow is illustrated below.
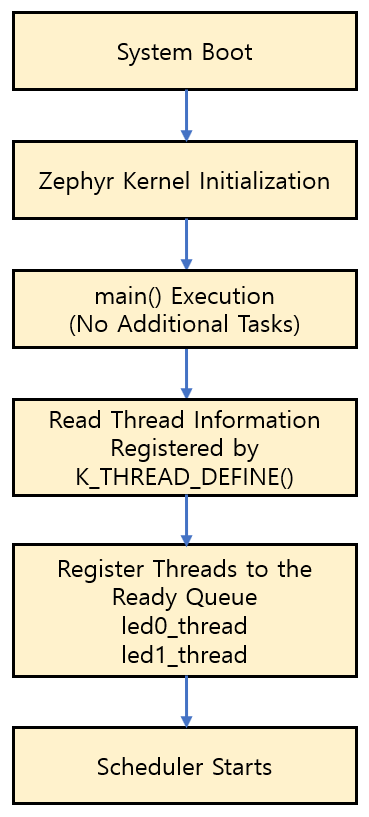
K_THREAD_DEFINE()does not start a thread immediately. Instead, it registers the thread so that the Zephyr kernel can automatically create and start it during system startup.Note
Zephyr supports both approaches: creating threads dynamically in the
main()function usingk_thread_create(), and defining them statically usingK_THREAD_DEFINE().In this tutorial, we use the
K_THREAD_DEFINE()approach because it provides a simpler project structure and makes it easier to organize the code into separate modules.
Modifying CMakeLists.txt
Update the CMakeLists.txt file so that the newly created led0_thread.c and led1_thread.c source files are included in the build.
If your existing CMakeLists.txt already contains main.c, add the two thread source files as shown below.
target_sources(app PRIVATE
    src/main.c
    src/led0_thread.c
    src/led1_thread.c
)target_sources() command specifies which source files are included in the Zephyr application build.target_sources(app PRIVATEapp represents the main build target of the Zephyr application. The PRIVATE keyword indicates that the listed source files are used only when building the current application.src/main.c
src/led0_thread.c
src/led1_thread.cled0_thread.h and led1_thread.h are included by the source files using #include, so they do not need to be listed separately in target_sources().As a result, only the following three source files are compiled in this project.
main.c
led0_thread.c
led1_thread.c
Each source file is compiled independently and then linked together into a single Zephyr application. During this process, the K_THREAD_DEFINE() macros defined in led0_thread.c and led1_thread.c are included in the final executable.
As a result, when the system boots, both threads are automatically created and started by the Zephyr kernel.
The updated CMakeLists.txt file is shown below.
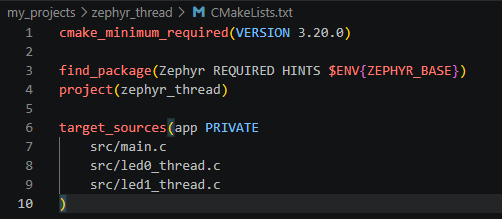
With these changes, main.c, led0_thread.c, and led1_thread.c are all included in the build, and the project is now ready to run the two LED threads.
Updating prj.conf and CHANGELOG.md
Update the prj.conf file as follows.
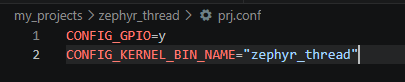
The CONFIG_KERNEL_BIN_NAME option specifies the name of the executable generated during the build. By setting it to zephyr_thread, the following output files will be generated.
zephyr_thread.elf
zephyr_thread.hex
zephyr_thread.bin
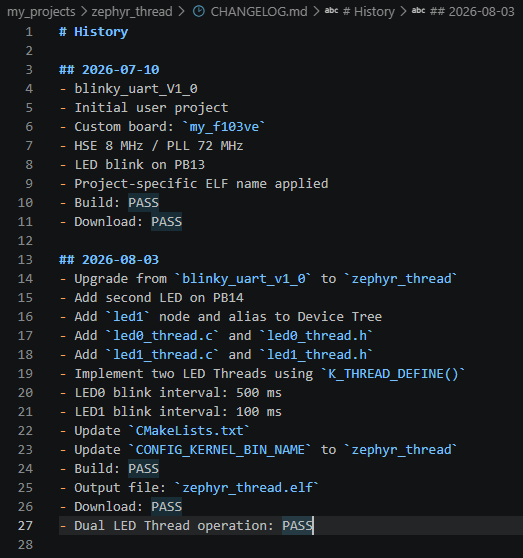
The CHANGELOG.md file is used to record the project’s revision history. Although it does not directly affect the build, it is good practice to keep it up to date whenever new features are added or existing code is modified.
Record the changes made in this tutorial as shown below.
Build and Download
The project configuration and thread implementation are now complete. The next step is to build the project and generate the executable.
To simplify the build command, open the Terminal in Visual Studio Code and change to the project directory zephyr_thread.

The build command is shown below.

| Option | Description |
|---|---|
-b my_f103ve |
Specifies the target board. |
-p always |
Deletes the previous build output and performs a clean build. |
-DBOARD_ROOT=".././my_boards" |
Specifies the location of the custom board. |
If the build completes successfully, you should see output similar to the following.

After the build is complete, the zephyr_thread.elf file is generated. This is the executable that will be downloaded to the target board.
The next step is to download the executable to the target board. As mentioned in Tutorial #1, west flash does not work correctly in our development environment. Therefore, we will use STM32CubeProgrammer to download zephyr_thread.elf instead.
The following figure shows the completed download.
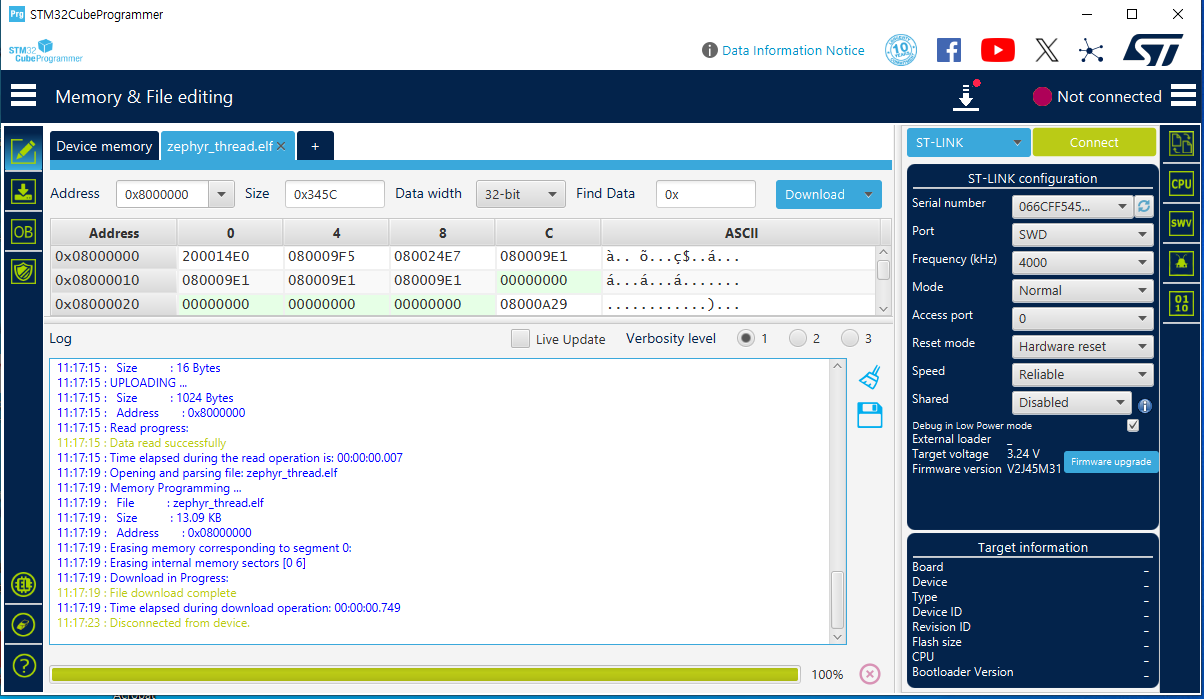
After the download is complete, click Disconnect in STM32CubeProgrammer, then press the Reset button on the target board. When the board boots, Zephyr starts automatically, and the led0_thread and led1_thread begin executing. The two LEDs should blink independently at different intervals.
Experimental Results
After building, downloading, and running the application, you should observe LED0 (PB13) and LED1 (PB14) blinking at their configured intervals.
In this tutorial, the LED0 thread was configured with a 500 ms blink interval, while the LED1 thread used a 100 ms interval. As expected, LED1 blinked faster than LED0, confirming that the two LEDs were controlled independently.
Although no threads were created explicitly in the main() function, both LEDs operated correctly. This is because the threads defined with K_THREAD_DEFINE() were automatically created during system startup by the Zephyr kernel and executed by the scheduler.
This experiment demonstrates how K_THREAD_DEFINE() provides a simple way to define static threads and confirms the basic thread execution model of Zephyr RTOS.
Conclusion
In this tutorial, we learned the most fundamental method of creating and running threads in Zephyr RTOS. By using K_THREAD_DEFINE(), we confirmed that the Zephyr kernel automatically creates and starts threads during system startup without requiring an explicit call to k_thread_create() from the main() function.
We also organized each thread into its own source file, making the project easier to modularize, maintain, and extend as it grows. This file organization is widely used in real-world embedded software projects.
The two LED threads implemented in this tutorial ran independently at different intervals, demonstrating how the Zephyr scheduler manages multiple threads concurrently.