Introduction
STM32C031 FreeRTOS Manual Port is the main topic of this tutorial series. FreeRTOS is one of the most widely used real-time operating systems (RTOS) in the embedded industry. It is designed to run even on microcontrollers with limited memory resources and supports a wide range of devices, including ARM Cortex-M based MCUs. FreeRTOS provides essential multitasking features such as Tasks, Queues, Semaphores, and Mutexes, making it easier to develop structured and scalable embedded software.
Today, tools such as STM32CubeMX allow developers to add FreeRTOS to a project with only a few mouse clicks. However, in real-world development, it is important to understand the internal structure and operating principles of an RTOS. Simply using automatically generated code does not provide a clear understanding of how FreeRTOS works internally, which files are required, or how the kernel is actually ported to a microcontroller.
Rather than focusing on simple usage examples that are already widely available on the Internet, this series aims to learn FreeRTOS by manually integrating FreeRTOS-Kernel V11.3.0 from the official FreeRTOS GitHub repository into a project and running it step by step on the STM32C0316-DK development board. Instead of relying on the STM32CubeMX middleware package, we will install and configure FreeRTOS manually to gain a deeper understanding of the complete porting process.
The target MCU used in this experiment is the STM32C031C6, which features 32 KB of Flash memory and 12 KB of RAM. One of the objectives of this series is to determine whether FreeRTOS can be effectively utilized on a small microcontroller with limited memory resources. Since I already have an STM32C0316-DK development board available, all experiments will be performed on actual hardware rather than in a simulated environment.
Test Environment
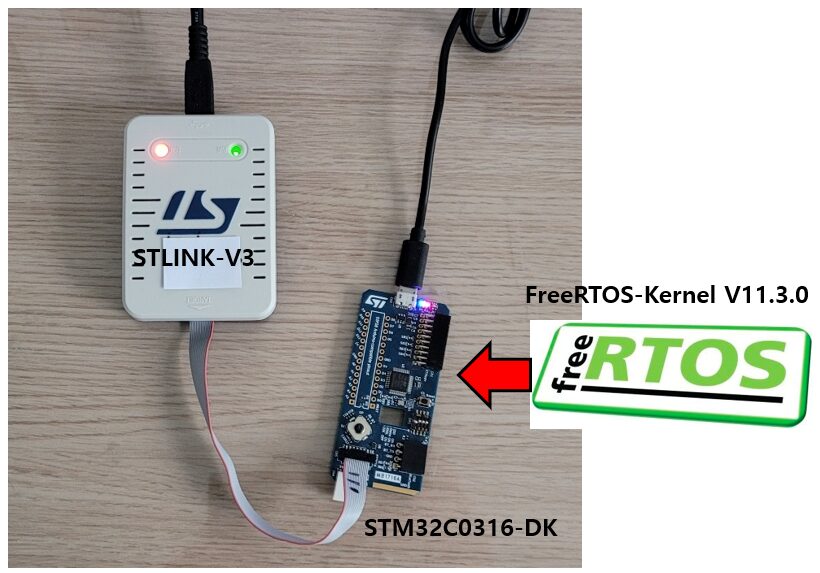
In this experiment, FreeRTOS-Kernel V11.3.0 will be manually installed on the STM32C0316-DK development board, and its operation will be verified through practical testing. During the initial stage of the experiment, no external sensors or communication modules will be connected. Instead, the onboard LED provided with the development board will be used to confirm that FreeRTOS is running correctly.
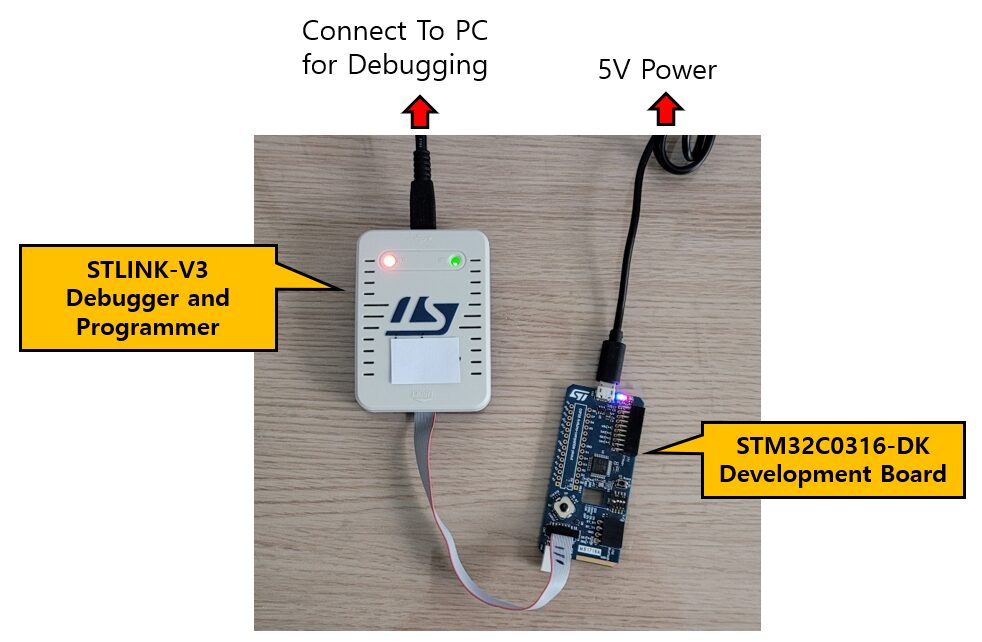
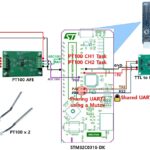
To focus on the FreeRTOS porting process itself, the hardware configuration will be kept as simple as possible. Therefore, as shown in the figure below, the experiment is performed using only the STM32C0316-DK development board and an STLINK-V3 debugger.
The STM32C031C6 is a relatively small microcontroller featuring 32 KB of Flash memory and 12 KB of RAM. In recent years, many MCUs have been released with hundreds of kilobytes—or even several megabytes—of Flash and RAM. Nevertheless, small microcontrollers such as the STM32C031C6 are still widely used in cost-sensitive embedded applications. For this reason, it is worthwhile to investigate whether FreeRTOS can operate efficiently within such limited memory constraints.
All experiments presented in this series were performed using the following environment:
- Development IDE: STM32CubeIDE Version 1.15.1
- RTOS: FreeRTOS-Kernel V11.3.0
- MCU: STM32C031C6
- Development Board: STM32C0316-DK
- Debugger & Programmer: STLINK-V3
It should be noted that this series does not use the FreeRTOS middleware package provided by STM32CubeMX. Instead, the kernel source code is obtained directly from the official FreeRTOS GitHub repository and manually integrated into the project. This approach provides a better understanding of how FreeRTOS is structured internally, which source files are required, and how the kernel is actually ported to an STM32 microcontroller.
FreeRTOS Porting
Porting Overvew
To port FreeRTOS-Kernel V11.3.0 to the STM32C0316-DK development board, the following steps will be performed:
- Create a basic STM32CubeIDE project (without FreeRTOS)
- Download FreeRTOS-Kernel V11.3.0
- Add FreeRTOS source files to the project
- Configure Include Paths and Source Locations
- Create and configure
FreeRTOSConfig.h - Build the project and resolve compilation errors
- Create an LED Blink Task and start the scheduler
The objective of this initial experiment is to verify that FreeRTOS has been successfully ported to the STM32C0316-DK and that tasks can run correctly under the control of the scheduler.
To keep the first experiment simple, we will begin by implementing a basic LED Blink Task. Once the scheduler is confirmed to be operating correctly, we will gradually explore more advanced FreeRTOS features, including Queues, Semaphores, Mutexes, and Software Timers in subsequent experiments.
By following this step-by-step approach, we can focus on understanding the fundamentals of FreeRTOS before moving on to more complex multitasking applications. This also provides a solid foundation for future projects that require task synchronization, inter-task communication, and real-time event handling.
Creating a Basic STM32CubeIDE Project (Without FreeRTOS)
The first step is to create a new STM32CubeIDE project and verify that the MCU operates correctly before adding FreeRTOS. Prior to integrating the RTOS, we will download and run a simple LED blinking program to ensure that the basic project can be built and executed successfully.
At this stage, FreeRTOS is not used. The application is implemented as a conventional super-loop program.
In STM32CubeIDE, select File → New → STM32 Project. The MCU/Board selection window will appear. Search for and select STM32C0316-DK, then click Finish to create the project.
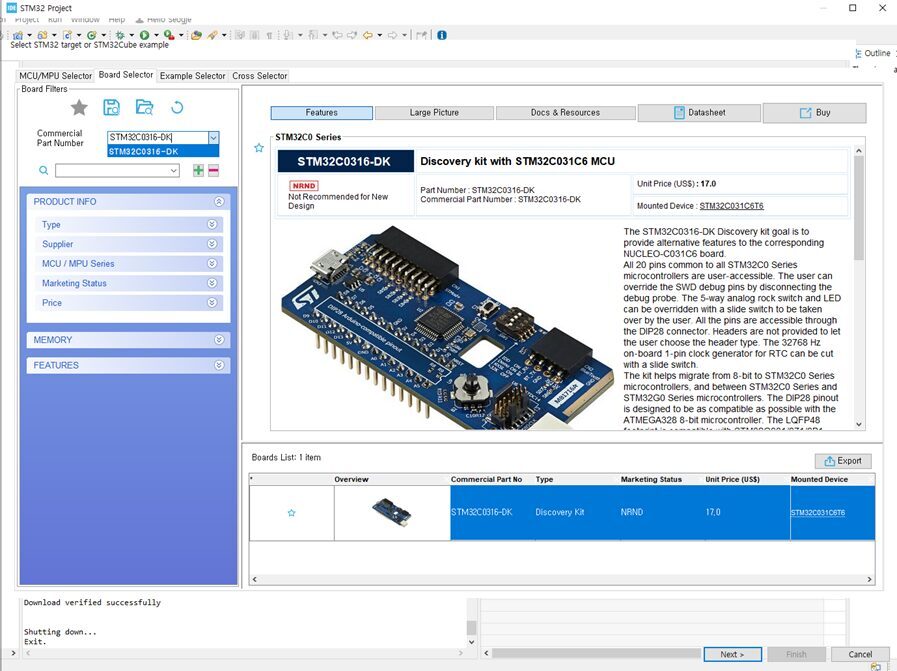
At the time of writing, STM32CubeIDE marks the STM32C0316-DK as NRND (Not Recommended for New Design). This designation indicates that the board is not recommended for new product designs and may eventually approach end-of-life (EOL) status. However, since the purpose of this experiment is to learn FreeRTOS porting and verify its operation, the board remains perfectly suitable for educational use and small development projects. In addition, the STM32C031C6 MCU still provides sufficient performance for many embedded applications.
It is also worth noting that the FreeRTOS porting process described in this article is not specific to the STM32C0316-DK. Most of the procedures are equally applicable to other STM32 microcontrollers based on the ARM Cortex-M architecture.
After selecting the device, specify a project name. In this example, the project is named C9SW-FreeRTOS-Manual-v1.0.
Because the STM32C0316-DK is a board officially supported by STM32CubeIDE, a dialog box will appear asking whether the default board peripheral configuration should be initialized automatically. For this tutorial, select Yes to use the default board configuration.
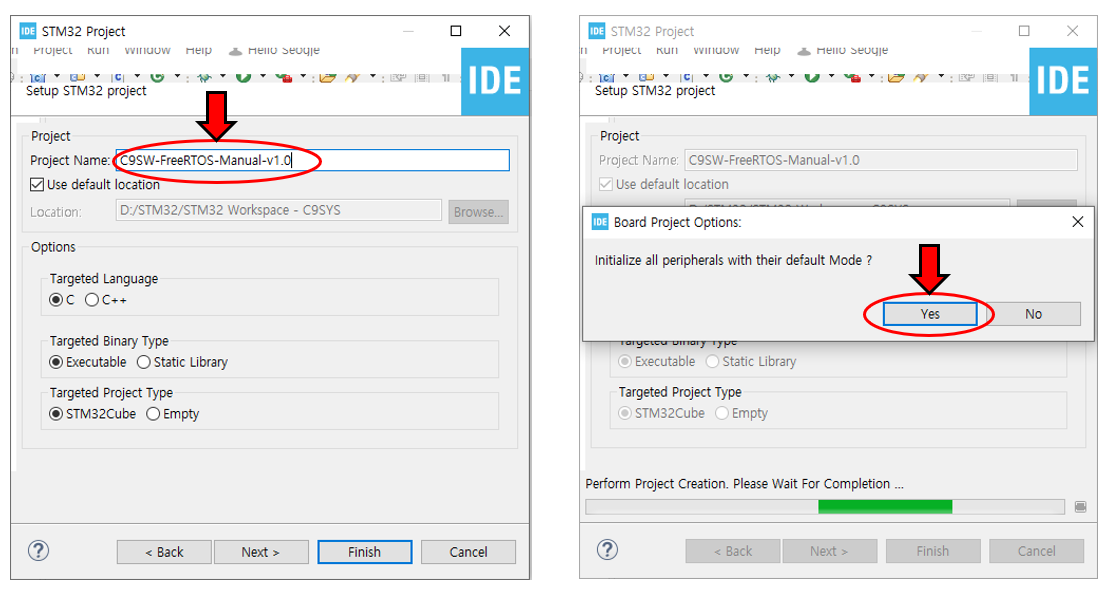
STM32CubeIDE will then create the new project and automatically open the project workspace when the process is complete.
Before proceeding with the FreeRTOS port, we will first verify that the basic project operates correctly by blinking the onboard LED. This step confirms that the clock configuration, GPIO configuration, programming environment, and debugging environment are all functioning properly.
Verifying the hardware and development environment before introducing FreeRTOS is an important practice. If the LED does not blink correctly at this stage, troubleshooting becomes much more difficult after the RTOS has been added.
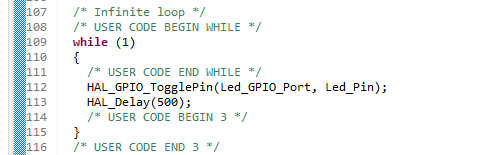
Add the following LED toggle code inside the while() loop in main.c. The example uses HAL_Delay() and toggles the LED every 500 ms.
Build the project and download it to the STM32C0316-DK board. The onboard LED should blink at 500 ms intervals.
This result confirms that the basic project has been configured correctly and that the GPIO settings, system clock, programming environment, and debugging environment are all operating as expected.
In the next section, we will add the FreeRTOS-Kernel V11.3.0 source code to the project and begin the actual FreeRTOS porting process.
Downloading FreeRTOS-Kernel V11.3.0
The official FreeRTOS website provides the FreeRTOS 202604.00 LTS (Long Term Support) package, which is intended for long-term maintenance and stability. LTS releases are generally recommended for commercial and industrial products where long-term support is an important requirement.
For this experiment, however, we will use only the FreeRTOS-Kernel rather than the complete FreeRTOS distribution. The FreeRTOS-Kernel contains the core RTOS functionality, including Tasks, Queues, Semaphores, Mutexes, and Software Timers. Since the objective of this series is to manually port the RTOS kernel to the STM32C0316-DK, the kernel package alone is sufficient for our needs.
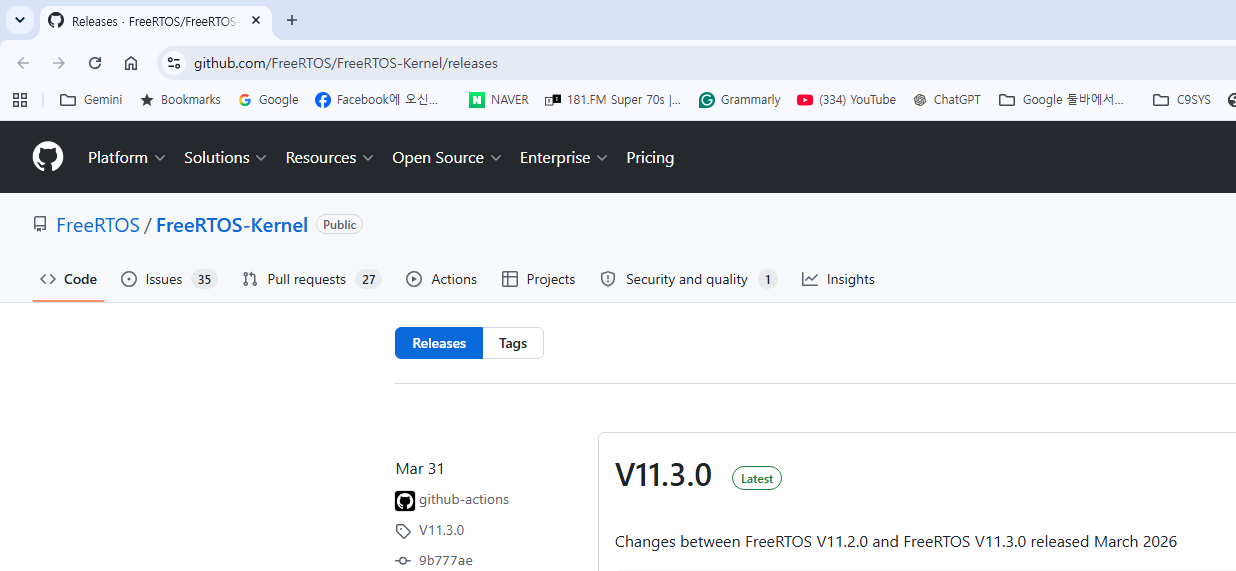
Therefore, we will download FreeRTOS-Kernel V11.3.0, which is the version used throughout this tutorial series, from the official GitHub release page.
When the release page is opened, a screen similar to the one shown below will appear.
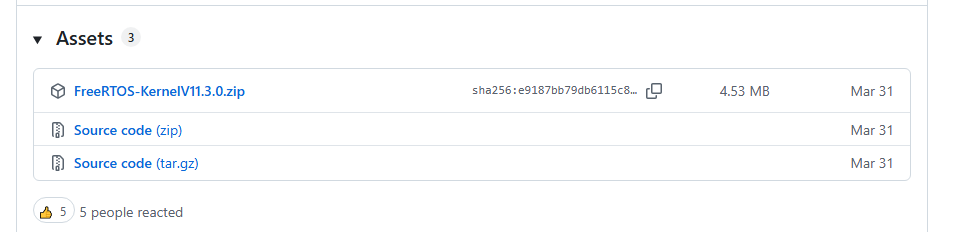
Under the Assets section near the bottom of the release page, download the file named FreeRTOS-KernelV11.3.0.zip.
After downloading the archive, extract it to a convenient working directory on your computer. In the next section, we will examine the directory structure of the FreeRTOS-Kernel package and add the required source files to the STM32CubeIDE project.
At this stage, there is no need to copy every file from the package into the project. One of the goals of this tutorial is to understand which files are actually required for a Cortex-M0+ based STM32 device and why those files are needed. This will help build a clearer understanding of the FreeRTOS architecture and its porting mechanism.
Adding FreeRTOS Source Files to the Project
Now it is time to add the downloaded FreeRTOS-Kernel V11.3.0 source files to the project.
It is generally a good idea to keep FreeRTOS-related files separate from the rest of the application source code. Therefore, we will first create a dedicated FreeRTOS folder and then copy the required kernel files into that folder.
In the Project Explorer window of STM32CubeIDE, select the project (C9SW-FreeRTOS-Manual-v1.0), right-click it, and choose New → Folder.
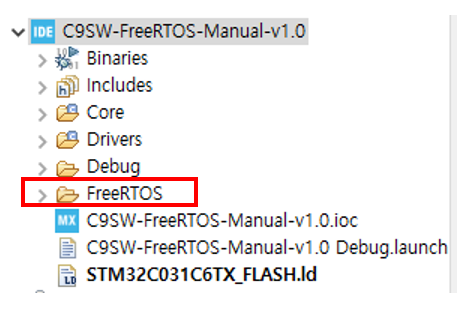
Create a new folder named FreeRTOS. All FreeRTOS kernel source files and header files will be placed under this directory.
In the next step, extract the downloaded FreeRTOS-Kernel V11.3.0 archive and examine its contents.
After extracting the archive, you will find a directory structure similar to the one shown below.
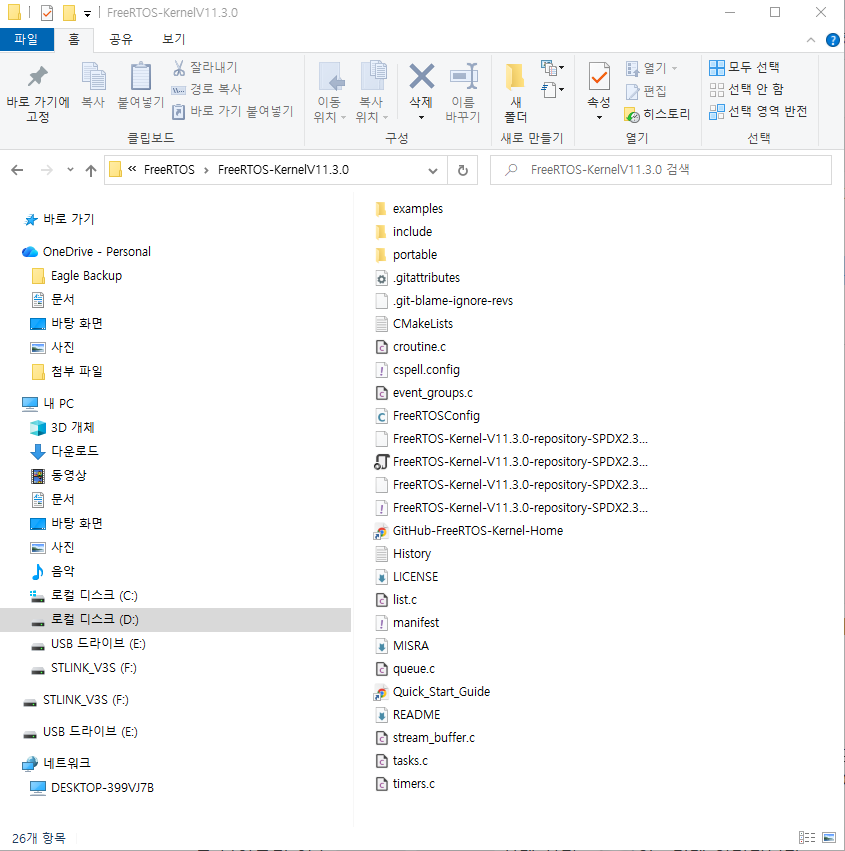
Note: Screenshots were captured on a Korean-language Windows system.
The FreeRTOS-Kernel package contains support files for many different MCU architectures and compiler toolchains. However, only a small subset of these files is required to run FreeRTOS on the STM32C0316-DK.
Copy the following files and folders into the newly created FreeRTOS directory:
include/ (folder)
portable/ (folder)
tasks.c
queue.c
list.c
timers.c
stream_buffer.c
event_groups.c
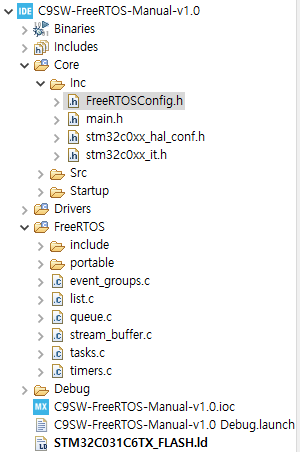
After copying these files, the project structure should resemble the following layout:
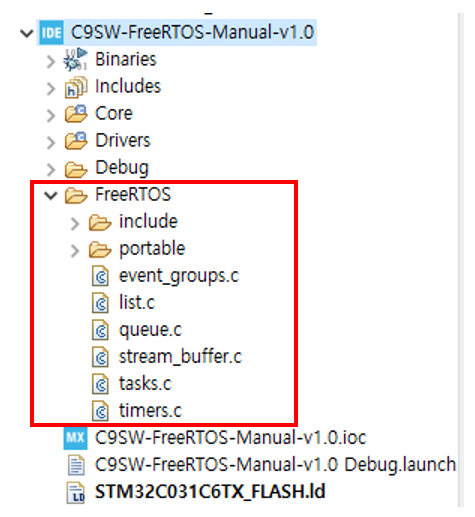
If the files are copied using Windows Explorer, they may not appear immediately in the STM32CubeIDE Project Explorer.
In that case, select the FreeRTOS folder, right-click it, and choose Refresh (F5). The newly copied files should then become visible.
When manually adding FreeRTOS for the first time, many developers mistakenly assume that the copy operation failed because the files do not appear immediately. In most cases, a simple refresh resolves the issue.
The files tasks.c, queue.c, and list.c implement the core functionality of FreeRTOS:
- tasks.c – Task creation, scheduling, and task management
- queue.c – Queues, Semaphores, and Mutexes
- list.c – Internal linked-list management used by the kernel
The remaining files provide additional functionality:
- timers.c – Software Timers
- stream_buffer.c – Stream Buffers and Message Buffers
- event_groups.c – Event Groups
Although the current LED Blink example does not require all of these modules, future experiments in this series will cover Queues, Semaphores, Mutexes, and Software Timers. Therefore, we will include them from the beginning.
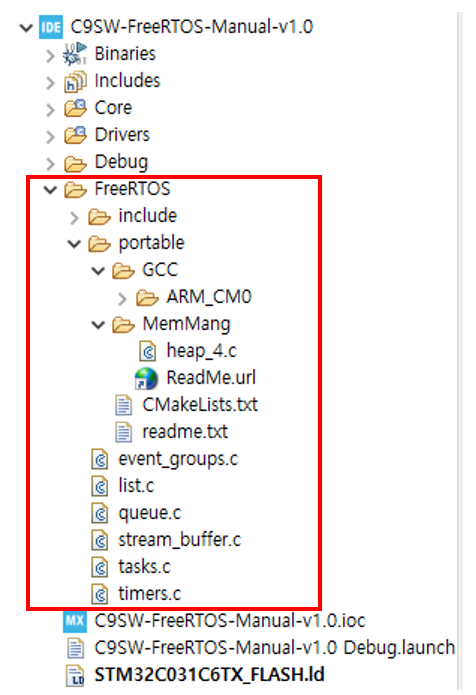
At this point, all required kernel source files have been copied. However, the portable directory still contains support files for many different MCU architectures and compiler toolchains.
Since the STM32C0316-DK uses an ARM Cortex-M0+ core and is compiled with GCC, we only need the files associated with that environment.
Keep the following files and folders:
portable -> GCC -> ARM_CM0
portable -> MemMang -> heap_4.c
The ARM_CM0 port layer provides support for Cortex-M0 and Cortex-M0+ devices. In FreeRTOS-Kernel V11.3.0, Cortex-M0 and Cortex-M0+ devices share the same port implementation.
For memory management, this tutorial uses heap_4.c. This is one of the most commonly used FreeRTOS memory allocation schemes because it supports both dynamic allocation and memory deallocation while maintaining relatively low fragmentation.
All other port layers can be removed because they are not required for the STM32C0316-DK environment. Removing unnecessary files keeps the project structure clean and makes the FreeRTOS porting process easier to understand.
After the cleanup process, the FreeRTOS directory should look similar to the following:
At this stage, the FreeRTOS source files have been added to the project, but STM32CubeIDE still does not know where the FreeRTOS header files and port files are located. As a result, the project will not compile successfully yet.
In the next section, we will configure the Include Paths and Source Locations so that STM32CubeIDE can locate and build the FreeRTOS kernel correctly.
Configuring Include Paths and Source Locations
In the previous section, the FreeRTOS source files were added to the project. However, STM32CubeIDE still does not know where the FreeRTOS header files and source files are located. As a result, the project cannot be compiled successfully at this stage.
For example, files such as tasks.c, queue.c, and timers.c include header files like FreeRTOS.h, task.h, and queue.h. If the compiler cannot locate these header files, compilation errors will occur.
To resolve this issue, we must register the FreeRTOS header file directories in the Include Paths settings and ensure that the FreeRTOS source files are included in the build through the Source Locations configuration.
Include Path Configuration
To configure the Include Paths, select the C9SW-FreeRTOS-Manual-v1.0 project in the Project Explorer, right-click it, and choose Properties.
Navigate to the following menu:
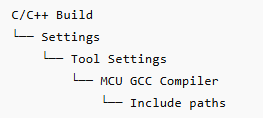
A configuration window similar to the one shown below will appear.
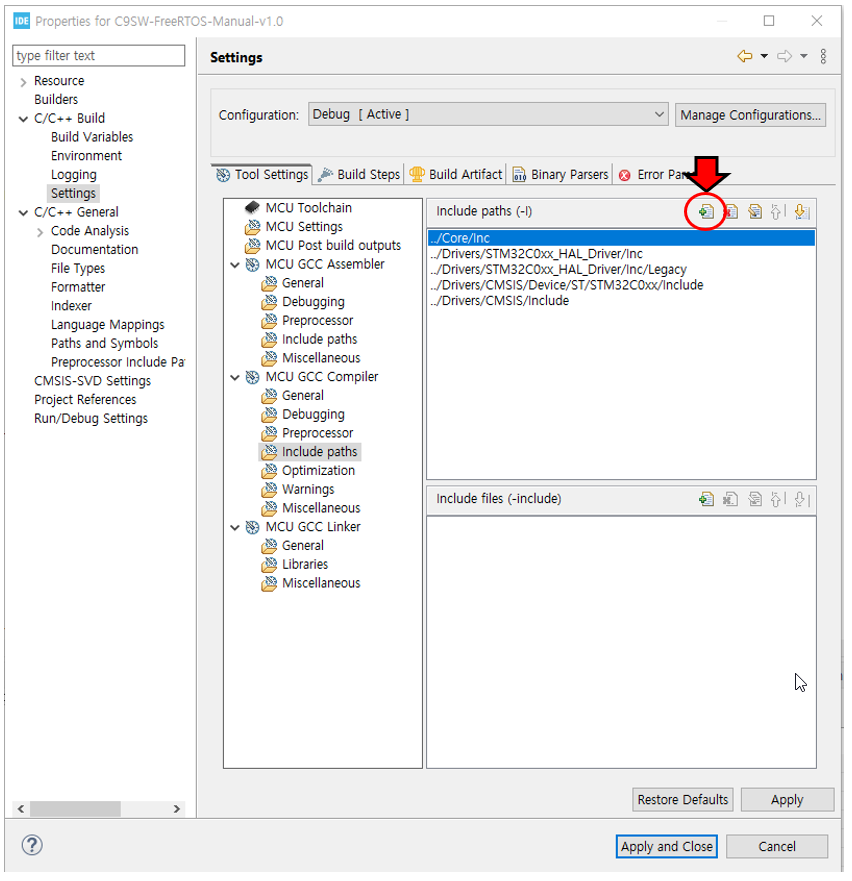
Click the Add (+) button on the right side of the window and add the following two directories:
FreeRTOS/Include
FreeRTOS/portable/GCC/ARM_CM0
The first path contains the common FreeRTOS kernel header files, while the second contains the Cortex-M0/M0+ port-specific header files.
For reference, the Core/Inc directory is automatically added when STM32CubeIDE creates the project, so there is no need to add it manually. The FreeRTOSConfig.h file that will be created later is also stored in this directory.
After adding the paths, the configuration should look similar to the following:
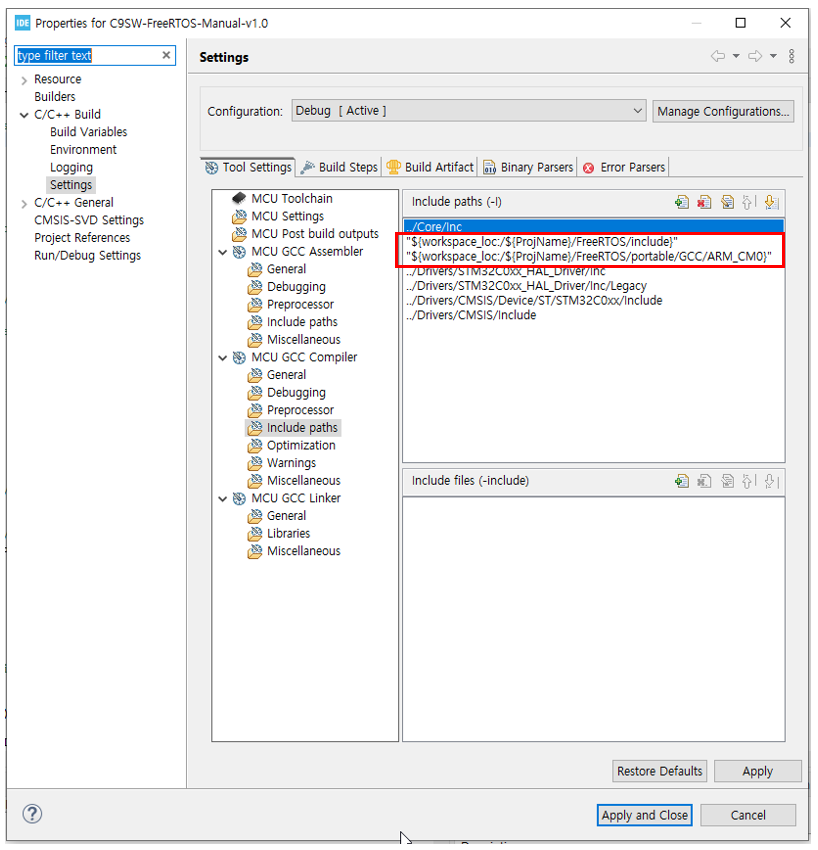
Click Apply and Close to save the changes.
Source Location Configuration
After configuring the Include Paths, the next step is to ensure that the FreeRTOS source files are actually included in the build process.
Once again, right-click the project and select Properties.
This time, navigate to:
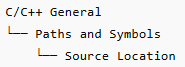
Add the FreeRTOS folder to the build path.
After the folder has been added, the Source Location list should contain entries similar to the following:

By adding the FreeRTOS directory, STM32CubeIDE will compile the kernel source files, the Cortex-M0 port layer, and the selected memory management module (heap_4.c) as part of the project build.
At this point, the following tasks have been completed:
- Downloaded FreeRTOS-Kernel V11.3.0
- Copied the required FreeRTOS source files
- Selected the ARM_CM0 port layer
- Selected the
heap_4.cmemory management scheme - Configured Include Paths
- Configured Source Locations
STM32CubeIDE now knows where all required FreeRTOS header files and source files are located.
In the next section, we will create and configure FreeRTOSConfig.h, which is the central configuration file of FreeRTOS, and customize it for the STM32C031C6 environment.
Creating FreeRTOSConfig.h
A FreeRTOSConfig.h file is required in every FreeRTOS project.
Because FreeRTOS is designed to support a wide variety of microcontrollers and application requirements, important kernel parameters such as the scheduling policy, tick frequency, heap size, and maximum task priority must be configured by the user.
All of these configuration options are stored in the FreeRTOSConfig.h file, and the FreeRTOS kernel references this file during compilation.
For this reason, creating and configuring FreeRTOSConfig.h is one of the most important steps in the manual porting process.
In the Project Explorer, navigate to:
![]()
Right-click the Inc folder and select:
![]()
Create a new header file named:
![]()
After the file is created, it should appear under the Core/Inc directory as shown below.
FreeRTOS.org provides sample configuration files for many platforms, which can be used as a starting point and customized for a specific MCU and application. Detailed information about each configuration option can be found in the official FreeRTOS documentation.
FreeRTOSConfig.h Customization
For this experiment, the following configuration was created specifically for the STM32C031C6 and the planned FreeRTOS exercises.
The complete configuration file is shown below.
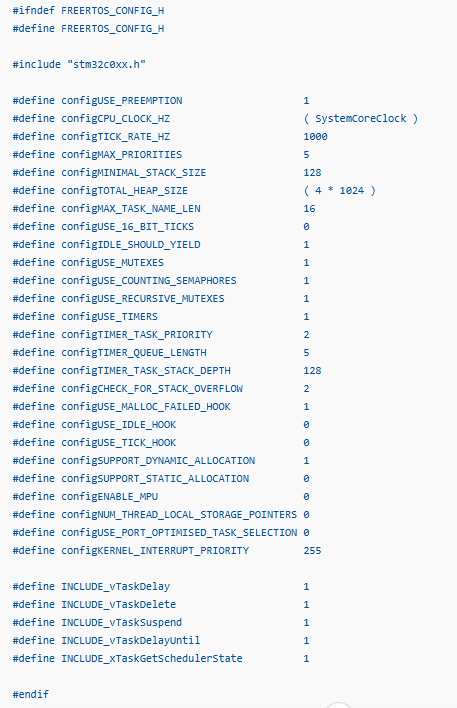
The FreeRTOS kernel supports dozens of configuration options. Since this series will eventually cover LED blinking, Queues, Semaphores, Mutexes, and Software Timers, the required features have been enabled from the beginning.
Important Configuration Parameters
Tick Frequency
![]()
This setting generates a FreeRTOS tick interrupt every 1 ms. A tick rate of 1000 Hz is commonly used in embedded applications and provides a good balance between timing resolution and CPU overhead.
Maximum Number of Priorities
![]()
This allows task priorities from 0 to 4.
For the experiments in this series, five priority levels are more than sufficient and help keep task management simple.
Heap Size
![]()
This reserves 4 KB of RAM for FreeRTOS dynamic memory allocation.
The STM32C031C6 provides only 12 KB of RAM, so memory usage must be considered carefully. However, for the simple experiments in this tutorial series, a 4 KB heap provides adequate space for task stacks, queues, semaphores, and other kernel objects.
Enable Mutex Support
![]()
Mutex support is enabled in preparation for future experiments involving shared resources such as UART peripherals.
Enable Counting Semaphores
![]()
This option enables counting semaphore functionality, which will be used in later synchronization examples.
Enable Software Timers
![]()
Software timer support is enabled for future timer-related experiments.
The current configuration is intended as a minimal but practical setup for learning FreeRTOS on the STM32C031C6. In production systems, parameters such as heap size, tick frequency, task priorities, and enabled kernel features should be carefully adjusted to match the specific requirements of the application.
It is also common practice to disable unused features in order to reduce Flash and RAM consumption, particularly when working with resource-constrained microcontrollers such as the STM32C031C6.
With FreeRTOSConfig.h now in place, the project contains all of the fundamental FreeRTOS configuration settings. In the next section, we will build the project, examine the compilation errors that occur, and make the additional modifications required to successfully compile FreeRTOS on the STM32C0316-DK.
Build and Error Fixes
Now that FreeRTOSConfig.h has been created, we can build the project.
In STM32CubeIDE, select Project → Build Project, or press Ctrl + B to start the build.
However, the first build produced the following errors:

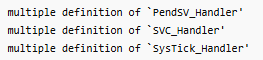
These errors occur because the same interrupt handler functions are defined in two different places.
In the default STM32CubeIDE project, PendSV_Handler, SVC_Handler, and SysTick_Handler are already defined in Core/Src/stm32c0xx_it.c. However, the FreeRTOS port file also defines the same handlers. As a result, the linker reports multiple definition errors.
When using FreeRTOS, these three handlers must be handled by the FreeRTOS port layer.
Therefore, open the following file:
![]()
Then comment out the following handler functions:
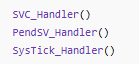
After commenting out these functions and building again, the previous multiple definition errors disappeared. However, another error occurred:
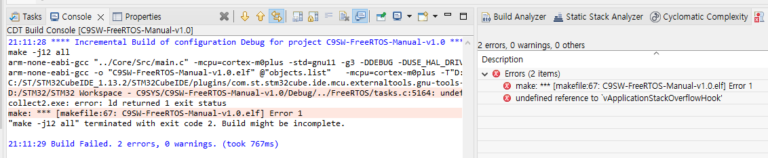
![]()
This error occurs because stack overflow checking was enabled in FreeRTOSConfig.h, but the corresponding hook function was not implemented.
![]()
Changing this value to 0 would remove the error. However, stack overflow detection is very useful during debugging, so we will implement the hook function instead.
In main.c, include task.h and add the following function:
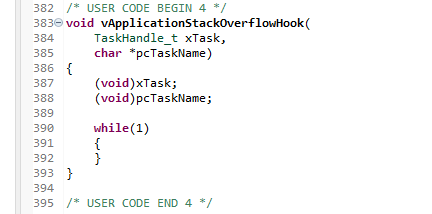
This function is called when a task stack overflow is detected. In this example, the program enters an infinite loop so that the error condition can be caught during debugging. In a real product, this could be replaced with LED indication, UART output, or error logging.
After building again, the errors were resolved, but one warning remained:

![]()
This warning is related to an internal variable in port.c. Since it does not affect the current operation, it can be safely ignored.
After building once more without making further changes, all errors and warnings disappeared, and the project built successfully.

At this point, the FreeRTOS-Kernel V11.3.0 source files, Include Paths, Source Locations, and FreeRTOSConfig.h settings have all been correctly applied.
The FreeRTOS kernel is now ready to be compiled as part of the STM32CubeIDE project. However, no task has been created yet, and the scheduler has not been started.
In the next section, we will create an LED Blink Task and start the FreeRTOS scheduler to verify actual task execution.
Creating an LED Blink Task and Starting the Scheduler
Now that the FreeRTOS kernel builds successfully, we can create an actual task and start the scheduler.
The goal of this step is to convert the existing super-loop based LED blink code into a FreeRTOS task.
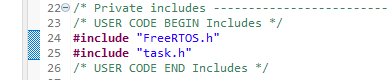
First, add the FreeRTOS header files at the top of main.c.
Next, create a task function that toggles the LED.

Also add the function prototype near the beginning of main.c.
![]()
Then, after the peripheral initialization code in main(), create the task and start the scheduler.
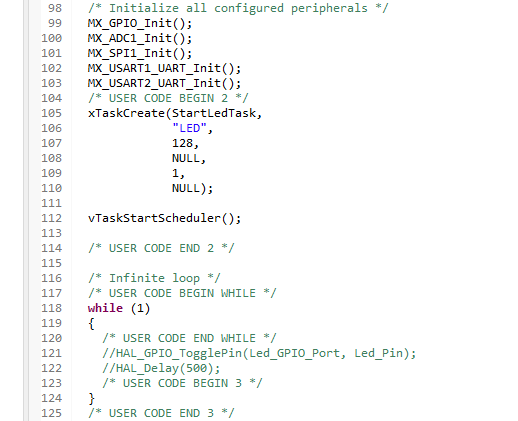
The old LED blink code inside the while(1) loop should be removed or commented out, because the LED is now controlled by the FreeRTOS task.
When the project was built at this point, the following error occurred:

![]()
This error occurs because the following option was enabled in FreeRTOSConfig.h:
![]()
When this option is enabled, FreeRTOS calls vApplicationMallocFailedHook() if pvPortMalloc() fails due to insufficient heap memory. Since this function was not yet implemented, the linker reported an error.
Add the following function to main.c.
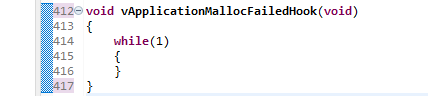
After adding this hook function and building the project again, the build completed successfully without errors.
At this point, the FreeRTOS porting process is complete.
After downloading the program to the STM32C0316-DK board, the onboard LED blinked normally. This confirms that the FreeRTOS scheduler is running correctly and that the created LED task is being executed.
Conclusion
In this article, we walked through the process of manually porting FreeRTOS-Kernel V11.3.0 to the STM32C0316-DK development board. Starting from a basic STM32CubeIDE project, we added the FreeRTOS source files, configured the Include Paths and Source Locations, created the FreeRTOSConfig.h file, resolved compilation and linker errors, and finally executed our first FreeRTOS task.
The experiment confirmed that the FreeRTOS scheduler was operating correctly and that the LED blinking function was no longer executed by a traditional super-loop structure but by a FreeRTOS task managed by the kernel.
During the porting process, several issues were encountered, including duplicate interrupt handler definitions and missing hook-function implementations. Although these problems required additional debugging, they also provided valuable insight into the internal structure of FreeRTOS. Understanding how the kernel interacts with the MCU at this level offers a much deeper understanding than simply relying on automatically generated middleware from STM32CubeMX.
The final project ran successfully on the STM32C031C6, a resource-constrained microcontroller with only 32 KB of Flash memory and 12 KB of RAM. This demonstrates that FreeRTOS-Kernel V11.3.0 can be deployed effectively even on small Cortex-M0+ devices when configured appropriately.
One of the key goals of this tutorial was not simply to get FreeRTOS running, but to understand what is actually required to port the kernel manually. By examining the source files, port layer, memory management scheme, configuration options, and startup sequence, we gained a clearer picture of how FreeRTOS operates internally.
In the next article, we will create a second LED task running at a different period and observe how the FreeRTOS scheduler shares CPU time between multiple tasks. This will provide our first practical look at task scheduling and multitasking behavior on the STM32C0316-DK.
https://c9sys.com/stm32c0316-dk-freertos-task-scheduling-en/


“How to Manually Install FreeRTOS-Kernel V11.3.0 on STM32C0316-DK”에 대한 2개의 생각